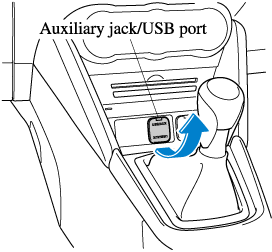
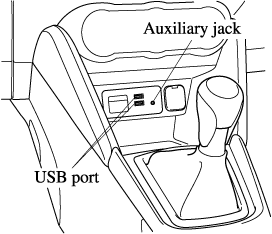
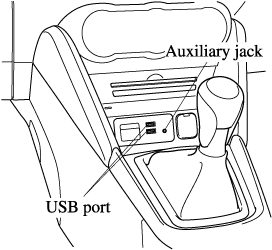
The aerial is embedded into the window glass.
When washing the inside of the window which has an aerial, use a soft cloth dampened in lukewarm water, gently wiping the aerial lines.
Use of glass cleaning products could damage the aerial.
Always adjust the audio while the vehicle is stopped:
Do not adjust the audio control switches while driving the vehicle. Adjusting the audio while driving the vehicle is dangerous as it could distract your attention from the vehicle operation which could lead to a serious accident.
Even if the audio control switches are equipped on the steering wheel, learn to use the switches without looking down at them so that you can keep your maximum attention on the road while driving the vehicle.
For the purposes of safe driving, adjust the audio volume to a level that allows you to hear sounds outside of the vehicle including car horns and particularly emergency vehicle sirens.
To prevent the battery from being discharged, do not leave the audio system on for a long period of time when the engine is not running.
If a cellular phone or CB radio is used in or near the vehicle, it could cause noise to occur from the audio system, however, this does not indicate that the system has been damaged.
Do not spill any liquid on the audio system.
Do not insert any objects, other than CDs, into the slot.
AM characteristics
AM signals bend around such things as buildings or mountains and bounce off the ionosphere.
Therefore, they can reach longer distances than FM signals.
Because of this, two stations may sometimes be picked up on the same frequency at the same time.
FM characteristics
An FM broadcast range is usually about 40―50 km (25―30 miles) from the source. Because of extra coding needed to break the sound into two channels, stereo FM has even less range than monaural (non-stereo) FM.
Signals from an FM transmitter are similar to beams of light because they do not bend around corners, but they do reflect. Unlike AM signals, FM signals cannot travel beyond the horizon. Therefore, FM stations cannot be received at the great distances possible with AM reception.
Atmospheric conditions can also affect FM reception. High humidity will cause poor reception. However, cloudy days may provide better reception than clear days.
Multipath noise
Since FM signals can be reflected by obstructions, it is possible to receive both the direct signal and the reflected signal at the same time. This causes a slight delay in reception and may be heard as a broken sound or a distortion. This problem may also be encountered when in close proximity to the transmitter.
Flutter/Skip noise
Signals from an FM transmitter move in straight lines and become weak in valleys between tall buildings, mountains, and other obstacles. When a vehicle passes through such an area, the reception conditions may change suddenly, resulting in annoying noise.
Weak signal noise
In suburban areas, broadcast signals become weak because of distance from the transmitter. Reception in such fringe areas is characterised by sound breakup.
Strong signal noise
This occurs very close to a transmitter tower. The broadcast signals are extremely strong, so the result is noise and sound breakup at the radio receiver.
Station drift noise
When a vehicle reaches the area of two strong stations broadcasting at similar frequencies, the original station may be temporarily lost and the second station picked up. At this time there will be some noise from this disturbance.
MP3 stands for MPEG Audio Layer 3, which is standardised voice compression established by the ISO*1 working group (MPEG).
Use of MP3 allows for audio data to be compressed to approximately a tenth of the source data size.
This unit plays files with the extension (.mp3) as MP3 files.
International Organisation for Standardisation
Do not use an audio file extension on files other than audio files. In addition, do not change the audio file extension. Otherwise, the unit will not recognise the file correctly resulting in noise or a malfunction.
Supply of this product only conveys a license for private, non-commercial use and does not convey a license nor imply any right to use this product in any commercial (i.e. revenue-generating) real time broadcasting (terrestrial, satellite, lead and/or any other media), broadcasting/streaming via the Internet, intranets and/or other networks or in other electronic content distribution systems, such as pay-audio or audio-on-demand applications. An independent license for such use is required. For details, please visit http://www.mp3licensing.com.
This audio system handles MP3 files that have been recorded on CD-R/CD-RW/CD-ROMs.
When naming an MP3 file, be sure to add an MP3 file extension (.mp3) after the file name.
The number of characters which can be displayed is restricted.
WMA is short for Windows Media Audio and is the audio compression format used by Microsoft.
Audio data can be created and stored at a higher compression ratio than MP3.
This unit plays files with the extension (.wma) as WMA files.
Microsoft and Windows Media are registered trademarks of Microsoft Corporation U.S. in the United States and other countries.
Do not use an audio file extension on files other than audio files. In addition, do not change the audio file extension. Otherwise, the unit will not recognise the file correctly resulting in noise or a malfunction.
WMA files written under specifications other than the indicated specification may not play normally or files or folder names may not display correctly.
The file extension may not be provided depending on the computer operating system, version, software, or settings. In this case, add the file extension “.wma” to the end of the file name, and then write it to the disc.
AAC stands for Advanced Audio Coding, which is standardised voice compression established by the ISO*1 working group (MPEG). Audio data can be created and stored at a higher compression ratio than MP3.
This unit plays files with the extensions (.aac/.m4a/.wav*2) as the AAC files.
International Organisation for Standardisation
Type C/Type D
Do not use an audio file extension on files other than audio files. In addition, do not change the audio file extension. Otherwise, the unit will not recognise the file correctly resulting in noise or a malfunction.
AAC files written under specifications other than the indicated specification may not play normally or files or folder names may not display correctly.
The file extension may not be provided depending on the computer operating system, version, software, or settings. In this case, add the file extension “.aac ”, “.m4a”, or “.wav*2” to the end of the file name, and then write it to the memory.
*2 Type C/Type D
Condensation phenomenon
Immediately after turning on the heater when the vehicle is cold, the DVD or optical components (prism and lens) in the DVD player may become clouded with condensation. At this time, the DVD will eject immediately when placed in the unit. A clouded DVD can be corrected simply by wiping it with a soft cloth. Clouded optical components will clear naturally in about an hour. Wait for normal operation to return before attempting to use the unit.
Handling the DVD player
The following precautions should be observed.
Do not use deformed or cracked DVDs. The disc may not eject resulting in a malfunction.
Do not use non-conventional discs such as heart-shaped, etc. The disc may not eject resulting in a malfunction.
If the memory portion of the DVD is transparent or translucent, do not use the disc.
A new DVD may have rough edges on its inner and outer perimeters. If a disc with rough edges is used, proper setting will not be possible and the DVD player will not play the DVD. In addition, the disc may not eject resulting in a malfunction. Remove the rough edges in advance by using a ball-point pen or pencil as shown below. To remove the rough edges, rub the side of the pen or pencil against the inner and outer perimeter of the DVD.
When driving over uneven surfaces, the sound may jump.
DVDs bearing the logo shown in the illustration or DVD-R/DVDR/DVD-RW/DVD
RW written with video data (DVD-Video/DVD-VR file) can be played.
Use discs that have been legitimately produced. If illegally-copied discs such as pirated discs are used, the system may not operate properly.
Be sure never to touch the signal surface when handling the DVDs. Pick up a DVD by grasping the outer edge or the edge of the hole and the outer edge.
Do not stick paper or tape on the DVD. Avoid scratching the reverse side (the side without a label). The disc may not eject resulting in a malfunction.
Dust, finger smudges, and dirt can decrease the amount of light reflected from the signal surface, thus affecting sound quality. If the DVD should become soiled, gently wipe it with a soft cloth from the centre of the DVD to the edge.
Do not use record sprays, antistatic agents, or household spray cleaners. Volatile chemicals such as benzine and thinner can also damage the surface of the DVD and must not be used. Anything that can damage, warp, or fog plastic should never be used to clean DVDs.
The DVD player ejects the DVD if the DVD is inserted upside down. Also dirty and/or defective DVDs may be ejected.
Do not insert cleaning discs in the DVD player.
Do not insert any disc with a peel-off seal affixed to it.
This unit may not be able to play certain DVD-R/DVDR/DVD-RW/DVD
RWs made using a computer or DVD recorder due to disc characteristics, scratches,
smudges, dirt, etc., or due to dust or condensation on the lens inside the unit.
Storing DVDs in the vehicle exposed to direct sunlight or high temperature may damage
the DVD-R/DVDR/DVD-RW/DVD
RWs, and make them unplayable.
This unit may not be able to play certain discs made using a computer due to the application (writing software) setting used. (For details, consult the store where the application was purchased.)
Completely read the instruction manual and cautions for DVD-R/DVDR/DVD-RW/DVD
RWs.
Do not use discs with cellophane tape adhering, partially peeled off labels, or adhesive material exuding from the edges of the DVD label. Also, do not use discs with a commercially-available DVD-R label affixed. The disc may not eject resulting in a malfunction.
The conditions in which a DVD video can be played may be pre-determined depending on the intentions of the disc software creator. Functions may not operate as the user intends because this DVD player operates according to the design intentions of the software creator. Always refer to the instructions accompanying the disc to be played.
Manufactured under license by Dolby Labouratories, Inc.. Dolby and the double-D symbol are trademarks of Dolby Labouratories.
Video data (DVD-Video/DVD-VR files) written to DVD/DVD-R/DVDR/DVD-RW/DVD
RW can be played.
This unit is compatible for playback of dual-layer DVD/DVD-R.
Regional number for this unit is [2] or [3] (regional number depends on market).
DVD-Video/DVD-VR files written under specifications other than the indicated specification may not play normally or files or folder names may not display correctly.
Mark indicating on disc
Marks indicated on discs or packages are as follows:
Mark |
Meaning |
|||
---|---|---|---|---|
NTSC |
PAL |
Indicates a colour TV system (broadcast system depends on market). |
||
![]() |
Indicates the number of audio tracks. The number indicates the number of audio recordings. |
|||
![]() |
Indicates the number of subtitled languages. The number indicates the number of recorded languages. |
|||
![]() |
Number of angles. The number indicates the number of recorded angles. |
|||
![]() |
![]() |
Indicates the screen modes which can be selected. “16:9” indicates a wide screen and “4:3” indicates a standard screen. |
||
![]() |
![]() |
![]() |
Indicates the region code for which a disc can be played. ALL indicates global applicability, and a number indicates applicability based on region. |
Glossary
DVD-Video
DVD-Video is a video image storing standard determined by the DVD forum.
“MPEG2”, a global standard in digital compression technologies, has been adopted which compresses on average about 1/40th of the image data and stores it. In addition, a variable-rate coding technology, which changes the assigned information amount according to the shape of the screen image, has been adopted. Audio information can be stored using Dolby digital instead of PCM (Pulse Code Modulation) and more realistic sounding audio can be enjoyed.
In addition, various, supplementary functions such as multi-language availability are provided for enhanced enjoyment.
DVD-VR
DVD-VR is short for DVD Video Recording Format; video image storing standard determined by the DVD forum.
Multi-angle
One of the DVD player's functions. Because scenes can be recorded in multiple angles (camera position), users can choose a desired angle.
Multi-language
As a function of the DVD player, audio or subtitles for the same video images can be stored in multiple languages and the language can be selected freely.
Region code
DVD players and discs are assigned codes for each market region and only discs manufactured for that specific region can be played.
A disc cannot be played if the region code assigned to the player is not indicated on the disc.
In addition, even if a region code is not indicated on the disc, disc playback may be prohibited depending on the region. In this case, a disc may not be playable in this DVD player.
OGG is the audio compression format for Xiph. Org Foundation.
Audio data can be created and stored at a higher compression ratio than MP3.
This unit plays files with the extension (.ogg) as OGG files.
Do not use an audio file extension on files other than audio files. In addition, do not change the audio file extension. Otherwise, the unit will not recognise the file correctly resulting in noise or a malfunction.
OGG files written under specifications other than the indicated specification may not play normally or files or folder names may not display correctly.
The file extension may not be provided depending on the computer operating system, version, software, or settings. In this case, add the file extension “.ogg” to the end of the file name, and then write it to the disc.
This unit plays audio files as follows:
Extension |
Playback with this unit |
---|---|
.mp3 |
MP3 |
.wma |
WMA |
.aac |
AAC |
.m4a |
|
.wav*1 |
|
.ogg*1 |
OGG |
Type C/Type D
Do not use an audio file extension on files other than audio files. In addition, do not change the audio file extension. Otherwise, the unit will not recognise the file correctly resulting in noise or a malfunction.
Playback may not be possible depending on the type and condition of the USB flash memory even if the audio file complies with the standard above.
A copyright protected WMA/AAC file cannot be played in this unit.
The order of the music data stored in the device may differ from the playback order.
To prevent loss or damage of stored data, we recommend that you always back up your data.
If a device exceeds the maximum electric current value of 1,000 mA, it may not operate or recharge when connected.
Do not pull out the USB device while in the USB mode (only pull it out while in FM/AM radio or CD mode).
The device will not operate if the data is password protected.
MP3/WMA/AAC/OGG*1 files written under specifications other than the indicated specification may not play normally or files/folder names may not display correctly.
Type C/Type D
Audio can be heard from the vehicle's speakers by connecting a commercially-available portable audio unit to the auxiliary jack.
A commercially-available, non-impedance (3.5) stereo mini plug lead is required. Contact an expert repairer, we recommend an Authorised
Mazda Repairer for details.
In addition, audio can be played from the vehicle audio device by connecting a USB device or an iPod to the USB port.
(Type C/Type D)
The SD card slot is for the navigation system. For vehicles with the navigation system, the SD card (Mazda genuine) with stored map data is inserted into the SD card slot and used.
Type A/Type B (Without CD player)
Type A/Type B (With CD player)
Type C/Type D (Without DVD/CD player)
Type C/Type D (With DVD/CD player)
Do not adjust the portable audio unit or a similar product while driving the vehicle:
Adjusting the portable audio unit or a similar product while driving the vehicle is dangerous as it could distract your attention from the vehicle operation which could lead to a serious accident. Always adjust the portable audio unit or a similar product while the vehicle is stopped.
Always close the auxiliary jack/USB port lid when it is not in use. If foreign matter or liquid penetrates the auxiliary jack/USB port, it may cause a malfunction.
Depending on the portable audio device, noise may occur when the device is connected to the vehicle accessory socket. (If noise occurs, do not use the accessory socket.)
This mode may not be usable depending on the portable audio device to be connected.
Before using the auxiliary jack/USB port, refer to the instruction manual for the portable audio device.
Use a commercially-available, non-impedance (3.5) stereo mini plug for connecting the portable audio unit to the auxiliary jack. Before
using the auxiliary jack, read the manufacturer's instructions for connecting a portable
audio unit to the auxiliary jack.
To prevent discharging of the battery, do not use the auxiliary input for long periods with the engine off or idling.
When connecting a device to the auxiliary jack or USB port, noise may occur depending on the connected device. If the device is connected to the vehicle's accessory socket, the noise can be reduced by unplugging it from the accessory socket.
Type A/Type B (Without CD player)
Type A/Type B (With CD player)
Type C/Type D (Without DVD/CD player)
Type C/Type D (With DVD/CD player)
Connecting a device
If there is a cover on the AUX jack or USB port, remove the cover.
Connect the connector on the device to the USB port.
Connecting with a connector lead
If there is a cover on the AUX jack or USB port, remove the cover.
Connect the device plug/connector lead to the auxiliary jack/USB port.
Do not allow the connection plug cord to get tangled with the parking brake or the shift lever:
Allowing the plug cord to become tangled with the parking brake or the shift lever is dangerous as it could interfere with driving, resulting in an accident.
Do not place objects or apply force to the auxiliary jack/USB port with the plug connected.
Insert the plug into the auxiliary jack/USB port securely.
Insert or pull out the plug with the plug perpendicular to the auxiliary jack/USB port hole.
Insert or remove the plug by holding its base.
Switch the ignition to ACC or ON.
Press the power/volume dial to turn the audio system on.
Press the media button () of the audio unit to change to the AUX mode.
When the device is not connected to the auxiliary jack, the mode does not switch to the AUX mode.
Adjust the audio volume using the portable audio device or audio unit.
Audio adjustments other than audio volume can only be done using the portable audio device.
If the connection plug is pulled out from the auxiliary jack while in AUX mode, noise may occur.
Type |
Playable data |
---|---|
USB mode |
MP3/WMA/AAC file |
This unit does not support a USB 3.0 device. In addition, other devices may not be supported depending on the model or OS version.
Playback
Switch the ignition to ACC or ON.
Press the power/volume dial to turn the audio system on.
Press the media button () to switch to the USB mode and start playback.
Some devices such as smart phones may require a setting change to allow operation using a USB connection.
When the USB device is not connected, the mode does not switch to USB mode.
When there is no playable data in the USB device, “NO CONTENTS”is flashed.
Playback of the USB device is in the order of the folder numbers. Folders which have no MP3/WMA/AAC files are skipped.
Do not remove the USB device while in the USB mode. The data may be damaged.
Pause
To stop playback, press the play/pause button (4).
Press the button again to resume playback.
Fast-forward/Reverse
Press and hold the fast-forward button () to advance through a track at high speed.
Press and hold the reverse button () to reverse through a track at high speed.
Track search
Press the track up button () once to skip forward to the beginning of the next track.
Press the track down button () within a few seconds after playback begins to track down to the beginning of the
previous track.
Press the track down button () after a few seconds have elapsed to start playback from the beginning of the current
track.
Folder search
To change to the previous folder, press the folder down button (), or press the folder up button (
) to advance to the next folder.
Music scan
This function scans the titles in a folder currently being played and plays ten seconds of each song to aid you in finding a song you want to listen to.
Press and hold the scan button () during playback to start the scan play operation (the track number will flash).
Press and hold the scan button (
) again to cancel scan playback.
If the unit is left in scan, normal playback will resume where scan was selected.
Repeat playback
Track repeat
Press the repeat button (1) during playback to play the current track repeatedly. “TRACK RPT” is displayed ( is displayed next to RPT at the bottom of the display area).
To cancel the repeat playback, press the button again after 3 seconds.
Folder repeat
Press the repeat button (1) during playback, and then press the button again within 3 seconds to play the tracks
in the current folder repeatedly. “FOLDER RPT” is displayed ( is displayed next to RPT at the bottom of the display area).
Press the button again to cancel the repeat playback.
Random playback
Tracks are randomly selected and played.
Folder random
Press the random button (2) during playback to play the tracks in the folder randomly. “FOLDER RDM” is displayed ( is displayed next to RDM at the bottom of the display area).
To cancel the random playback, press the button again after 3 seconds.
All random
Press the random button (2) during playback, and then press the button again within 3 seconds to play the tracks
in the USB device randomly. “ALL RDM” is displayed ( is displayed next to RDM at the bottom of the display area).
Press the button again to cancel the random playback.
Switching the display
The information displayed on the audio display changes as follows each time the text button (3) is pressed during playback.
Button |
Information displayed on audio display |
---|---|
![]() |
File number/Elapsed time |
Folder number/File number |
|
File name |
|
Folder name |
|
Album name |
|
Song name |
|
Artist name |
The information (artist name, music name) is displayed only when the USB device information in the USB device has information which can be displayed on the screen.
This unit cannot display some characters. Characters which cannot be displayed are
indicated by an asterisk ().
Display scroll
Only 13 characters can be displayed at one time. To display the rest of the characters of a long title, press and hold the text button (3). The display scrolls the next 13 characters. Press and hold the text button (3) again after the last 13 characters have been displayed to return to the beginning of the title.
The number of characters which can be displayed is restricted.
Error Messages
When the message “CHECK USB” is displayed, it indicates that there is some error in the USB device. Verify that the content recorded in the USB device has MP3/WMA/AAC files and re-connect correctly. If the message reappears, have the unit checked by an Authorised Mazda Repairer.
An iPod may not be compatible depending on the model or OS version. In this case, an error message is displayed.
The iPod functions on the iPod cannot be operated while it is connected to the unit because the unit controls the iPod functions.
Playback
Switch the ignition to ACC or ON.
Press the power/volume dial to turn the audio system on.
Press the media button () to switch to the iPod mode and start playback.
When an iPod is not connected, the mode does not switch to the iPod mode.
When there is no playable data in the iPod, “NO CONTENTS” is flashed.
Do not remove the iPod while in the iPod mode. Otherwise, the data could be damaged.
Pause
To stop playback, press the play/pause button (4).
Press the button again to resume playback.
Fast-forward/Reverse
Press and hold the fast-forward button () to advance through a track at high speed.
Press and hold the reverse button () to reverse through a track at high speed.
Track search
Press the track up button () once to skip forward to the beginning of the next track.
Press the track down button () within a few seconds (depends on iPod software version) after playback begins to
track down to the beginning of the previous track.
Press the track down button () after a few seconds (depends on iPod software version) have elapsed to start playback
from the beginning of the current track.
Category search
Press the category down button (5) to select the previous category and press the category up button (6) to select the next category.
The types of categories include Playlist, Artist, Album, Song, Podcast, Genre, Composer, and Audio book.
List search
Press the list down button () to select the previous list and press the list up button (
) to select the next list.
When the selected category is Song or Audio book, there is no list.
Music scan
This function scans the titles in a list currently being played and plays 10 seconds of each song to aid you in finding a song you want to listen to.
Press and hold the scan button () during playback to start the scan play operation (the track number will flash).
Press and hold the scan button (
) again to cancel scan playback.
If the unit is left in scan, normal playback will resume where scan was selected.
Repeat playback
Press the repeat button (1) during playback to play the current track repeatedly. “TRACK RPT” is displayed ( is displayed next to RPT at the bottom of the display area).
Press the button again to cancel the repeat playback.
Random playback
Tracks are randomly selected and played.
Song random
Press the random button (2) during playback to play the tracks in the list randomly. “SONG RDM” is displayed ( is displayed next to RDM at the bottom of the display area).
To cancel the random playback, press the button again after 3 seconds.
Album random
Press the random button (2) during playback, and then press the button again within 3 seconds to play the tracks
in the iPod randomly. “ALBUM RDM” is displayed ( is displayed next to RDM at the bottom of the display area).
Press the button again to cancel the random playback.
The track number being played randomly is in the order of the iPod shuffle table.
Switching the display
The information displayed on the audio display changes as follows each time the text button (3) is pressed during playback.
Button |
Information displayed on audio display |
---|---|
![]() |
File number/Elapsed time |
File number |
|
Category name |
|
Artist name |
|
Album name |
|
Song name |
The information (artist name, music name) is displayed only when the iPod has information which can be displayed.
This unit cannot display some characters. Characters which cannot be displayed are
indicated by an asterisk ().
Display scroll
13 characters can be displayed at one time. To display the rest of the characters of a long title, press and hold the text button (3). The display scrolls the next 13 characters. Press and hold the text button (3) again after the last 13 characters have been displayed to return to the beginning of the title.
The number of characters which can be displayed is restricted.
Error Messages
If the message “CHECK iPod” is displayed, it indicates that there is a malfunction in the iPod. Verify that the content recorded in the iPod has playable files and connect correctly. If the message reappears, have the unit checked by an Authorised Mazda Repairer.
If you see an error indication on the display, find the cause in the chart. If you cannot clear the error indication, take the vehicle to an expert repairer, we recommend an Authorised Mazda Repairer.
Indication |
Cause |
Solution |
---|---|---|
CHECK USB |
USB device malfunction |
Verify that the content recorded in the USB device has MP3/WMA/AAC files and re-connect correctly. If the error indication continues to display, consult an expert repairer, we recommend an Authorised Mazda Repairer. |
CHECK iPod |
iPod malfunction |
Verify that the content recorded in the iPod has playable files and re-connect correctly. If the error indication continues to display, consult an expert repairer, we recommend an Authorised Mazda Repairer. |
Select the icon on the home screen and display the Entertainment screen.
Select to switch to the AUX mode. The following icons are displayed in the lower part of
the centre display.
Icon |
Function |
---|---|
![]() |
Displays the Entertainment menu. Use to switch to a different audio source. |
![]() |
Displays sound settings to adjust audio quality level. Refer to Volume/Display/Sound Controls (Search). |
If a device is not connected to the auxiliary jack, the mode does not switch to the AUX mode.
Adjust the audio volume using the portable audio device, commander switch, or audio control switch.
Audio adjustments can also be made using the portable audio device's volume setting.
If the connection plug is pulled out from the auxiliary jack while in AUX mode, noise may occur.
Type |
Playable data |
---|---|
USB mode |
MP3/WMA/AAC/OGG file |
This unit does not support a USB 3.0 device. In addition, other devices may not be supported depending on the model or OS version.
USB devices formatted to FAT32 are supported (USB devices formatted to other formats such as NTFS are not supported).
Playback
Select the icon on the home screen and display the Entertainment screen.
Select or
to switch the USB mode. The following icons are displayed in the lower part of the
centre display.
Icon |
Function |
---|---|
![]() |
Displays the Entertainment menu. Use to switch to a different audio source. |
![]() |
Category list is displayed. |
![]() |
Current track list is displayed. Select a desired track to play it. |
![]() |
Plays the current track repeatedly. Select it again to play the tracks in the current track list repeatedly. When selected again, the function is cancelled. |
![]() |
Tracks in the current track list are played randomly. Select it again to cancel. |
![]() |
Starts playing a track similar to the current track using Gracenote's More Like This™. Select the desired song from the category list to cancel More Like This™. |
![]() |
If selected within a few seconds from the beginning of a song which has started to play, the previous song is selected. If more than a few seconds have elapsed, the song currently being played is replayed from the beginning. Long-press to fast reverse. It stops when you remove your hand from the icon or the commander knob. |
![]() |
Track is played. When selected again, playback is temporarily stopped. |
![]() |
Advances to the beginning of the next song. Long-press to fast forward. |
![]() |
Displays sound settings to adjust audio quality level. Refer to Volume/Display/Sound Controls (Search). |
To move to the desired location on the track, move the slider indicating the playback time.
The appearance of the repeat and shuffle icons changes depending on the type of operation in which the function is used.
Category list
Select the icon and display the following category list.
Select a desired category and item.
Category |
Function |
---|---|
Playlist |
Displays playlists on the device. |
Artist |
Displays the artist name list. All the tracks or tracks for each album of the selected artist can be played. |
Album |
Displays the album name list. |
Song |
All the tracks in the device are displayed. |
Genre |
Displays the genre list. All the tracks or tracks per album or artist in the selected genre can be played. |
Audiobook |
Displays the audiobook list. Chapters can be selected and played. |
Podcast |
Displays the podcast list. Episode can be selected and played. (Special service for some Apple devices.) |
Folder |
Displays the folder/file list. |
Example of use (to play all tracks in USB device)
(Method 1)
Select to display the category list.
Select .
All the tracks in the USB device are displayed.
Select a desired track.
The selected track is played. All the tracks in the USB device can be played by continuing playback.
Only the tracks in the desired category selected in Step 2 are played.
(Method 2)*1
Select to display the category list.
Select .
All the folders in the USB device are displayed.
Select .
All the tracks in the USB device are displayed.
Select a desired track.
The selected track is played. All the tracks in the USB device can be played by continuing playback.
Can be operated using an Android™ device or USB flash memory.
Only the tracks in the desired folder selected in Step 3 are played.
When a USB device is connected to this unit and the audio is played, the album name, artist name, genre and title information are automatically displayed if there is a match in the vehicle's database compilation to the music being played. The information stored in this device uses database information in the Gracenote music recognition service.
For information related to the most recent Gracenote database which can be used and how to install it, go to the Mazda Hands Free Website:
Introduction
Music recognition technology and related data are provided by Gracenote®. Gracenote is the industry standard in music recognition technology and related content delivery. For more information visit www.gracenote.com.
CD and music-related data from Gracenote, Inc., copyright © 2000 to present Gracenote.
Gracenote Software, copyright © 2000 to present Gracenote. One or more patents owned by Gracenote apply to this product and service. See the Gracenote website for a non-exhaustive list of applicable Gracenote patents. Gracenote, CDDB, MusicID, MediaVOCS, the Gracenote logo and logotype, and the “Powered by Gracenote” logo are either registered trademarks or trademarks of Gracenote in the United States and/or other countries.
Gracenote® End User License Agreement
This application or device contains software from Gracenote, Inc. of Emeryville, California (“Gracenote”). The software from Gracenote (the “Gracenote Software”) enables this application to perform disc and/or file identification and obtain music-related information, including name, artist, track, and title information (“Gracenote Data”) from online servers or embedded databases (collectively, “Gracenote Servers”) and to perform other functions. You may use Gracenote Data only by means of the intended End-User functions of this application or device.
You agree that you will use Gracenote Data, the Gracenote Software, and Gracenote Servers for your own personal non-commercial use only. You agree not to assign, copy, transfer or transmit the Gracenote Software or any Gracenote Data to any third party. YOU AGREE NOT TO USE OR EXPLOIT GRACENOTE DATA, THE GRACENOTE SOFTWARE, OR GRACENOTE SERVERS, EXCEPT AS EXPRESSLY PERMITTED HEREIN.
You agree that your non-exclusive license to use the Gracenote Data, the Gracenote Software, and Gracenote Servers will terminate if you violate these restrictions. If your license terminates, you agree to cease any and all use of the Gracenote Data, the Gracenote Software, and Gracenote Servers. Gracenote reserves all rights in Gracenote Data, the Gracenote Software, and the Gracenote Servers, including all ownership rights. Under no circumstances will Gracenote become liable for any payment to you for any information that you provide. You agree that Gracenote, Inc. may enforce its rights under this Agreement against you directly in its own name.
The Gracenote service uses a unique identifier to track queries for statistical purposes. The purpose of a randomly assigned numeric identifier is to allow the Gracenote service to count queries without knowing anything about who you are. For more information, see the web page for the Gracenote Privacy Policy for the Gracenote service.
The Gracenote Software and each item of Gracenote Data are licensed to you “AS IS.”
Gracenote makes no representations or warranties, express or implied, regarding the accuracy of any Gracenote Data from in the Gracenote Servers. Gracenote reserves the right to delete data from the Gracenote Servers or to change data categories for any cause that Gracenote deems sufficient. No warranty is made that the Gracenote Software or Gracenote Servers are error-free or that functioning of Gracenote Software or Gracenote Servers will be uninterrupted. Gracenote is not obligated to provide you with new enhanced or additional data types or categories that Gracenote may provide in the future and is free to discontinue its services at any time.
GRACENOTE DISCLAIMS ALL WARRANTIES EXPRESS OR IMPLIED, INCLUDING, BUT NOT LIMITED TO, IMPLIED WARRANTIES OF MERCHANTABILITY, FITNESS FOR A PARTICULAR PURPOSE, TITLE, AND NON-INFRINGEMENT. GRACENOTE DOES NOT WARRANT THE RESULTS THAT WILL BE OBTAINED BY YOUR USE OF THE GRACENOTE SOFTWARE OR ANY GRACENOTE SERVER. IN NO CASE WILL GRACENOTE BE LIABLE FOR ANY CONSEQUENTIAL OR INCIDENTAL DAMAGES OR FOR ANY LOST PROFITS OR LOST REVENUES.
© 2000 to present. Gracenote, Inc.
Updating the database
The Gracenote media database can be updated using USB device.
Connect a USB device containing the software for updating Gracenote.
Select the icon on the home screen and display the Settings screen.
Select the tab and select
.
Select . The list of the update package stored in the USB device and the version are displayed.
Select the package to use the update.
Select .
Gracenote can be downloaded from the Mazda Hands-free Website.