Driving Position Memory (Power Seat) (Some Models)
The desired driving position can be called up after programming the position.
The following driving positions can be programmed.
-
Driver’s seat position (seat slide, height adjustment, front edge of seat bottom, seat recline)
Refer to Adjusting the Driver's Seat (Search).
-
Active driving display (display position, brightness level, display information)
Refer to Active Driving Display (Search).
-
Outside mirror angle
Refer to Outside Mirrors (Search).
A driving position can be programmed to the following parts.
-
Position memory button
-
Transmitter used for vehicle


Programming
-
Make sure the parking brake is on.
-
(Automatic transmission)
Make sure the selector lever is in the P position.
-
Switch the ignition ON.
-
Adjust the following parts to the desired conditions.
-
Driver's seat
-
Active driving display
-
Outside mirrors
-
-
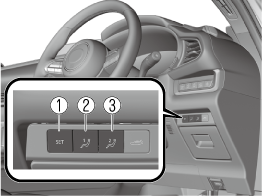
Press the SET button continuously until a sound is activated.
-
SET button
-
1 button
-
2 button
-
-
Do the following operation within 5 seconds after the sound is activated to programme the driving position.
-
Programming to a position memory button
Press the button you want to programme, either 1 or 2 button.
-
Programming to the transmitter
Press the unlock button on the transmitter.
A sound is activated when the operation is completed correctly.
-
-
If you do not perform the operation correctly, a sound indicating that the programming has failed is activated.
-
If the angle of the outer mirrors only changes a little, the angle of the outer mirrors may not have been programmed correctly.
-
If the angle of the outer mirrors is adjusted close to the limits of its range of motion, the driving position can be successfully programmed, but it may fail when calling up the programmed driving position.
Calling up the programmed driving position
Do not place fingers or hands around the bottom of the seat while the seat memory function is operating. The seat moves automatically while the seat memory function is operating and fingers or hands could get pinched and injured.
Using the position memory button
-
Make sure the parking brake is on.
-
(Automatic transmission)
Make sure the selector lever is in the P position.
-
Switch the ignition ON.
-
Press the programming button for the driving position you want to call up (button 1 or 2).
-
A sound is activated when the adjustment to the programmed driving position is completed.
-
When adjustment of the driving position is not necessary, a sound is not activated.
-
The driving position adjustment is cancelled in the following cases:
-
The seat adjustment switch on the driver's seat is operated.
-
The angle of the outer mirrors is adjusted.
-
The SET button is pressed.
-
Programming button 1 or 2 is pressed.
-
The lock button or unlock button on the transmitter is pressed.
-
The vehicle starts moving.
-
The active driving display is adjusted.
-
(Manual transmission)
The parking brake is released.
-
(Automatic transmission)
The selector lever is shifted to a position other than P.
-
Using the transmitter
-
Unlock the driver's door using one of the following methods.
-
Touch the sensing area of the door release touch sensor.
-
Press the unlock button on the transmitter.
-
-
When you open the driver's door within 90 seconds after unlocking the doors, the adjustment of the following parts starts.
-
Driver's seat
-
Active driving display (When the ignition is switched ON, the adjusted active driving display is activated.)
-
Outside mirrors
A sound is activated when the adjustment is completed.
-
-
When adjustment of the driving position is not necessary, a sound is not activated.
-
The driving position adjustment is cancelled in the following cases:
-
The seat adjustment switch on the driver's seat is operated.
-
The angle of the outer mirrors is adjusted.
-
The SET button is pressed.
-
Programming button 1 or 2 is pressed.
-
The lock button or unlock button on the transmitter is pressed.
-
The vehicle starts moving.
-
The active driving display is adjusted.
-
(Manual transmission)
The parking brake is released.
-
(Automatic transmission)
The selector lever is shifted to a position other than P.
-
Erasing programmed driving positions
Erasing the driving positions programmed to the key
-
Switch the ignition OFF.
-
Press the SET button continuously until a sound is activated.
-
Press the lock button on the transmitter within 5 seconds after the sound is activated.
If you do not perform the operation correctly, a sound indicating that the programming has failed is activated.