Before Using the Audio System

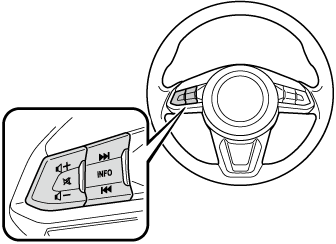
Audio Control Switch

Without Bluetooth® Hands-Free


With Bluetooth® Hands-Free


Adjusting the Volume

To increase the volume, press up the volume switch ().

To decrease the volume, press down the volume switch ().

Mute Switch (Some Models)

Press the mute switch () once to mute audio, press it again to resume audio output.


If the ignition is switched off with the audio muted, the mute will be cancelled. Therefore, when the engine is restarted, the audio is not muted. To mute the audio again, press the mute switch ().

Seek Switch

AM (Some Models)/MW (Some Models)/LW (Some Models)/FM radio

Press the seek switch (, ). The radio switches to the next/previous stored station in the order that it was stored.

Press and hold the seek switch (, ) to seek all usable stations at a higher or lower frequency whether programmed or not.


Radio stations which have been previously stored in the auto memory tuning (Type A)/favourite radio (Type B) can be called up by pressing the seek switch (, ) while any radio station stored in the auto memory tuning (Type A)/favourite radio (Type B) is being received. Radio stations can be called up in the order they were stored with each press of the switch (, ).


DAB radio (Type B) (Some Models)

Press the Seek switch (, ) while listening to DAB radio to call up a station previously stored to the favourites list. With each operation of the switch, radio stations can be called up in the order they were stored.

Press and hold the seek switch () to go to the next station, () to return to the previous station.

USB Audio/Bluetooth® Audio (Some Models)/CD (Some Models)

Press the seek switch () to skip forward to the beginning of the next track.

Press the seek switch () within a few seconds after playback begins to track down to the beginning of the previous track.

Press the seek switch () after a few seconds have elapsed to start playback from the beginning of the current track.

Press and hold the seek switch (, ) to continuously switch the tracks up or down.

DVD (Type B) (Some Models)

Press the seek switch () to skip forward to the beginning of the next chapter.

Press the seek switch () to return to the beginning of the previous chapter.

Aha™/Stitcher™ Radio (Type B)

Press the seek switch () to skip forward to the beginning of the next track.

Press and hold the seek switch () to evaluate the playback of the current song as “Like”.

Press and hold the seek switch () to evaluate the playback of the current song as “Dislike”.

AUX/USB mode

Audio can be heard from the vehicle's speakers by connecting a commercially-available portable audio unit to the auxiliary jack.

A commercially-available, non-impedance (3.5) stereo mini plug lead is required. Contact an expert repairer, we recommend an Authorised Mazda Repairer for details.

In addition, audio can be played from the vehicle audio device by connecting a USB device to the USB port.


(Type B)

The SD card slot is for the navigation system. For vehicles with the navigation system, the SD card (Mazda genuine) with stored map data is inserted into the SD card slot and used.

Type A


Type B


  1. How to use AUX mode (Type A)
  2. How to use USB mode (Type A)
  3. How to use iPod mode (Type A)
  4. How to use AUX mode (Type B)
  5. How to use USB mode (Type B)


Do not adjust the portable audio unit or a similar product while driving the vehicle:

Adjusting the portable audio unit or a similar product while driving the vehicle is dangerous as it could distract your attention from the vehicle operation which could lead to a serious accident. Always adjust the portable audio unit or a similar product while the vehicle is stopped.


Depending on the portable audio device, noise may occur when the device is connected to the vehicle accessory socket. (If noise occurs, do not use the accessory socket.)


  • This mode may not be usable depending on the portable audio device to be connected.

  • Before using the auxiliary jack/USB port, refer to the instruction manual for the portable audio device.

  • Use a commercially-available, non-impedance (3.5) stereo mini plug for connecting the portable audio unit to the auxiliary jack. Before using the auxiliary jack, read the manufacturer's instructions for connecting a portable audio unit to the auxiliary jack.

  • To prevent discharging of the battery, do not use the auxiliary input for long periods with the engine off or idling.

  • When connecting a device to the auxiliary jack or USB port, noise may occur depending on the connected device. If the device is connected to the vehicle's accessory socket, the noise can be reduced by unplugging it from the accessory socket.

How to connect USB port/Auxiliary jack

Type A


Type B


Connecting a device

  1. Open the console lid.

  2. If there is a cover on the auxiliary jack or USB port, remove the cover. (Type A)

  3. Connect the connector on the device to the USB port.

Connecting with a connector lead

  1. Open the console lid.

  2. If there is a cover on the auxiliary jack or USB port, remove the cover. (Type A)

  3. Connect the device plug/connector lead to the auxiliary jack/USB port. Pass the device plug/connector lead through the notch in the console and connect.


Do not allow the connection plug cord to get tangled with the shift lever (manual )/selector lever (automatic ):

Allowing the plug cord to become tangled with the shift lever (manual )/selector lever (automatic ) is dangerous as it could interfere with driving, resulting in an accident.


Do not place objects or apply force to the auxiliary jack/USB port with the plug connected.


  • Insert the plug into the auxiliary jack/USB port securely.

  • Insert or pull out the plug with the plug perpendicular to the auxiliary jack/USB port hole.

  • Insert or remove the plug by holding its base.

Aerial

Type A (Some Models)

The aerial is embedded into the window glass.


When washing the inside of the window which has an aerial, use a soft cloth dampened in lukewarm water, gently wiping the aerial lines.

Use of glass cleaning products could damage the aerial.

Type B

Page top