Interior Equipment
Sunvisors
When you need a sunvisor, lower it for use in front or swing it to the side.

Interior Lights
Do not leave the lights on for long periods while the engine is turned off. Otherwise the battery power could be depleted.
Overhead Lights
Switch Position |
Overhead Lights |
---|---|
![]() |
Light off |
![]() |
|
![]() |
Light on |

The rear map lights also turn on and off when the overhead light switch is operated.
Front Map Lights
When the overhead light switch is in the door or off position, press the lens to illuminate the front map lights, and then press the lens again to turn them off.

The front map lights will not turn off even if the lens is pressed in the following cases:
-
The overhead light switch is in the ON position.
-
The overhead light switch is in the door position with the door open.
-
The illuminated entry system is on.
Rear Map Lights
When the overhead light switch is in the door or off position, press the lens to illuminate a rear map light, and then press the lens again to turn it off.

-
Once the rear map lights have been turned off, they will turn on and off depending on the position to which the overhead light is switched.
-
The rear map lights will not turn off even if the lens is pressed in the following cases:
-
The overhead light switch is ON.
-
The overhead light switch is in the door position with the door open.
-
The illuminated entry system is on.
-
Luggage Compartment Lights

Switch Position |
Luggage Compartment Light |
---|---|
![]() |
Light off |
![]() |
Light on when the liftgate is open |
Illuminated Entry System
The overhead lights turn on when any of the following operations is done with the overhead light switch in the DOOR position.
-
The driver's door is unlocked with the ignition is switched OFF.
-
The ignition is switched OFF with all doors closed.
-
The illumination time differs depending on the operation.
-
Battery saver
If an interior light is left on with the ignition switched OFF, the light is turned off automatically after about 30 minutes to prevent battery depletion.
-
The operation of the illuminated entry system can be changed.
Refer to Personalisation Features (Search).
Accessory Sockets
Only use genuine Mazda accessories or the equivalent requiring no greater than 120 W (DC 12 V, 10 A).
The ignition must be switched to ACC or ON.
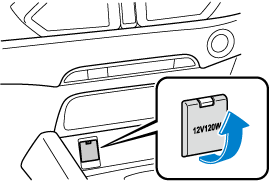
Front
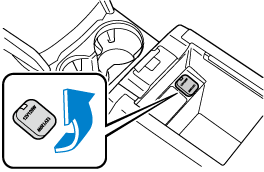
Centre
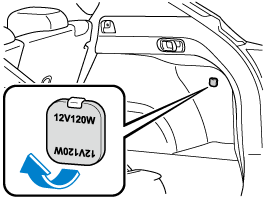
Rear
-
To prevent accessory socket damage or electrical failure, pay attention to the following:
-
Do not use accessories that require more than 120 W (DC 12 V, 10 A).
-
Do not use accessories that are not genuine Mazda accessories or the equivalent.
-
Close the cover when the accessory socket is not in use to prevent foreign objects and liquids from getting into the accessory socket.
-
Correctly insert the plug into the accessory socket.
-
Do not insert the cigarette lighter into the accessory socket.
-
-
Noise may occur on the audio playback depending on the device connected to the accessory socket.
-
Depending on the device connected to the accessory socket, the vehicle's electrical system may be affected, which could cause the warning light to illuminate. Disconnect the connected device and make sure that the problem is resolved. If the problem is resolved, disconnect the device from the socket and switch the ignition off. If the problem is not resolved, consult an expert repairer, we recommend an Authorised Mazda Repairer.
To prevent discharging of the battery, do not use the socket for long periods with the engine off or idling.
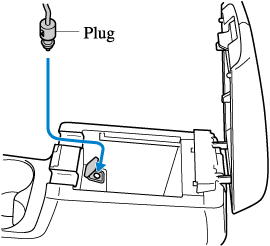
Connecting the accessory socket
-
Open the lid.
-
Pass the connection plug cord through the cutout of the console and insert the plug into the accessory socket.
Front

Rear (Some Models)
The rear cup holder is on the rear centre armrest.