Adjusting the Driver's Seat
Using the driving position set up procedure recommended by Mazda allows you to maintain a relaxed posture, drive the vehicle for longer periods without feeling tyred, and make quick operations naturally.
Also, you can be assured of a clear view in the forward direction to help you drive more safely and comfortably.
The adjustments for the driving position recommended by Mazda are done using the following procedures.
-
Moving the steering wheel and seat to their default positions.
-
Adjusting the seatback angle.
-
Adjusting the seat position forward and back.
-
Adjusting the seat height.
-
Adjusting the steering wheel position.
-
Adjusting the head restraint position.
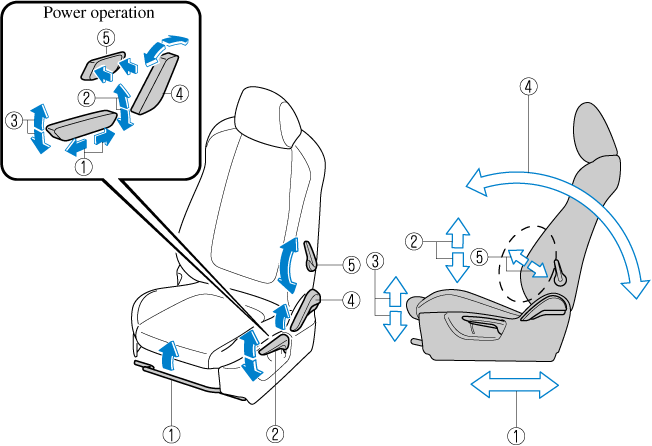
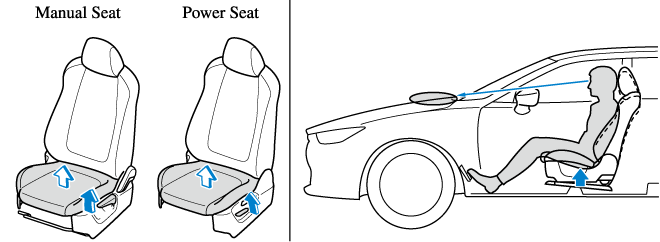
 Seat Slide
(Manual Seat)
To move a seat forward or backward, raise the lever and slide the seat to the desired position and release the lever.
Make sure the lever returns to its original position and the seat is locked in place by attempting to push it forward and backward.
(Power Seat)
To slide the seat, move the slide lifter switch on the outside of the seat to the front or back and hold it. Release the switch at the desired position.
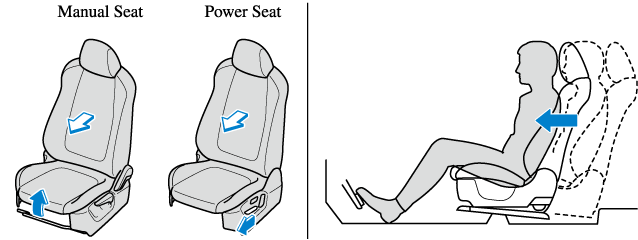
 Height Adjustment
(Manual Seat)
To adjust the seat height, move the lever up or down.
(Power Seat)
To adjust the seat height, move the slide lifter switch up or down.
 Height Adjustment for Front Edge of Seat Bottom (Power Seat)
To adjust the front height of the seat bottom, raise or lower the front of the slide lifter switch.
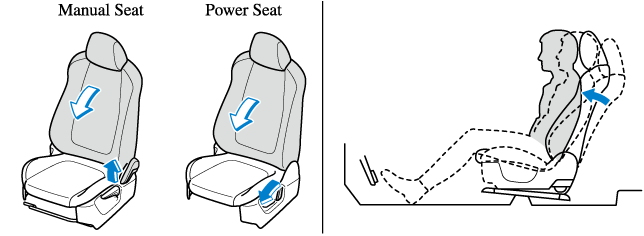
 Seat Recline
(Manual Seat)
To change the seatback angle, lean forward slightly while raising the lever. Then lean back to the desired position and release the lever.
Make sure the lever returns to its original position and the seatback is locked in place by attempting to push it forward and backward.
(Power Seat)
To change the seatback angle, press the front or rear side of the reclining switch. Release the switch at the desired position.
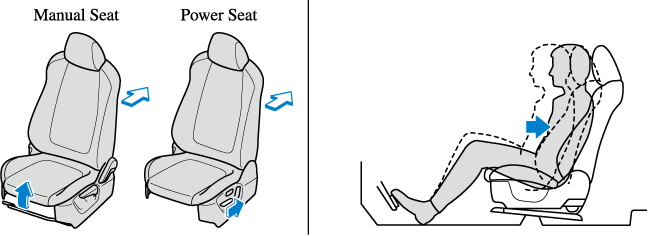
 Lumbar Support Adjustment (Some Models)
(Manual Seat)
To increase the seat firmness, move the lever downward. Move the lever upward to decrease firmness.
(Power Seat)
To increase the seat firmness, press and hold the front part of the switch to the desired position, then release it.
Press the rear part of the switch to decrease firmness.
Before making adjustments to the driving position recommended by Mazda
Before making adjustments, move the steering wheel and seat to their default positions.
How to move the steering wheel to its default position
Never adjust the steering wheel while the vehicle is moving:
Adjusting the steering wheel while the vehicle is moving is dangerous. Moving it can very easily cause the driver to abruptly turn to the left or right. This can lead to loss of control or an accident.
After adjusting the steering wheel position, make sure it is securely locked by trying to move it up and down:
Driving with the steering wheel not securely locked in position is dangerous. If the steering wheel moves unexpectedly while driving, you could lose control of the steering resulting in an accident.


Lower the lever, move the steering wheel to the lowest position, and then push it down and all the way back.

How to move a driver’s seat to its default position
-
Slide the seat all the way back.
-
Lower the seat to its lowest height.
-
Sit squarely in the seat and rest your back against the seatback.
Seat adjustment procedure for the driving position recommended by Mazda
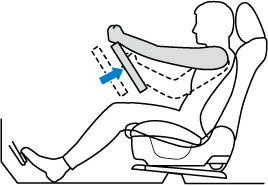
Adjusting the seatback angle (reclining)
Adjust the seatback to the angle providing a comfortable seated posture.
-
With your posture slightly slouched, move the seatback forward to the angle where your waist feels slightly cramped.
-
Move the seatback backward to a comfortable seated posture without any feeling of cramping in your waist.

Adjusting the seat position forward and back (sliding)
Adjust the seat to the position best for operating the accelerator and brake pedals.
-
Place your left foot on the footrest, your right foot between the accelerator and brake pedals, and position your heel to the position allowing easy switching between the pedals.
-
With your heel set on the floor, set your right foot on the brake pedal and move the seat forward as far as possible until you feel a slight cramping in your ankle.
-
With your right foot set on the brake pedal, move the seat back until you no longer feel cramping in your ankle.
-
With your heel set on the floor, make sure you can move your foot between the brake pedal and accelerator pedal smoothly.
-
Depress the accelerator pedal completely with your heel set on the floor and make sure that your ankle does not feel over-stretched.
Adjusting the seat height
Adjust the seat height to a position where you have a clear forward view and you can drive the vehicle easily.
-
With your back resting against the seatback, raise the seat to the height where you can see the rear edge area of the bonnet surface from the windscreen.
With the manual seat, if you raise the seat height, the seat moves forward. Adjust the seat forward or back again.
Adjusting the steering wheel position
Adjust the steering wheel to the position where it can be operated easily and the gauges can be viewed easily.
-
With your back resting against the seatback, extend both arms, place them on the top of the steering wheel, and pull the steering wheel towards you to the position of your wrists.
-
Adjust the steering wheel height so that the gauges can be viewed easily.
-
Raise the lever to securely lock the steering wheel.

Adjusting the head restraint position
To prevent shock to the head and neck, adjust the head restraints to their correct positions.
Refer to Height Adjustment (Search).