Seat Warmer/Seat Ventilation/Heated Steering Wheel
Seat Belt Systems
Seat Belt Warning Systems
Seat Belt Pretensioner and Load Limiting Systems
Child-Restraint System Installation
Installing Child-Restraint Systems
Supplementary Restraint System Components
How the SRS Air Bags Work
Limitations to SRS Air Bag
Front Passenger Occupant Classification System
Constant Monitoring
Advanced Keyless Entry System
Doors and Locks
Fuel and Emission
Mirrors
Windows
Security System
Driving Tips
Saving Fuel and Protection of the Environment
Hazardous Driving
Floor Mat
Rocking the Vehicle
Winter Driving
Driving In Flooded Area
Turbocharger Information
Instrument Cluster and Display
Instrument Cluster (Type A)
Switches and Controls
Turn and Lane-Change Signals
Windscreen Wipers and Washer
Rear Window Wiper and Washer
Rear Window Defogger
Horn
Hazard Warning Flasher
ABS/TCS/DSC/Trailer Stability Assist (TSA)
Traction Control System (TCS)
Dynamic Stability Control (DSC)
Trailer Stability Assist (TSA)
i-ACTIV AWD
Power Steering
i-ACTIVSENSE
High Beam Control System (HBC) (Some Models)
Adaptive LED Headlights (ALH) (Some Models)
Blind Spot Monitoring (BSM)
Distance Recognition Support System (DRSS)
Driver Attention Alert (DAA) (Some Models)
Mazda Radar Cruise Control with Stop & Go function (MRCC with Stop & Go function)
360° View Monitor (Some Models)
Radar Sensor (Front)
Radar Sensors (Rear)
Ultrasonic Sensor (Rear)
Front Camera/Side Cameras/Rear Camera (Some Models)
Tyre Pressure Monitoring System
Rear View Monitor
Parking Sensor System
Vent Operation (Front)
Front Air Conditioner
Rear Air Conditioner
Audio Set
Home screen
Settings
Operating the Radio
Operating the Digital Audio Broadcasting (DAB) Radio
How to use AUX mode
How to use USB mode
How to use Apple CarPlay
How to use Android Auto™ mode
Bluetooth®
Bluetooth® Preparation
Available Language
Bluetooth® Audio
How to Use Stitcher™ Radio
Bluetooth® Hands-Free
Applications
Troubleshooting
Interior Equipment
Scheduled Maintenance
Owner Maintenance
Bonnet
Engine Compartment Overview
Engine Oil
Engine Coolant
Brake Fluid
Window Washer Fluid
Body Lubrication
Wiper Blades
Battery
Key Battery Replacement
Tyres
Light Bulbs
Fuses
Emission Control Maintenance (Australia)
Flat Tyre
Battery Runs Out
Emergency Starting
Overheating
Emergency Towing
Warning/Indicator Lights and Warning Sounds
Message Indicated in Multi-information Display
Warning Sound is Activated
Active Driving Display Does Not Operate
Cell Phones
Recording of Vehicle Data
Declaration of Conformity
When the wipers no longer clean well, the blades are probably worn or cracked.
Replace them.
To prevent damage to the wiper arms and other components, do not try to sweep the wiper arm by hand.
Do not bend the blade rubber unnecessarily when replacing it. Otherwise, the metal stiffener in the blade may deform and the windscreen wiper operation may be adversely affected.
When raising both windscreen wiper arms, raise the driver's side wiper arm first. When lowering the wiper arms, slowly lower the wiper arm from the passenger's side first while supporting it with your hand. Forcefully lowering the wiper arms could damage the wiper arm and blade, and may scratch or crack the windscreen.
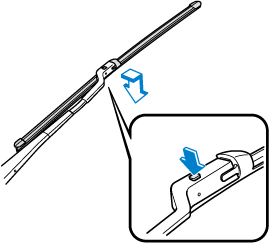
Raise the wiper arm.
To prevent damage to the windscreen let the wiper arm down easily, do not let it slap down on the windscreen.
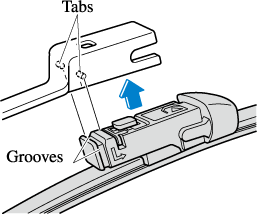
Slide the blade component in the direction of the arrow while pressing the wiper arm tab to remove the blade component from the wiper arm.
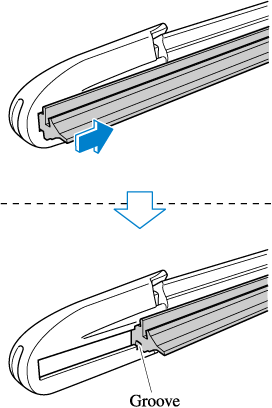
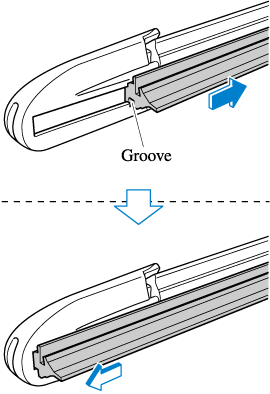
Pull the blade rubber in the direction of the arrow and slide it to a position where the blade holder groove can be checked.
Pull the end of the blade rubber from the blade holder groove in the direction of the arrow and remove the blade rubber from the blade holder.
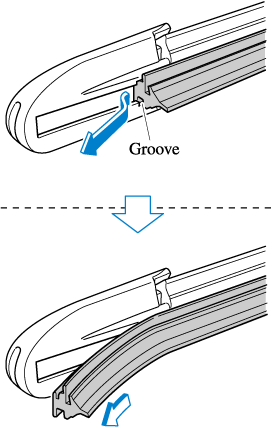
Insert the end of the new blade rubber into the groove of the blade holder until it contacts the end of the blade holder.
After pulling the blade rubber in the direction of the arrow and sliding the blade rubber to a position to check the blade holder groove, slide the blade rubber end in the opposite direction.
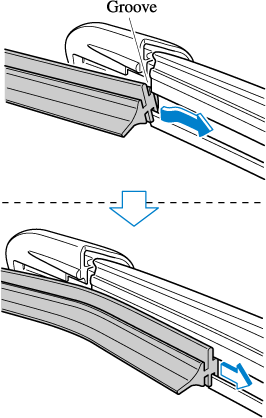
Make sure that the blade rubber is correctly installed to the blade holder.
Align the wiper arm tabs with the blade component grooves.
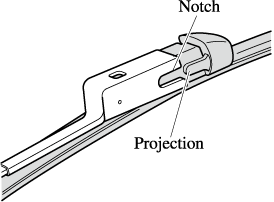
Align the blade component projection with the wiper arm notch.
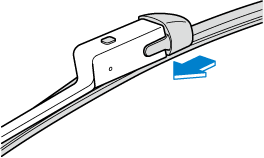
Slide the blade component and install it to the wiper arm.
Slowly lower the wiper arm onto the windscreen.
Page top