Flat Tyre

Spare Tyre and Tool Storage

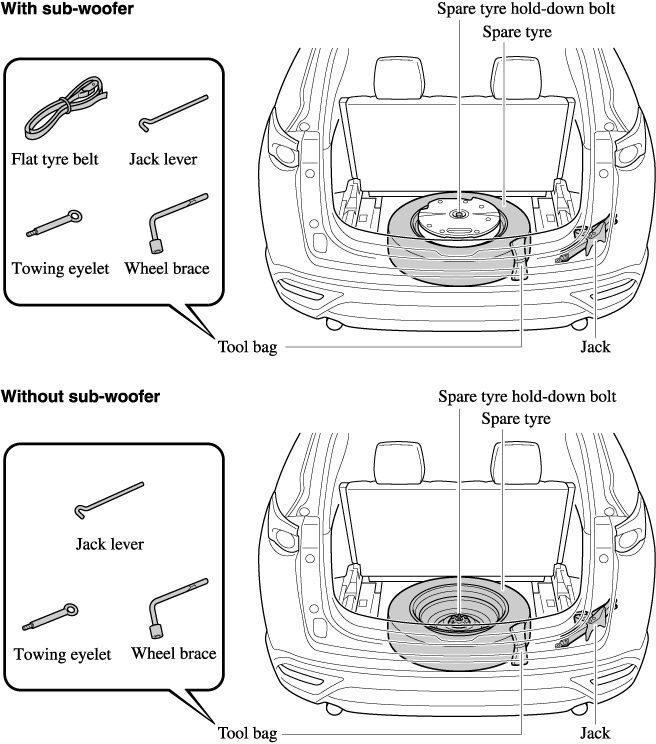
Spare tyre and tools are stored in the locations illustrated in the diagram.

Jack

To remove the jack

  1. Set the third-row seatbacks to their on-road positions.

  2. Raise the luggage board.


  3. Raise the luggage board a little while pulling it towards you, and then insert the bottom edge into the holders.


  4. Remove the cover on the right side.


  5. Remove the cargo sub compartment.


  6. Turn the wing bolt and jack screw anticlockwise.


To secure the jack

  1. Insert the wing bolt into the jack with the jack screw pointing back and turn the wing bolt clockwise to temporarily tighten it.

  2. Tighten the jack screw clockwise.


  3. Turn the wing bolt completely to secure the jack.


    If the jack is not completely secured, it could rattle while driving. Make sure the jack screw is sufficiently tightened.

Maintenance

  • Always keep the jack clean.

  • Make sure the moving parts are kept free from dirt or rust.

  • Make sure the screw thread is adequately lubricated.

Spare Tyre

Your Mazda has a temporary spare tyre.

The temporary spare tyre is lighter and smaller than a conventional tyre, and is designed only for emergency use and should be used only for VERY short periods. Temporary spare tyres should NEVER be used for long drives or extended periods.


Do not install the temporary spare tyre on the front wheels (driving wheels):

Driving with the temporary spare tyre on one of the front driving wheels is dangerous. Handling will be affected. You could lose control of the vehicle, especially on ice or snow bound roads, and have an accident. Move a regular tyre to the front wheel and install the temporary spare tyre to the rear.


  • When using the temporary spare tyre, driving stability may decrease compared to when using only the conventional tyre. Drive carefully.

  • To avoid damage to the temporary spare tyre or to the vehicle, observe the following precautions:

    • Do not exceed 80 km/h (50 mph).

    • Avoid driving over obstacles. Also, do not drive through an automatic car wash. This tyre's diameter is smaller than a conventional tyre, so the ground clearance is reduced.

    • Do not use a tyre chain on this tyre because it will not fit properly.

    • Do not use your temporary spare tyre on any other vehicle, it has been designed only for your Mazda.

    • Use only one temporary spare tyre on your vehicle at the same time.

To remove the spare tyre


(Vehicles with sub-woofer)

Because the sub-woofer is not operational when the sub-woofer connector is disconnected, no sound is output from the sub-woofer.

  1. Set the third-row seatbacks to their on-road positions.

  2. Raise the luggage board.


  3. Raise the luggage board a little while pulling it towards you, and then insert the bottom edge into the holders.


  4. Remove the tool bag.

  5. (Vehicles with sub-woofer)

    Disconnect the sub-woofer connector.


  6. (Vehicles with sub-woofer)

    Turn the hold-down bolt anticlockwise and remove the sub-woofer and the spare tyre.


    (Vehicles without sub-woofer)

    Turn the hold-down bolt anticlockwise and remove the spare tyre.


To secure the spare tyre

Store the spare tyre in the reverse order of removal. After storing, verify that the spare tyre is stored securely.


(Vehicles with sub-woofer)

  • Secure the sub-woofer in its correct position. If the sub-woofer is not installed to the correct position, it may move while the vehicle is driven which may damage the sub-woofer or the wiring harness.

  • Store the tool bag on the right side of the vehicle. If the tool bag is stored on the left side of the vehicle, it may move while the vehicle is driven which may damage the wiring harness.

Refer to Spare Tyre and Tool Storage (Search).

Changing a Flat Tyre


If the following occurs while driving, it could indicate a flat tyre.

  • Steering becomes difficult.

  • The vehicle begins to vibrate excessively.

  • The vehicle pulls in one direction.

If you have a flat tyre, drive slowly to a level spot that is well off the road and out of the way of traffic to change the tyre.

Stopping in traffic or on the shoulder of a busy road is dangerous.


Be sure to follow the directions for changing a tyre:

Changing a tyre is dangerous if not done properly. The vehicle can slip off the jack and seriously injure someone.

No person should place any portion of their body under a vehicle that is supported by a jack.

Never allow anyone inside a vehicle supported by a jack:

Allowing someone to remain in a vehicle supported by a jack is dangerous. The occupant could cause the vehicle to fall resulting in serious injury.


Make sure the jack is well lubricated before using it.

  1. Park on a hard, level surface off the right-of-way and firmly set the parking brake.

  2. Shift into Park (P) and turn off the engine.

  3. Turn on the hazard warning flasher.

  4. Have everyone get out of the vehicle and away from the vehicle and traffic.

  5. Remove the jack, tool, and spare tyre (Search).

  6. Block the wheel diagonally opposite the flat tyre. When blocking a wheel, place a tyre block both in front and behind the tyre.


    When blocking a tyre, use rocks or wood blocks of sufficient size if possible to hold the tyre in place.

Removing a Flat Tyre


When jacking-up a vehicle, always shift the selector lever to P, apply the parking brake, and place wheel blocks in the position diagonally opposed to the jack:

Changing a flat tyre without using wheel blocks is dangerous because the vehicle may move and fall off the jack even with the select lever is in P, which could result in an accident.

  1. Loosen the wheel nuts by turning them anticlockwise one turn each, but do not remove any wheel nuts until the tyre has been raised off the ground.


  2. Place the jack on the ground.

  3. Turn the jack screw in the direction shown in the figure and adjust the jack head so that it is close to the jack-up position.


  4. Set the jack to the designated jack-up position closest to the tyre being removed.

    (Jacking-up the vehicle front)

    Set the groove on the top of the jack head at a right angle into the centre of the designated jack-up position guide projection closest to the vehicle front.


    Always set the jack into the designated jack-up position shown in the figure correctly.

    (Jacking-up the vehicle rear)

    Set the groove on the top of the jack head at a right angle between the designated jack-up position guide projections.


  5. Continue raising the jack head gradually by rotating the screw with your hand until the jack head is inserted into the jack-up position.


    Use only the front and rear jacking positions recommended in this manual:

    Attempting to jack the vehicle in positions other than those recommended in this manual is dangerous. The vehicle could slip off the jack and seriously injure or even kill someone. Use only the front and rear jacking positions recommended in this manual.

    Do not jack up the vehicle in a position other than the designated jack-up position or place any objects on or under the jack:

    Jacking up the vehicle in a position other than the designated jack-up position or placing objects on or under the jack is dangerous as it could deform the vehicle body or the vehicle could fall off the jack resulting in an accident.

    Use only the jack provided with your Mazda:

    Using a jack that is not designed for your Mazda is dangerous. The vehicle could slip off the jack and seriously injure someone.

    Never place objects under the jack:

    Jacking the vehicle with an object under the jack is dangerous. The jack could slip and someone could be seriously injured by the jack or the falling vehicle.


    When raising the jack head into the jacking position and aligning the groove in the jack head with the rail under the vehicle body, the top of the jack head contacts the vehicle's underbody without the rail contacting the bottom of the groove.

  6. Insert the jack lever and attach the wheel brace to tyre jack.


  7. Turn the jack handle clockwise and raise the vehicle high enough so that the spare tyre can be installed. Before removing the wheel nuts, make sure your Mazda is firmly in position and that it cannot slip or move.


    Do not jack up the vehicle higher than is necessary:

    Jacking up the vehicle higher than is necessary is dangerous as it could destabilize the vehicle resulting in an accident.

    Do not start the engine or shake the vehicle while it is jacked up:

    Starting the engine or shaking the vehicle while it is jacked up is dangerous as it could cause the vehicle to fall off the jack resulting in an accident.

    Never go under the vehicle while it is jacked up:

    Going under the vehicle while it is jacked up is dangerous as it could result in death or serious injury if the vehicle were to fall off the jack.

  8. Remove the wheel nuts by turning them anticlockwise; then remove the wheel and centre cap.

Mounting the Spare Tyre

  1. Remove dirt and grime from the mounting surfaces of the wheel and hub, including the hub bolts, with a cloth.


    Make sure the mounting surfaces of the wheel, hub and wheel nuts are clean before changing or replacing tyres:

    When changing or replacing a tyre, not removing dirt and grime from the mounting surfaces of the wheel, hub and hub bolts is dangerous. The wheel nuts could loosen while driving and cause the tyre to come off, resulting in an accident.

  2. Mount the spare tyre.

  3. Install the wheel nuts with the bevelled edge inward; tighten them by hand.


    Do not apply oil or grease to wheel nuts and bolts and do not tighten the wheel nuts beyond the recommended tightening torque:

    Applying oil or grease to wheel nuts and bolts is dangerous. The wheel nuts could loosen while driving and cause the tyre to come off, resulting in an accident. In addition, wheel nuts and bolts could be damaged if tightened more than necessary.

  4. Turn the wheel brace anticlockwise and lower the vehicle.

  5. Use the wheel brace to tighten the nuts in the order shown.


    If you are unsure of how tight the nuts should be, have them inspected at an expert repairer, we recommend an Authorised Mazda Repairer.

    Nut tightening torque

    N·m (kgf·m, ft·lbf)

    108―147 (12―14, 80―108)


    Always securely and correctly tighten the wheel nuts:

    Improperly or loosely tightened wheel nuts are dangerous. The wheel could wobble or come off. This could result in loss of vehicle control and cause a serious accident.

    Be sure to reinstall the same nuts you removed or replace them with metric nuts of the same configuration:

    Because the wheel studs and wheel nuts on your Mazda have metric threads, using a non-metric nut is dangerous. On a metric stud, it would not secure the wheel and would damage the stud, which could cause the wheel to slip off and cause an accident.

  6. (Vehicles with sub-woofer)

    Secure the sub-woofer to the flat tyre using the flat tyre belt.

    1. Pass the flat tyre belt through the wheel of the flat tyre.


    2. Install the sub-woofer to the flat tyre.


    3. Pass the flat tyre belt through the buckle.


    4. Pull the end of the flat tyre belt and secure the sub-woofer and the wiring harness to the flat tyre.


      When pulling the flat tyre belt, wrap the buckle with a cloth. If the buckle directly contacts the sub-woofer, the sub-woofer may be damaged.

  7. Place the flat tyre in the luggage compartment so that it leans against the luggage board.


    Tuck a cloth between the flat tyre and the vehicle trim. If the flat tyre directly contacts the vehicle trim, the trim may be damaged.

  8. Slowly close the liftgate while making sure that the liftgate trim does not contact the flat tyre.


    If the liftgate trim contacts the flat tyre, adjust the position of the flat tyre.

  9. Make sure that the liftgate closes securely.

  10. Check the tyre inflation pressure.

    Refer to the specification charts (Search).

  11. Have the flat tyre repaired or replaced as soon as possible.


Do not drive with any tyres that have incorrect air pressure:

Driving on tyres with incorrect air pressure is dangerous. Tyres with incorrect pressure could affect handling and result in an accident. When you check the regular tyres' air pressure, check the spare tyre, too.


To prevent the jack and tool from rattling, store them properly.

Page top