Audio Set [Type B (touchscreen)]

Touch panel operation


Do not press the screen strongly or press it with a sharp-pointed object. Otherwise, the screen could be damaged.


For safety reasons, operation of the centre display is disabled while the vehicle is being driven. However, items not displayed in grey can be operated using the commander switch while the vehicle is being driven.


Touch & Tap

  1. Touch or tap on the item indicated on the screen.

  2. The operation is launched and the next item is displayed.


Slide (USB audio only)

  1. Touch the setting item displaying a slider bar.

  2. Touch the slider with your finger and move to the desired level.


Swipe

  1. Touch the screen with your finger and move up or down.

  2. Items which were not displayed can be displayed.


Return to previous screen

  1. Touch the .

Displaying the home screen

  1. Touch the .

Home screen

Icon

Function

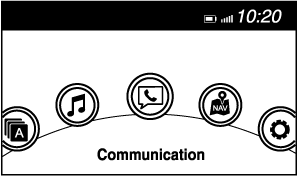
Applications

Information such as average fuel economy, maintenance, and warnings can be verified.

Depending on the grade and specification, the screen display may differ.

Entertainment

Operates audio such as the radio and CDs. The audio source most recently used is displayed. An audio source which cannot be used at that time is skipped and the previous audio source is displayed.

To change the audio source, select the icon displayed at the bottom of the screen.

Communication

Bluetooth® related functions are available.

Navigation

Navigation screen is displayed (vehicles with navigation system).

If the SD card for the navigation system is not inserted, the compass indicating the direction in which the vehicle is moving is displayed.

The compass may not indicate the correct bearing when the vehicle is stopped or travelling at a slow speed.

Settings

Overall setting menu (Such as display, sound, Bluetooth® and Language).

Depending on the grade and specification, the screen display may differ.

Operating the Radio

Radio ON

Select the icon on the home screen to display the Entertainment screen. When selecting the desired radio, the following icons are indicated in the lower part of the centre display.

AM/FM Radio

Icon

Function

Displays the Entertainment menu. Use to switch to a different audio source.

Displays the list of receivable RDS radio stations (FM only).*1

Displays the station list.*2

Select to display the frequencies of up to 10 radio stations on the auto memory preset list.

Select the desired frequency.

Displays the Favourites list. Long-press to store radio station currently being aired.

You can search for receivable radio stations.

Scanning stops at each station for about 5 seconds.

Select again to continue receiving the radio station.

You can change the radio frequency manually.

Rotate the commander knob, slide the screen, or touch the radio frequency.

Press or to change the radio frequency one step at a time.

When or is long-pressed, the radio frequency changes continually. It stops when you remove your hand from the icon or the commander knob.

Switches the TA mode on and off.*1

Automatic radio station selection.

When long-pressed, the radio frequency changes continually. It stops when you remove your hand from the icon or the commander knob.

Displays the FM settings screen (FM only).*1

On/Off of Alternative frequency and Region lock can be set.

Displays sound settings to adjust audio quality level.

Refer to Volume/Display/Sound Controls (Search).

  1. With Radio Data System (RDS)

  2. Not displayed when listening to FM radio on vehicles with Radio Data System (RDS).


(With Radio Data System (RDS))

When the or icon is selected while FM is selected, each programme is selected.

DAB radio setting

  1. Select the icon while using DAB radio.

  2. Select the desired item and perform the setting.

    The items which can be set are as follows:

Item

Setting

Function

BAND Settings

Band III/L Band/Both

Frequency band can be changed.

DAB-FM Link

On/Off

On: If the reception condition is bad, an FM station which is providing the same broadcast is searched and switched to.

DAB-DAB Link

On/Off

On: If the reception condition is bad, a DAB station which is providing the same broadcast is searched and switched to.

Radio Text

On/Off

On: Radio text is displayed.


  • The radio text may not be displayed depending on the radio station.

  • The radio text cannot be displayed in DAB-FM mode.

  • If there is no DAB radio signal, “Signal Lost” is displayed on the screen. Change the ensemble or radio station, or perform station list updating.

Playback

Select the icon on the home screen with a DVD inserted and display the Entertainment screen. When is selected, the DVD top menu screen and the controller are displayed.

When starting the playback by operating the controller, the following icons are displayed at the bottom of the screen.

Icon

Function

Displays the Entertainment menu. Use to switch to a different audio source.

Returns to the DVD menu screen.

Returns to the beginning of the previous chapter if the icon is selected within a few seconds after the playback of the current chapter has started.

Returns to the beginning of the current chapter if the icon is selected a few seconds after the playback of the current chapter has started.

Long-press during playback to fast reverse.

Long-press during pause to play in reverse in slow motion. It stops when you remove your hand from the icon or the commander knob.

Plays the DVD. Select again to pause the playback.

Advances to the beginning of the next chapter.

Long-press during playback to fast forward.

Long-press during pause to play in slow motion. It stops when you remove your hand from the icon or the commander knob.

Changes camera angle each time the icon is selected (usable DVDs only).

Changes display/non-display of the sub titles (usable DVDs only).

Changes the parental lock setting.

Parental lock level and PIN code setting changes are possible.

Pauses the playback and displays the DVD setting screen.

Select to adjust the sound quality.

Refer to Volume/Display/Sound Controls (Search).

Select to change the aspect ratio (horizontal to vertical ratio of the screen). 16:9 Widescreen, 4:3 Letterbox, and 4:3 Pan-scan are available.

Adjusts the screen.

Displays the video setting screen at the bottom of the screen.


  • For safety reasons, images are not displayed while the vehicle is being driven.

  • Slide the of the controller to move the controller.

  • If the mode is switched to DVD mode once the DVD playback has stopped, the playback restarts without displaying the DVD menu screen.

Setting DVD functions

Sound quality and aspect ratio settings can be performed.

Setting sound quality

  1. Select the icon.

  2. Select to adjust the sound quality.

    Refer to Volume/Display/Sound Controls (Search).

Setting aspect ratio

  1. Select the icon.

  2. Select .

  3. Select a desired aspect ratio.

Playback

  1. Select the icon on the home screen to display the Entertainment screen.

  2. Select to switch to the AUX mode. The following icons are displayed in the lower part of the centre display.

Icon

Function

Displays the Entertainment menu. Use to switch to a different audio source.

Displays sound settings to adjust audio quality level.

Refer to Volume/Display/Sound Controls (Search).


  • If a device is not connected to the auxiliary jack, the mode does not switch to the AUX mode.

  • Adjust the audio volume using the portable audio device, commander switch, or audio control switch.

  • Audio adjustments can also be made using the portable audio device's volume setting.

  • If the connection plug is pulled out from the auxiliary jack while in AUX mode, noise may occur.

Playback

  1. Select the icon on the home screen to display the Entertainment screen.

  2. Select or to switch the USB mode. The following icons are displayed in the lower part of the centre display.

Icon

Function

Displays the Entertainment menu. Use to switch to a different audio source.

Category list is displayed.

Current track list is displayed.

Select a desired track to play it.

Plays the current track repeatedly.

Select it again to play the tracks in the current track list repeatedly.

When selected again, the function is cancelled.

Tracks in the current track list are played randomly.

Select it again to cancel.

Starts playing a track similar to the current track using Gracenote®'s More Like This™.

Select the desired song from the category list to cancel More Like This™.

If selected within a few seconds from the beginning of a song which has started to play, the previous song is selected.

If more than a few seconds have elapsed, the song currently being played is replayed from the beginning.

Long-press to fast reverse. It stops when you remove your hand from the icon or the commander knob.

Track is played. When selected again, playback is temporarily stopped.

Advances to the beginning of the next song.

Long-press to fast forward.

Displays sound settings to adjust audio quality level.

Refer to Volume/Display/Sound Controls (Search).


  • If a file name in the USB memory is too long, it could cause operation problems such as not being able to playback the song.

    (Recommended: Within 80 characters)

  • The album art may not display depending on the album art size.

  • To move to the desired location on the track, move the slider indicating the playback time.

  • The appearance of the repeat and shuffle icons changes depending on the type of operation in which the function is used.

Category list

Select the icon to display the following category list.

Select a desired category and item.

Category

Function

Playlist*1

Displays playlists on the device.

Artist

Displays the artist name list.

All the tracks or tracks for each album of the selected artist can be played.

Album

Displays the album name list.

Song

All the tracks in the device are displayed.

Genre

Displays the genre list.

All the tracks or tracks per album or artist in the selected genre can be played.

Audiobook*2

Displays the audiobook list.

Chapters can be selected and played.

Podcast*2

Displays the podcast list.

Episode can be selected and played.

Folder*3

Displays the folder/file list.

  1. Playlist folders of Apple devices are not supported.

  2. Apple device only

  3. USB-Sticks and USB-Android™ device only

Example of use (to play all tracks in USB device)

(Method 1)

  1. Select to display the category list.

  2. Select .

    All the tracks in the USB device are displayed.

  3. Select a desired track.

    The selected track is played. All the tracks in the USB device can be played by continuing playback.


Only the tracks in the desired category selected in Step 2 are played.

(Method 2)*1

  1. Select to display the category list.

  2. Select .

    All the folders in the USB device are displayed.

  3. Select .

    All the tracks in the USB device are displayed.

  4. Select a desired track.

    The selected track is played. All the tracks in the USB device can be played by continuing playback.

  1. Can be operated using an Android™ device or USB flash memory.


Only the tracks in the desired folder selected in Step 3 are played.

Introduction

Bluetooth® Hands-Free outline

When a Bluetooth® device (mobile phone) is connected to the vehicle's Bluetooth® unit via radio wave transmission, a call can be made or received by pressing the talk button, pick-up button, or hang-up button on the audio remote control switch, or by operating the centre display. For example, even if a device (mobile phone) is in your coat pocket, a call can be made without taking the device (mobile phone) out and operating it directly.

Bluetooth® audio outline

When a portable audio unit equipped with the Bluetooth® communication function is paired to the vehicle, you can listen to music stored on the paired portable audio device from the vehicle's speakers. It is not necessary to connect the portable audio device to the vehicle's external input terminal. After programming, operate the vehicle audio control panel to play/stop the audio.


  • For your safety, a device can be paired only when the vehicle is parked. If the vehicle starts to move, the pairing procedure will end. Park the vehicle in a safe place before pairing.

  • The communication range of a Bluetooth® equipped device is about 10 meters (32 ft) or less.

  • Basic audio operation is available using voice commands even if Bluetooth® is not connected.

  • For safety reasons, operation of the centre display is disabled while the vehicle is being driven. However, items not displayed in grey can be operated using the commander switch while the vehicle is being driven.


Some Bluetooth® mobile devices are not compatible with the vehicle. Consult an Authorised Mazda Repairer, Mazda's call centre or Web support centre for information regarding Bluetooth® mobile device compatibility:


Phone:

(Germany)

0800 4263 738 (8:00―18:00 Central European Time)

(Except Germany)

00800 4263 7383 (8:00―18:00 Central European Time)

(Worldwide)

49 (0) 6838 907 287 (8:00―18:00 Central European Time)

Web:

http://www.mazdahandsfree.com

Applicable Bluetooth® specification (Recommended)

Ver. 1.1/1.2/2.0 EDR/2.1 EDR/3.0 (conformity)

Device pairing

To use Bluetooth® audio and Hands-Free, the device equipped with Bluetooth® has to be paired to the unit using the following procedure. A maximum of 7 devices including Bluetooth® audio devices and hands-free mobile phones can be paired.


  • The Bluetooth® system may not operate for 1 or 2 minutes after the ignition is switched to ACC or ON. However, this does not indicate a problem. If the Bluetooth® system does not connect automatically after 1 or 2 minutes have elapsed, make sure that the Bluetooth® setting on the device is normal and attempt to reconnect the Bluetooth® device from the vehicle side.

  • If Bluetooth®-enabled devices are used in the following locations or conditions, connection via Bluetooth® may not be possible.

    • The device is in a location hidden from the centre display such as behind or under a seat, or inside the glove compartment.

    • The device contacts or is covered by a metal object or body.

    • The device is set to power-saving mode.

Pairing Procedure

  1. Select the icon on the home screen to display the Settings screen.

  2. Select the tab.

  3. Select .

  4. Turn the Bluetooth® setting on.

  5. Select to display the message and switch to the device operation.

  6. Using your device, perform a search for the Bluetooth® device (Peripheral device).

  7. Select “Mazda” from the device list searched by the device.

  8. (Device with Bluetooth® version 2.0)

    Input the displayed 4-digit pairing code into the device.

    (Device with Bluetooth® version 2.1 or higher)

    Make sure the displayed 6-digit code on the audio is also displayed on the device, and touch the .

    Connection permission and phonebook access permission for your mobile device may be required depending on the mobile device.

  9. If pairing is successful, the functions of the device connected to Bluetooth® are displayed.

  10. (Devices compatible with Mazda E-mail / SMS function)

    SMS (Short Message Service) messages, and E-mail for the device are downloaded automatically. A download permission operation for your device may be required depending on the device.


When Call history and messages are downloaded automatically, each automatic download setting must be on.

Refer to Communication Settings (Search).

After a device is registered, the system automatically identifies the device. By activating Bluetooth® Hands-Free again, or by activating Bluetooth® Hands-Free first after switching the ignition from OFF to ACC, the device connection condition is indicated in the centre display.

IMPORTANT note about pairing and automatic reconnection:

  • If pairing is redone on the same mobile phone device, first clear “Mazda” displayed on the Bluetooth® setting screen of the mobile device.

  • When the OS of the device is updated, the pairing information may be deleted. If this happens, reprogramme the pairing information to the Bluetooth® unit.

  • Before you pair your device, make sure that Bluetooth® is “ON”, both on your phone and on the vehicle.

Switching to Bluetooth® audio mode

To listen to music or voice audio recorded to a Bluetooth® audio device, switch to the Bluetooth® audio mode to operate the audio device using the audio system control panel. Any Bluetooth® audio device must be paired to the vehicle's Bluetooth® unit before it can be used.

Refer to Bluetooth® Preparation (Search).

  1. Turn on the Bluetooth® audio device's power.

  2. Switch the ignition to ACC or ON.

  3. Select the icon on the home screen to display the Entertainment screen.

  4. When is selected, switches to the Bluetooth® audio mode to begin playback.


  • If the Applications screen is not displayed on the device, Bluetooth® audio may not play on the centre display.

  • If Bluetooth® audio is used after using Aha™ or Stitcher™ radio, the application on the mobile device has to be closed first.

  • If the Bluetooth® audio device does not begin playback, select the icon.

  • If the mode is switched from Bluetooth® audio mode to another mode (radio mode), audio playback from the Bluetooth® audio device stops.

Bluetooth® Audio Device Information Display

If a Bluetooth® audio device is connected, the following information is displayed in the centre display.

AVRCP Ver. lower than 1.3

AVRCP Ver. 1.3

AVRCP Ver. 1.4 or higher

Device name

X

X

X

Remaining battery charge of device

X

X

X

Song name

X

X

Artist name

X

X

Album name

X

X

Playback time

X

X

Genre name

X

X

Album art image

X: Available

—: Not available


Some information may not display depending on the device, and if the information cannot be displayed, “Unknown - - -” is indicated.

Page top