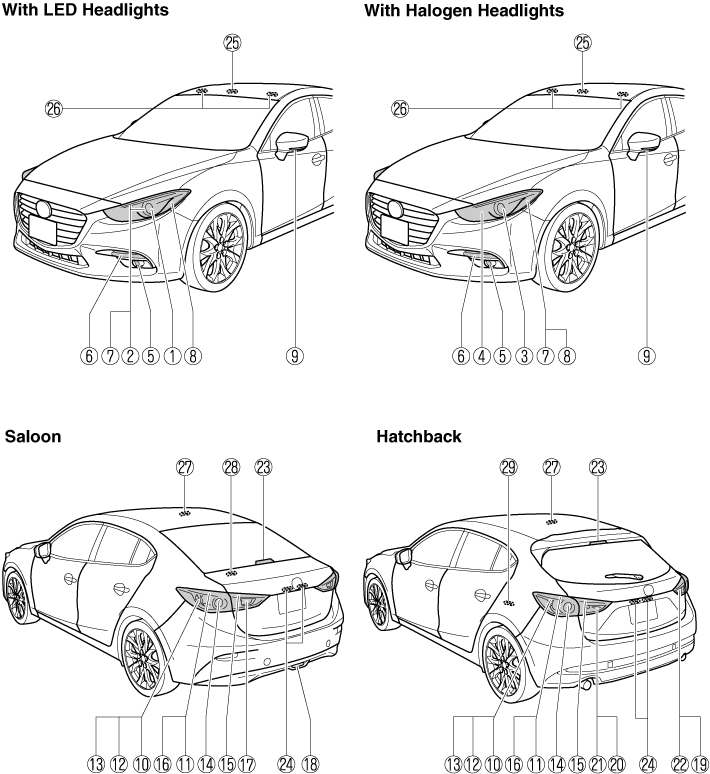
Headlights (Low/High beam)
Running lights
Headlights (Low beam)
Headlights (High beam)/Running lights (Some Models)
Front fog lights (Some Models)
Front direction indicator lights
Position lights
Front side-marker lights (Some Models)
Side direction indicator lights
Brake lights (With LED headlights)
Tail lights (With LED headlights)
Brake lights/Tail lights (With halogen headlights)
Rear side-marker lights (Bulb type) (Some Models)
Rear direction indicator lights
Tail lights (With LED headlights)
Rear side-marker lights (LED type) (Some Models)
Reverse lights
Rear fog light (Some Models)
Reverse light (Left-hand drive model)
Reverse light (Right-hand drive model)
Rear fog light*1/Reverse light*2 (Left-hand drive model)
Rear fog light*1/Reverse light*2 (Right-hand drive model)
High-mount brake light
Number plate lights
Overhead lights (Front)/Map lights (Some Models)
Vanity mirror lights (Some Models)
Overhead lights (Rear) (Some Models)
Boot light (Saloon)
Luggage compartment light (Hatchback)
With rear fog light
Without rear fog light
Never touch the glass portion of a halogen bulb with your bare hands and always wear eye protection when handling or working around the bulbs:
When a halogen bulb breaks, it is dangerous. These bulbs contain pressurised gas. If one is broken, it will explode and serious injuries could be caused by the flying glass.
If the glass portion is touched with bare hands, body oil could cause the bulb to overheat and explode when lit.
Always keep halogen bulbs out of the reach of children:
Playing with a halogen bulb is dangerous. Serious injuries could be caused by dropping a halogen bulb or breaking it some other way.
When removing the lens or lamp unit using a flathead screwdriver, make sure that the flathead screwdriver does not contact the interior terminal. If the flathead screwdriver contacts the terminal, a short circuit may occur.
To replace the bulb, contact an expert repairer, we recommend an Authorised Mazda Repairer.
If the halogen bulb is accidentally touched, it should be cleaned with rubbing alcohol before being used.
Use the protective cover and carton for the replacement bulb to dispose of the old bulb promptly and out of the reach of children.
Headlights (With LED headlights), Running lights/Position lights (With LED headlights)
The LED bulb cannot be replaced as a single unit because it is an integrated unit.
The LED bulb has to be replaced with the unit. We recommend an Authorised Mazda Repairer when the replacement is necessary.
Headlights (With halogen headlights)
Low-beam bulbs
If you are changing the right bulb, start the engine, turn the steering wheel all the way to the left, and turn off engine. If you are changing the left bulb, turn the steering wheel to the right, and turn off engine.
Make sure the headlight switch is off.
Pull the centre of each plastic retainer and remove the retainers.
Turn the screw anticlockwise and remove it, and then partially peel back the mudguard.
Disconnect the connector from the unit by pressing the tab on the connector with your finger and pulling the connector downward.
Turn the socket and bulb assembly to remove it. Carefully remove the bulb from its socket in the reflector by gently pulling it straight backward out of the socket.
Install the new bulb in the reverse order of the removal procedure.
High-beam bulbs (With running lights)
Make sure the ignition is switched off, and the headlight switch is off.
Lift the bonnet.
Turn the cover anticlockwise and remove it.
Turn the socket and bulb assembly anticlockwise and remove it.
Install the new bulb in the reverse order of the removal procedure.
High-beam bulbs (Without running lights)
Make sure the ignition is switched off, and the headlight switch is off.
Lift the bonnet.
Disconnect the connector from the unit by pressing the tab on the connector with your finger and pulling the connector downward.
Turn the socket and bulb assembly to remove it. Carefully remove the bulb from its socket in the reflector by gently pulling it straight backward out of the socket.
Install the new bulb in the reverse order of the removal procedure.
Front direction indicator lights, Position lights/Front side-marker lights (With halogen headlights) (Some Models), Front side-marker lights (With LED headlights) (Some Models)
If you are changing the right bulb, start the engine, turn the steering wheel all the way to the left, and turn off engine. If you are changing the left bulb, turn the steering wheel to the right, and turn off engine.
Make sure the headlight switch is off.
Pull the centre of each plastic retainer and remove the retainers.
Turn the screw anticlockwise and remove it, and then partially peel back the mudguard.
(Front direction indicator lights)
Disconnect the connector from the unit by pressing the tab on the connector with your finger and pulling the connector.
Turn the socket and bulb assembly anticlockwise and remove it.
Disconnect the bulb from the socket.
Front direction indicator lights
Position lights/Front side-marker lights (With halogen headlights), Front side-marker lights (With LED headlights)
Install the new bulb in the reverse order of the removal procedure.
Front fog lights (Some Models), Side direction indicator lights, Brake lights (LED type), Tail lights/Rear side-marker lights (LED type) (Some Models), Tail lights (Boot lid side/Liftgate side) (Some Models), High-mount brake light
The LED bulb cannot be replaced as a single unit because it is an integrated unit.
The LED bulb has to be replaced with the unit. We recommend an Authorised Mazda Repairer when the replacement is necessary.
Rear direction indicator lights, Brake lights/Tail lights/Rear side-marker lights (Bulb type) (Some Models)
Saloon
Make sure the ignition is switched off, and the headlight switch is off.
Pull the centre of each plastic retainer and remove the retainers.
Remove boot end trim.
Pull the centre of each plastic retainer and remove the retainers.
Peel back the boot side trim.
Turn the socket and bulb assembly anticlockwise and remove it.
Rear direction indicator lights
Brake lights/Tail lights/Rear side-marker lights (Bulb type)
Disconnect the connector from the unit by pressing the tab on the connector with your finger and pulling the connector.
Rear direction indicator lights
Brake lights/Tail lights/Rear side-marker lights (Bulb type)
Disconnect the bulb by pulling it out.
Rear direction indicator lights, Brake lights/Tail lights/Rear side-marker lights (Bulb type)
Install the new bulb in the reverse order of the removal procedure.
Hatchback
(Left side)
Make sure the ignition is switched off, and the headlight switch is off.
Remove the cover.
Turn the socket and bulb assembly anticlockwise and remove it.
Rear direction indicator lights
Brake lights/Tail lights (Bulb type)
Disconnect the connector from the unit by pressing the tab on the connector with your finger and pulling the connector.
Rear direction indicator lights
Brake lights/Tail lights (Bulb type)
Disconnect the bulb by pulling it out.
Rear direction indicator lights, Brake lights/Tail lights (Bulb type)
Install the new bulb in the reverse order of the removal procedure.
Insert the cover tabs and install the cover.
Verify that the cover is securely installed.
(Right side)
Make sure the ignition is switched off, and the headlight switch is off.
Turn the knob and remove the cover.
Turn the wing bolt and jack screw anticlockwise.
Remove the jack
Turn the socket and bulb assembly anticlockwise and remove it.
Rear direction indicator lights
Brake lights/Tail lights/Rear side-marker lights (Bulb type)
Disconnect the connector from the unit by pressing the tab on the connector with your finger and pulling the connector.
Rear direction indicator lights
Brake lights/Tail lights/Rear side-marker lights (Bulb type)
Disconnect the bulb by pulling it out.
Rear direction indicator lights, Brake lights/Tail lights/Rear side-marker lights (Bulb type)
Install the new bulb.
Insert the wing bolt into the jack with the jack screw pointing to the down and turn the wing bolt clockwise to temporarily tighten it.
Turn the jack screw in the direction shown in the figure.
Turn the wing bolt completely to secure the jack.
If the jack is not completely secured, it could rattle while driving. Make sure the jack screw is sufficiently tightened.
Install the cover in the reverse order of the removal procedure.
Insert the cover tabs and install the cover.
Verify that the cover is securely installed.
Reverse lights(Saloon), Reverse lights/Rear fog light (Hatchback) (Some Models)
Saloon
Make sure the ignition is switched off, and the headlight switch is off.
Pull the centre of each plastic retainer and remove the retainers.
Peel back the boot lid trim.
Disconnect the electrical connector from the bulb by pressing the tab on the connector with your finger and pulling the connector.
Turn the socket and bulb assembly anticlockwise and remove it.
Disconnect the bulb from the socket.
Install the new bulb in the reverse order of the removal procedure.
Hatchback
Make sure the ignition is switched off, and the headlight switch is off.
Remove the cover.
Disconnect the electrical connector from the bulb by pressing the tab on the connector with your finger and pulling the connector.
Turn the socket and bulb assembly anticlockwise and remove it.
Disconnect the bulb from the socket.
Install the new bulb in the reverse order of the removal procedure.
Rear fog light (Saloon) (Some Models)
Make sure the ignition is switched off, and the headlight switch is off.
Turn the socket and bulb assembly anticlockwise and remove it.
Disconnect the bulb from the socket.
Install the new bulb in the reverse order of the removal procedure.
Number plate lights
Saloon
Make sure the ignition is switched off, and the headlight switch is off.
Pull the centre of each plastic retainer and remove the retainers.
Peel back the boot lid trim.
Disconnect the connector from the unit by pressing the tab on the connector with your finger and pulling the connector.
Turn the socket and bulb assembly anticlockwise and remove it.
Disconnect the bulb from the socket.
Install the new bulb in the reverse order of the removal procedure.
Hatchback
Make sure the ignition is switched off, and the headlight switch is off.
Wrap a flathead screwdriver with a soft cloth to prevent damage to the lens, and then remove the lens by carefully prying on the edge of the lens with a flathead screwdriver.
Disconnect the bulb by pulling it out.
Install the new bulb in the reverse order of the removal procedure.
Overhead lights (Front)/Map lights (Some Models), Overhead lights (Front) (Some Models), Overhead lights (Rear) (Some Models), Vanity mirror lights (Some Models)
Wrap a small flathead screwdriver with a soft cloth to prevent damage to the lens, and then remove the lens by carefully prying on the edge of the lens with the flathead screwdriver.
Disconnect the bulb by pulling it out.
Overhead lights (Front)/Map lights (Some Models)
Overhead lights (Front) (Some Models)
Overhead lights (Rear) (Some Models)
Vanity mirror lights (Some Models)
Install the new bulb in the reverse order of the removal procedure.
Boot light (Saloon)
Press both sides of the lens cap to remove it.
Disconnect the bulb by pulling it out.
Install the new bulb in the reverse order of the removal procedure.
Luggage compartment light (Hatchback)
Wrap a small flathead screwdriver with a soft cloth to prevent damage to the lens and remove the lens by carefully prying on the edge of the lens with the flathead screwdriver.
Disconnect the connector from the unit by pressing the tab on the connector with your finger and pulling the connector.
Disconnect the bulb by pulling it out.
Install the new bulb in the reverse order of the removal procedure.