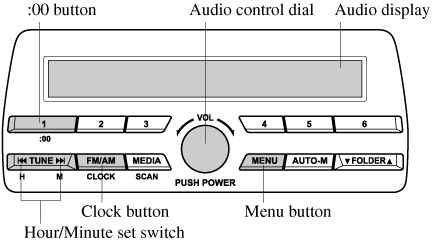
Power ON/OFF
Switch the ignition to ACC or ON. Press the power/volume dial to turn the audio system on. Press the power/volume dial again to turn the audio system off.
Volume adjustment
To adjust the volume, turn the power/volume dial. Turn the power/volume dial clockwise to increase volume, anticlockwise to decrease it.
Audio sound adjustment
Press the menu button () to select the function. The selected function will be indicated.
Turn the audio control dial to adjust the selected functions as follows:
Indication |
Setting value |
|
---|---|---|
Turn Anticlockwise |
Turn Clockwise |
|
ALC (Automatic volume adjustment) |
Level decrease |
Level increase |
BASS (Low pitch sound) |
Decrease bass |
Increase bass |
TREB (Treble sound) |
Decrease treble |
Increase treble |
FADE (Front/back volume balance) |
Shift the sound to the front |
Shift the sound to the rear |
BAL (Left/right volume balance) |
Shift the sound to the left |
Shift the sound to the right |
BEEP (Audio operation sound) |
Off |
On |
BT SETUP |
Select mode |
|
12Hr (12 Hr/24 Hr time adjustment) |
12Hr (Flashing) |
24Hr (Flashing) |
If not operated for several seconds, the display returns to the previous display. To reset bass, treble, fade, and balance, press the menu button () for 2 seconds. The unit will beep and “CLEAR” will be displayed.
ALC (Automatic volume adjustment)
The automatic level control (ALC) changes the audio volume automatically according to the vehicle speed. The faster the vehicle speed, the higher the volume increases. ALC has ALC OFF and ALC LEVEL 1 to 7 modes. At ALC LEVEL 7, the amount that the volume can increase is at the maximum. Select the mode according to the driving conditions.
BEEP (Audio operation sound)
The setting for the operation sound when pressing and holding a button can be changed. The initial setting is ON. Set to OFF to mute the operation sound.
BT SETUP mode
Music and other audio such as voice data recorded on portable audio devices and mobile phones available on the market which are equipped with the Bluetooth® transmission function can be listened to via wireless transmission over the vehicle's speakers. Using the BT SETUP mode, these devices can be programmed to the Bluetooth® unit or changed (Search).
12Hr 24Hr (12 Hr/24 Hr time adjustment)
Rotating the audio control dial switches the display between 12 and 24-hour clock time (Search).
Setting the time
The clock can be set at any time when the ignition is switched to ACC or ON.
To adjust the time, press the clock button () for about 2 seconds until a beep is heard.
The clock's current time will flash.
Time adjustment
To adjust the time, press the hour/minute set button (,
) while the clock's current time is flashing.
The hours advance while the hour set button () is pressed. The minutes advance while the minute set button (
) is pressed.
Press the clock button () again to start the clock.
Time resetting
Press the clock button () for about 2 seconds until a beep is heard.
Press the :00 button (1).
When the button is pressed, the time will be reset as follows:
(Example)
12:01―12:29→12:00
12:30―12:59→1:00
When the :00 button (1) is pressed, the seconds will start at “00”.
Switching between 12 and 24-hour clock time:
Press the menu button () several times until 12 and 24-hour clock time are displayed. Turn the audio control dial in either direction, select the desired clock setting while the preferred clock time is flashing.
Radio ON
Press a band selector button () to turn the radio on.
Band selection
Successively pressing the band selector button () switches the bands as follows: FM1→FM2→AM.
The selected mode will be indicated.
If the FM broadcast signal becomes weak, reception automatically changes from STEREO to MONO for reduced noise.
Tuning
The radio has the following tuning methods: Manual, Seek, Scan, Preset channel, and Auto memory tuning. The easiest way to tune stations is to set them on preset channels.
Manual tuning
Select the station by pressing the tuning button (,
) lightly.
Seek tuning
Automatic search for radio stations starts when the tuning button (,
) is pressed until a beep sound is heard. The search stops when a station is found.
If you continue to press and hold the button, the frequency will continue changing without stopping.
Scan tuning
Press and hold the scan button () to automatically sample strong stations. Scanning stops at each station for about 5 seconds. To hold a station, press and hold the scan button (
) again during this interval.
Preset channel tuning
The 6 preset channels can be used to store 6 AM and 12 FM stations.
To set a channel first select AM, FM1, or FM2. Tune to the desired station.
Press a channel preset button for about 2 seconds until a beep is heard. The preset channel number or station frequency will be displayed. The station is now held in the memory.
Repeat this operation for the other stations and bands you want to store. To tune one in the memory, select AM, FM1, or FM2 and then press its channel preset button. The station frequency or the channel number will be displayed.
Auto memory tuning
This is especially useful when driving in an area where the local stations are not known.
Press and hold the auto memory button () for about 2 seconds until a beep is heard; the system will automatically scan and temporarily store up to 6 stations with the strongest frequencies in each selected band in that area.
After scanning is completed, the station with the strongest frequency will be tuned and its frequency displayed. Press and release the auto memory button () to recall stations from the auto-stored stations. One stored station will be selected each time and its frequency and channel number will be displayed.
If no stations can be tuned after scanning operations, “A” will be displayed.
Audio can be heard from the vehicle's speakers by connecting a commercially-available portable audio unit to the auxiliary jack.
Use a commercially-available, non-impedance (3.5) stereo mini plug lead. Contact an expert repairer, we recommend an Authorised Mazda Repairer for details.
In addition, audio can be played from the vehicle audio device by connecting a USB device to the USB port.
Refer to AUX/USB mode (Search).