Owner Maintenance

Owner Maintenance Precautions

Routine Service

We highly recommend that these items be inspected daily, or at least every week.


Improper or incomplete service may result in problems. This section gives instructions only for items that are easy to perform.


As explained in the Introduction (Search), several procedures can be done only by a qualified service technician with special tools.


Improper do-it yourself maintenance during the warranty period may affect warranty coverage. For details, read the separate Mazda Warranty statement provided with the vehicle. If you are unsure about any servicing or maintenance procedure, have it done by an expert repairer, we recommend an Authorised Mazda Repairer.


There are strict environmental laws regarding the disposal of waste oil and fluids. Please dispose of your waste properly and with due regard to the environment.


We recommend that you entrust the oil and fluid changes of your vehicle to an Authorised Mazda Repairer.


Do not perform maintenance work if you lack sufficient knowledge and experience or the proper tools and equipment to do the work. Have maintenance work done by a qualified technician:

Performing maintenance work on a vehicle is dangerous if not done properly. You can be seriously injured while performing some maintenance procedures.

If you must run the engine while working under the bonnet, make certain that you remove all jewellery (especially rings, bracelets, watches, and necklaces) and all neckties, scarves, and similar loose clothing before getting near the engine or cooling fan which may turn on unexpectedly:

Working under the bonnet with the engine running is dangerous. It becomes even more dangerous when you wear jewellery or loose clothing.

Either can become entangled in moving parts and result in injury.

Pull over to a safe location, then switch the ignition off and make sure the fan is not running before attempting to work near the cooling fan:

Working near the cooling fan when it is running is dangerous. The fan could continue running indefinitely even if the engine has stopped and the engine compartment temperature is high. You could be hit by the fan and seriously injured.

Do not leave items in the engine compartment:

After you have finished checking or doing servicing in the engine compartment, do not forget and leave items such as tools or rags in the engine compartment.

Tools or other items left in the engine compartment could cause engine damage or a fire leading to an unexpected accident.

Bonnet


Always check that the bonnet is closed and securely locked:

A bonnet that is not closed and securely locked is dangerous as it could fly open while the vehicle is moving and block the driver's vision which could result in a serious accident.

Opening the Bonnet

  1. With the vehicle parked, pull the release handle to unlock the bonnet.


  2. Insert your hand into the bonnet opening, slide the latch lever to the right, and lift up the bonnet.


    The lever is located a little to the left of centre when facing the vehicle.

  3. Grasp the support rod in the padded area and secure it in the support rod hole indicated by the arrow to hold the bonnet open.


Closing the Bonnet

  1. Check under the bonnet area to make certain all filler caps are in place and all loose items (e.g. tools, oil containers, etc.) have been removed.

  2. Lift the bonnet, grasp the padded area on the support rod, and secure the support rod in the clip. Verify that the support rod is secured in the clip before closing the bonnet.


  3. Lower the bonnet slowly to a height of about 20 cm (7.9 in) above its closed position and then let it drop.


When closing the bonnet, do not push it excessively such as by applying your weight. Otherwise, the bonnet could be deformed.

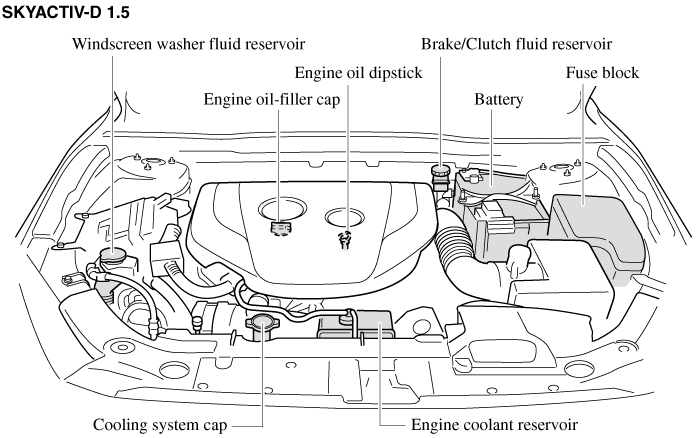
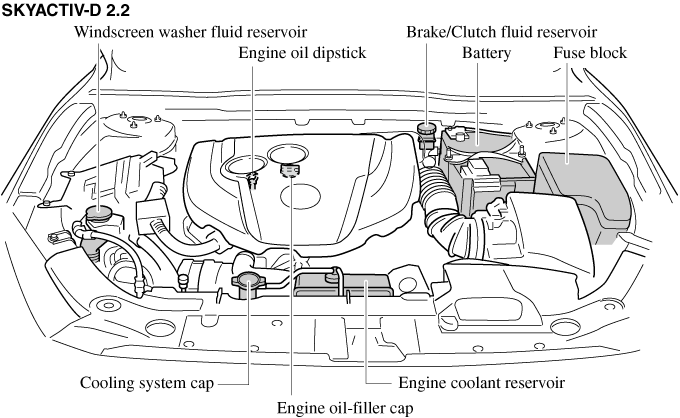
Engine Compartment Overview


Engine Oil


Changing the engine oil should be done by an expert repairer, we recommend an Authorised Mazda Repairer.

Recommended Oil

In order to keep the maintenance interval (Search) and to protect the engine from damage caused by poor lubrication, it is vitally important to make use of engine oil with the correct specification. Do not use oils which do not meet the following specifications or requirements. Use of unsuitable oil may lead to engine damage which is not covered by the Mazda Warranty.


Engine oil viscosity, or thickness, has an effect on fuel economy and cold-weather operation (starting and oil flow).

Low-viscosity engine oils can provide improved fuel economy and cold-weather performance.


When choosing an oil, consider the temperature range your vehicle will operate in before the next oil change.

Then select the recommended viscosity from the chart.


  • Using oils of viscosity besides those recommended for specific temperature ranges could result in engine damage.

  • (SKYACTIV-D 1.5 and SKYACTIV-D 2.2)

    SKYACTIV-D 1.5 and SKYACTIV-D 2.2 use specified oil. Please confirm the specification in owner's manual. If engine oil other than the specified oil is used, the Diesel Particulate Filter effective period of use will be shortened or the Diesel Particulate Filter may be damaged.


(MZR 1.6, SKYACTIV-G 1.5, SKYACTIV-G 2.0, and SKYACTIV-G 2.5)

  • It is normal for all engines to consume engine oil under normal driving conditions.

    Engine oil consumption may be as high as 0.8 L/1,000 km (1 L/800 miles). This may be as a result of evaporation, internal ventilation or burning of the lubricating oil in the working engine. Oil consumption may be higher when the engine is new due to the running-in process. Oil consumption is also dependant on engine speed and engine load. Under extreme driving conditions, oil consumption may be higher.

(SKYACTIV-D 1.5 and SKYACTIV-D 2.2)

  • Whenever the engine oil is replaced, the vehicles engine control unit needs to be reset as soon as possible. Otherwise the wrench indicator light or engine oil warning light may turn on. To reset the engine control unit, consult an expert repairer, we recommend an Authorised Mazda Repairer or refer to the vehicle engine control unit reset procedure (Search).

  • Inspect the engine oil level periodically. When inspecting the engine oil, if the engine oil level is exceeds the “X” mark on the dipstick, replace the engine oil. This should be done by an expert repairer, we recommend an Authorised Mazda Repairer. When replacing the engine oil, inspect the oil level using the oil dipstick and refill so that the engine oil level is within the range between MIN and MAX as shown in the figure.


Vehicle Engine Control Unit Reset Procedure


This procedure is intended for vehicles with SKYACTIV-D 1.5 and SKYACTIV-D 2.2, and vehicles with SKYACTIV-G 1.5 or SKYACTIV-G 2.0 which have the engine oil flexible maintenance setting selected.

After replacing the engine oil, have a repair shop such as an Authorised Mazda Repairer perform the initialization (engine oil data resetting) of the recorded value. If the value recorded by the computer is not initialized, the wrench indicator light may not turn off or it may turn on earlier than normal.


The initialization (engine oil data resetting) of the recorded value can be performed using the following procedure:

  1. Switch the ignition OFF.

  2. Switch the ignition ON with the selector pressed, and press and hold the selector for about 5 seconds until the master warning light flashes.


  3. After the master warning light flashes for several seconds, the initialization is completed.

Inspecting Engine Oil Level

  1. Be sure the vehicle is on a level surface.

  2. Warm up the engine to normal operating temperature.

  3. Turn it off and wait at least 5 minutes for the oil to return to the sump.

  4. Pull out the dipstick, wipe it clean, and reinsert it fully.

    MZR 1.6


    SKYACTIV-G 1.5, SKYACTIV-G 2.0, and SKYACTIV-G 2.5


    SKYACTIV-D 1.5


    SKYACTIV-D 2.2


    (SKYACTIV-D 1.5 and SKYACTIV-D 2.2)

    When inspecting the engine oil level, pull out the dipstick straight without twisting. In addition, when inserting the dipstick, always insert it without twisting so that the “X” mark faces the front of the vehicle.

  5. Pull it out again and examine the level.

    The level is normal if it is between the MIN and MAX marks.

    If it is near or below MIN, add enough oil to bring the level to MAX.


    Do not overfill the engine oil. This may cause engine damage.

  6. Make sure the O-ring on the dipstick is positioned properly before reinserting the dipstick.

  7. Reinsert the dipstick fully.

Engine Coolant

Inspecting Coolant Level


Do not use a match or live flame in the engine compartment. DO NOT ADD COOLANT WHEN THE ENGINE IS HOT:

A hot engine is dangerous. If the engine has been running, parts of the engine compartment can become very hot. You could be burned. Carefully inspect the engine coolant in the coolant reservoir, but do not open it.

Pull over to a safe location, then switch the ignition off and make sure the fan is not running before attempting to work near the cooling fan:

Working near the cooling fan when it is running is dangerous. The fan could continue running indefinitely even if the engine has stopped and the engine compartment temperature is high. You could be hit by the fan and seriously injured.

Do not remove either cooling system cap when the engine and radiator are hot:

When the engine and radiator are hot, scalding coolant and steam may shoot out under pressure and cause serious injury.


Changing the coolant should be done by an expert repairer, we recommend an Authorised Mazda Repairer.

Inspect the antifreeze protection and coolant level in the coolant reservoir at least once a year―at the beginning of the winter season―and before travelling where temperatures may drop below freezing.


Inspect the condition and connections of all cooling system and heater hoses.

Replace any that are swollen or deteriorated.


The coolant should be at full in the radiator and between the F and L marks on the coolant reservoir when the engine is cool.

MZR 1.6, SKYACTIV-G 1.5, SKYACTIV-G 2.0, and SKYACTIV-G 2.5


SKYACTIV-D 1.5


SKYACTIV-D 2.2


If it is at or near L, add enough coolant to the coolant reservoir to provide freezing and corrosion protection and to bring the level to F.

Securely tighten the coolant reservoir tank cap after adding coolant.


  • Radiator coolant will damage paint.

    Rinse it off quickly if spilled.

  • If the “FL22” mark is shown on or near the cooling system cap, use of FL-22 is recommended when replacing engine coolant. Using engine coolant other than FL-22 may cause serious damage to the engine and cooling system.


If the coolant reservoir is empty or new coolant is required frequently, consult an expert repairer, we recommend an Authorised Mazda Repairer.

Brake/Clutch Fluid

Inspecting Brake/Clutch Fluid Level


If the brake/clutch fluid level is low, have the brakes inspected:

A low brake/clutch fluid level is dangerous.

A low level could indicate brake lining wear or a brake system leak which could cause the brakes to fail and lead to an accident.

The brakes and clutch draw fluid from the same reservoir.

Inspect the fluid level in the reservoir regularly. It should be kept between the MAX and MIN lines.

The level normally drops with accumulated distance, a condition associated with wear of brake and clutch linings. If it is excessively low, have the brake/clutch system inspected by an expert repairer, we recommend an Authorised Mazda Repairer.

Left-hand drive model

Type A

Type B

Right-hand drive model

Automatic Transaxle Fluid (4-speed transaxle)

Inspecting Automatic Transaxle Fluid Level

The automatic transaxle fluid level should be inspected regularly. Measure it using the following procedure:


The volume of fluid changes with temperature. Fluid must be checked while idling the engine without driving at normal operating temperature.

  1. Park on a level surface and set the parking brake firmly.

  2. Start the engine and depress the brake pedal.

  3. Move the shift lever through all ranges and set it at P.


    Make sure the brake pedal is applied before shifting the shift lever:

    Shifting the shift lever without first depressing the brake pedal is dangerous. The vehicle could move suddenly and cause an accident.

  4. With the engine still idling, pull out the dipstick, wipe it clean, and put it back.

  5. Pull it out again.

    The proper fluid level is marked on the dipstick as follows.


Fluid hot scale A

When the vehicle has been driven and the fluid is at normal operating temperature, about 65°C (150°F), the level must be between Full and Low.

Fluid cold scale B

When the engine has not been running and the outside temperature is about 20°C (70°F), the level must be between Full and Low.


  • Use the cold scale only as a reference.

  • If outside temperature is lower than about 20°C (70°F), start the engine and inspect the fluid level after the engine reaches operating temperature.

  • If the vehicle has been driven for an extended period at high speeds or in city traffic in hot weather, inspect the level only after stopping the engine and allowing the fluid to cool for 30 minutes.

If the ATF level does not reach the appropriate level, consult an expert repairer, we recommend an Authorised Mazda Repairer to have the vehicle inspected.


Inspect the fluid on both sides of the dipstick in a well lit area for an accurate reading.

Window and Headlight Washer Fluid

Inspecting Washer Fluid Level


Use only windscreen washer fluid or plain water in the reservoir:

Using radiator antifreeze as washer fluid is dangerous. If sprayed on the windscreen, it will dirty the windscreen, affect your visibility, and could result in an accident.

Inspect fluid level in the washer fluid reservoir; add fluid if necessary.


Type A

Type B


Use plain water if washer fluid is unavailable.

But use only washer fluid in cold weather to prevent it from freezing.


Front and rear washer fluid is supplied from the same reservoir.

Body Lubrication

All moving points of the body, such as door and bonnet hinges and locks, should be lubricated each time the engine oil is changed. Use a nonfreezing lubricant on locks during cold weather.


Make sure the bonnet's secondary latch keeps the bonnet from opening when the primary latch is released.

Wiper Blades


  • Hot waxes applied by automatic car washers have been known to affect the wiper's ability to clean windows.

  • To prevent damage to the wiper blades, do not use petrol, paraffin, paint thinner, or other solvents on or near them.

  • When the wiper lever is in the AUTO position and the ignition is switched ON, the wipers may move automatically in the following cases:

    • If the windscreen above the rain sensor is touched.

    • If the windscreen above the rain sensor is wiped with a cloth.

    • If the windscreen is struck with a hand or other object.

    • If the rain sensor is struck with a hand or other object from inside the vehicle.

    Be careful not to pinch hands or fingers as it may cause injury, or damage the wipers. When washing or servicing the vehicle, make sure the wiper lever is in the OFF position.

Contamination of either the windscreen or the blades with foreign matter can reduce wiper effectiveness. Common sources are insects, tree sap, and hot wax treatments used by some commercial car washes.


If the blades are not wiping properly, clean the window and blades with a good cleaner or mild detergent; then rinse thoroughly with clean water. Repeat if necessary.

Replacing Windscreen Wiper Blades

When the wipers no longer clean well, the blades are probably worn or cracked.

Replace them.


To prevent damage to the wiper arms and other components, do not try to sweep the wiper arm by hand.


When raising both windscreen wiper arms, raise the driver's side wiper arm first. When lowering the wiper arms, slowly lower the wiper arm from the passenger's side first while supporting it with your hand. Forcefully lowering the wiper arms could damage the wiper arm and blade, and may scratch or crack the windscreen.

  1. Raise the wiper arm.

  2. Open the clip and slide the blade assembly in the direction of the arrow.

  3. Tilt the blade assembly and remove it from the arm.


    To prevent damage to the windscreen let the wiper arm down easily, do not let it slap down on the windscreen.

  4. Pull down the blade rubber and slide it out of blade holder.

  5. Remove the metal stiffeners from each blade rubber and install them in the new blade.


    • Do not bend or discard the stiffeners. You need to use them again.

    • If the metal stiffeners are switched, the blade's wiping efficiency could be reduced.

      So do not use the driver's side metal stiffeners on the passenger's side, or vice versa.

    • Be sure to reinstall the metal stiffeners in the new blade rubber so that the curve is the same as it was in the old blade rubber.

  6. Carefully insert the new blade rubber. Then install the blade assembly in the reverse order of removal.

Replacing Rear Window Wiper Blade (Hatchback)

When the wiper no longer cleans well, the blade is probably worn or cracked.

Replace it.


To prevent damage to the wiper arm and other components, do not move the wiper by hand.

  1. Raise the wiper arm and rotate the wiper blade to the right until it unlocks, then remove the blade.


    To prevent damage to the rear window, do not let the wiper arm fall on it.

  2. Pull down the blade rubber and slide it out of the blade holder.


  3. Remove the metal stiffeners from the blade rubber and install them in the new blade.


    Do not bend or discard the stiffeners. You need to use them again.

  4. Carefully insert the new blade rubber.

    Then install the blade assembly in the reverse order of removal.


Battery


Read the following precautions carefully before using the battery or inspecting to ensure safe and correct handling:

Always wear eye protection when working near the battery:

Working without eye protection is dangerous. Battery fluid contains SULPHURIC ACID which could cause blindness if splashed into your eyes. Also, hydrogen gas produced during normal battery operation, could ignite and cause the battery to explode.

Wear eye protection and protective gloves to prevent contact with battery fluid:

Spilled battery fluid is dangerous.

Battery fluid contains SULPHURIC ACID which could cause serious injuries if it gets in eyes, or on the skin or clothing. If this happens, immediately flush your eyes with water for 15 minutes or wash your skin thoroughly and get medical attention.

Always keep batteries out of the reach of children:

Allowing children to play near batteries is dangerous. Battery fluid could cause serious injuries if it gets in the eyes or on the skin.

Keep flames and sparks away from open battery cells and do not allow metal tools to contact the positive () or negative () terminal of the battery when working near a battery. Do not allow the positive () terminal to contact the vehicle body:

Flames and sparks near open battery cells are dangerous. Hydrogen gas, produced during normal battery operation, could ignite and cause the battery to explode. An exploding battery can cause serious burns and injuries. Keep all flames including cigarettes and sparks away from open battery cells.

Keep all flames, including cigarettes, and sparks away from open battery cells:

Flames and sparks near open battery cells are dangerous. Hydrogen gas, produced during normal battery operation, could ignite and cause the battery to explode. An exploding battery can cause serious burns and injuries.


Before performing battery maintenance, remove the battery cover.


Battery Maintenance

To get the best service from a battery:

  • Keep it securely mounted.

  • Keep the top clean and dry.

  • Keep terminals and connections clean, tight, and coated with petroleum jelly or terminal grease.

  • Rinse off spilled electrolyte immediately with a solution of water and baking soda.

  • If the vehicle will not be used for an extended time, disconnect the battery leads and charge the battery every six weeks.

Inspecting Electrolyte Level (Some Models)

A low level of electrolyte fluid will cause the battery to discharge quickly.


Inspect the electrolyte level at least once a week. If it is low, remove the caps and add enough distilled water to bring the level between the upper and lower level (illustration).


Do not overfill.

Examine the specific gravity of the electrolyte with a hydrometer, especially during cold weather. If it is low, recharge the battery.

Battery Recharging


  • Before performing maintenance or recharging the battery, turn off all accessories and stop the engine.

  • To disconnect the battery, remove the negative lead first. Install it last when connecting the battery.

  • Be sure to remove the caps before recharging the battery.

  • (With i-stop system)

    Do not quick-charge the battery.

  • If the battery quickly discharges because, for example, the lights were left on too long with the engine off, slow-charge it as required by battery size and charger capacity.

  • If the battery gradually discharges because of high electric load while the vehicle is being used, recharge it as required by battery size and charger capacity.

Battery Replacement

Contact an Authorised Mazda Repairer for a battery replacement purchase.

Key Battery Replacement

If the buttons on the transmitter are inoperable and the operation indicator light does not flash, the battery may be dead.

Replace with a new battery before the transmitter becomes unusable.


  • Make sure the battery is installed correctly. Battery leakage could occur if it is not installed correctly.

  • When replacing the battery, be careful not to touch any of the internal circuitry and electrical terminals, bend the electrical terminals, or get dirt in the transmitter as the transmitter could be damaged.

  • There is the danger of explosion if the battery is not correctly replaced.

  • Dispose of used batteries according to the following instructions.

    • Insulate the plus and minus terminals of the battery using cellophane or equivalent tape.

    • Never disassemble.

    • Never throw the battery into fire or water.

    • Never deform or crush.

  • Replace only with the same type battery (CR2025 or equivalent).

The following conditions indicate that the battery power is low:

  • The KEY indicator light (green) flashes in the instrument cluster for about 30 seconds after the engine is turned off.

  • The system does not operate and the operation indicator light on the transmitter does not flash when the buttons are pressed.

  • The system's operational range is reduced.

Replacing the battery at an Authorised Mazda Repairer is recommended to prevent damage to the key. If replacing the battery by yourself, follow the instruction.

Replacing the key battery

  1. Press the knob and pull out the auxiliary key.

  2. Twist a tape-wrapped flathead screwdriver in the direction of the arrow and open the cover slightly.

  3. Insert the tape-wrapped flathead screwdriver into the gap and slide it in the direction of the arrow.

  4. Twist the flathead screwdriver in the direction of the arrow and remove the cover.

  5. Remove the battery cap, then remove the battery.


    • Be careful not to allow the rubber ring shown in the figure to be scratched or damaged.

    • If the rubber ring detaches, reattach it before inserting a new battery.

  6. Insert a new battery with the positive pole facing up, and then cover the battery with the battery cap.

  7. Close the cover.

  8. Reinsert the auxiliary key.

Tyres

For reasons of proper performance, safety, and better fuel economy, always maintain recommended tyre inflation pressures and stay within the recommended load limits and weight distribution.


Using Different Tyre Types:

Driving your vehicle with different types of tyres is dangerous. It could cause poor handling and poor braking; leading to loss of control.

Except for the limited use of the temporary spare tyre, use only the same type tyres (radial, bias-belted, bias-type) on all four wheels.

Using Wrong-Sized Tyres:

Using any other tyre size than what is specified for the vehicle (Search) is dangerous. It could seriously affect ride, handling, ground clearance, tyre clearance, and speedometer calibration. This could cause you to have an accident. Use only tyres that are the correct size specified for the vehicle.

Tyre Inflation Pressure


Always inflate the tyres to the correct pressure:

Overinflation or underinflation of tyres is dangerous. Adverse handling or unexpected tyre failure could result in a serious accident.

Refer to Tyres (Search).

Use only a Mazda-genuine tyre valve cap:

Use of a non-genuine part is dangerous as the correct tyre air pressure cannot be maintained if the tyre valve becomes damaged. If the vehicle is driven under this condition, the tyre air pressure will decrease which could result in a serious accident. Do not use any part for the tyre valve cap that is not a Mazda-genuine part.

Inspect all tyre pressures monthly (including the spare (Some Models)) when the tyres are cold. Maintain recommended pressures for the best ride, handling, and minimum tyre wear.

Refer to the specification charts (Search).

After adjusting the tyre pressure, initialization of the tyre pressure monitoring system is necessary to make the system operate normally.

Refer to Tyre Pressure Monitoring System Initialization (Search).


  • Always check tyre pressure when tyres are cold.

  • Warm tyres normally exceed recommended pressures. Do not release air from warm tyres to adjust the pressure.

  • Underinflation can cause reduced fuel economy, uneven and accelerated tyre wear, and poor sealing of the tyre bead, which will deform the wheel and cause separation of tyre from rim.

  • Overinflation can produce a harsh ride, uneven and accelerated tyre wear, and a greater possibility of damage from road hazards.

    Keep your tyre pressure at the correct levels. If one frequently needs inflating, have it inspected.

Tyre Rotation


Rotate tyres periodically:

Irregular tyre wear is dangerous. To equalize tread wear for maintaining good performance in handling and braking, rotate the tyres every 10,000 km (6,250 miles), or sooner if irregular wear develops.

During rotation, inspect them for correct balance.


(Without temporary spare tyre)

Because your vehicle is not equipped with a spare tyre, you cannot do a tyre rotation safely with the jack that comes with your vehicle. Have an expert repairer, we recommend an Authorised Mazda Repairer perform tyre rotation.


Also, inspect them for uneven wear and damage. Abnormal wear is usually caused by one or a combination of the following:


  • Incorrect tyre pressure

  • Improper wheel alignment

  • Out-of-balance wheel

  • Severe braking


After rotation, inflate all tyre pressures to specification (Search) and inspect the wheel nuts for tightness.

After adjusting the tyre pressure, initialization of the tyre pressure monitoring system is necessary to make the system operate normally.

Refer to Tyre Pressure Monitoring System Initialization (Search).


Rotate unidirectional tyres and radial tyres that have an asymmetrical tread pattern or studs only from front to rear, not from side to side. Tyre performance will be reduced if rotated from side to side.

Replacing a Tyre


Always use tyres that are in good condition:

Driving with worn tyres is dangerous. Reduced braking, steering, and traction could result in an accident.

Replace all four tyres at the same time:

Replacing just one tyre is dangerous. It could cause poor handling and poor braking resulting in loss of vehicle control. Mazda strongly recommends that you replace all four tyres at the same time.

If a tyre wears evenly, a wear indicator will appear as a solid band across the tread.

Replace the tyre when this happens.

You should replace the tyre before the band crosses the entire tread.

After adjusting the tyre pressure, initialization of the tyre pressure monitoring system is necessary to make the system operate normally.

Refer to Tyre Pressure Monitoring System Initialization (Search).

Temporary Spare Tyre (Some Models)

Inspect the temporary spare tyre at least monthly to make sure it is properly inflated and stored.


The temporary spare tyre condition gradually deteriorates even if it has not been used.

The temporary spare tyre is easier to handle because of its construction which is lighter and smaller than a conventional tyre. This tyre should be used only for an emergency and only for a short distance.


Use the temporary spare tyre only until the conventional tyre is repaired, which should be as soon as possible.


Refer to Tyre (Search).


  • Do not use your temporary spare tyre rim with a snow tyre or a conventional tyre. Neither will properly fit and could damage both tyre and rim.

  • The temporary spare tyre has a tread life of less than 5,000 km (3,000 miles). The tread life may be shorter depending on driving conditions.

  • The temporary spare tyre is for limited use, however, if the tread wear solid-band indicator appears, replace the tyre with the same type of temporary spare (Search).

Replacing a Wheel


Always use wheels of the correct size on your vehicle:

Using a wrong-sized wheel is dangerous. Braking and handling could be affected, leading to loss of control and an accident.


A wrong-sized wheel may adversely affect:

  • Tyre fit

  • Wheel and bearing life

  • Ground clearance

  • Snow-chain clearance

  • Speedometer calibration

  • Headlight aim

  • Bumper height

  • Tyre Pressure Monitoring System


  • When replacing a wheel, make sure the new one is the same as the original factory wheel in diameter, rim width, and offset (inset/outset).

  • For details, contact an expert repairer, we recommend an Authorised Mazda Repairer.


Proper tyre balancing provides the best riding comfort and helps reduce tread wear. Out-of-balance tyres can cause vibration and uneven wear, such as cupping and flat spots.

Light Bulbs

Headlights (Low/High beam)

Running lights

Headlights (Low beam)

Headlights (High beam)/Running lights (Some Models)

Front fog lights (Some Models)

Front direction indicator lights

Position lights

Front side-marker lights (Some Models)

Side direction indicator lights

Brake lights (With LED headlights)

Tail lights (With LED headlights)

Brake lights/Tail lights (With halogen headlights)

Rear side-marker lights (Bulb type) (Some Models)

Rear direction indicator lights

Tail lights (With LED headlights)

Rear side-marker lights (LED type) (Some Models)

Reverse lights

Rear fog light (Some Models)

Reverse light (Left-hand drive model)

Reverse light (Right-hand drive model)

Rear fog light*1/Reverse light*2 (Left-hand drive model)

Rear fog light*1/Reverse light*2 (Right-hand drive model)

High-mount brake light

Number plate lights

Overhead lights (Front)/Map lights (Some Models)

Vanity mirror lights (Some Models)

Overhead lights (Rear) (Some Models)

Boot light (Saloon)

Luggage compartment light (Hatchback)

  1. With rear fog light

  2. Without rear fog light


Never touch the glass portion of a halogen bulb with your bare hands and always wear eye protection when handling or working around the bulbs:

When a halogen bulb breaks, it is dangerous. These bulbs contain pressurised gas. If one is broken, it will explode and serious injuries could be caused by the flying glass.

If the glass portion is touched with bare hands, body oil could cause the bulb to overheat and explode when lit.

Always keep halogen bulbs out of the reach of children:

Playing with a halogen bulb is dangerous. Serious injuries could be caused by dropping a halogen bulb or breaking it some other way.


When removing the lens or lamp unit using a flathead screwdriver, make sure that the flathead screwdriver does not contact the interior terminal. If the flathead screwdriver contacts the terminal, a short circuit may occur.


  • To replace the bulb, contact an expert repairer, we recommend an Authorised Mazda Repairer.

  • If the halogen bulb is accidentally touched, it should be cleaned with rubbing alcohol before being used.

  • Use the protective cover and carton for the replacement bulb to dispose of the old bulb promptly and out of the reach of children.

Replacing Exterior Light Bulbs

Headlights (With LED headlights), Running lights/Position lights (With LED headlights)

The LED bulb cannot be replaced as a single unit because it is an integrated unit.

The LED bulb has to be replaced with the unit. We recommend an Authorised Mazda Repairer when the replacement is necessary.

Headlights (With halogen headlights)

Low-beam bulbs

  1. If you are changing the right bulb, start the engine, turn the steering wheel all the way to the left, and turn off engine. If you are changing the left bulb, turn the steering wheel to the right, and turn off engine.

  2. Make sure the headlight switch is off.

  3. Pull the centre of each plastic retainer and remove the retainers.


  4. Turn the screw anticlockwise and remove it, and then partially peel back the mudguard.


  5. Disconnect the connector from the unit by pressing the tab on the connector with your finger and pulling the connector downward.


  6. Turn the socket and bulb assembly to remove it. Carefully remove the bulb from its socket in the reflector by gently pulling it straight backward out of the socket.


  7. Install the new bulb in the reverse order of the removal procedure.

High-beam bulbs (With running lights)

  1. Make sure the ignition is switched off, and the headlight switch is off.

  2. Lift the bonnet.

  3. Turn the cover anticlockwise and remove it.


  4. Turn the socket and bulb assembly anticlockwise and remove it.


  5. Install the new bulb in the reverse order of the removal procedure.

High-beam bulbs (Without running lights)

  1. Make sure the ignition is switched off, and the headlight switch is off.

  2. Lift the bonnet.

  3. Disconnect the connector from the unit by pressing the tab on the connector with your finger and pulling the connector downward.


  4. Turn the socket and bulb assembly to remove it. Carefully remove the bulb from its socket in the reflector by gently pulling it straight backward out of the socket.


  5. Install the new bulb in the reverse order of the removal procedure.

Front direction indicator lights, Position lights/Front side-marker lights (With halogen headlights) (Some Models), Front side-marker lights (With LED headlights) (Some Models)

  1. If you are changing the right bulb, start the engine, turn the steering wheel all the way to the left, and turn off engine. If you are changing the left bulb, turn the steering wheel to the right, and turn off engine.

  2. Make sure the headlight switch is off.

  3. Pull the centre of each plastic retainer and remove the retainers.


  4. Turn the screw anticlockwise and remove it, and then partially peel back the mudguard.


  5. (Front direction indicator lights)

    Disconnect the connector from the unit by pressing the tab on the connector with your finger and pulling the connector.


  6. Turn the socket and bulb assembly anticlockwise and remove it.

  7. Disconnect the bulb from the socket.

    Front direction indicator lights


    Position lights/Front side-marker lights (With halogen headlights), Front side-marker lights (With LED headlights)


  8. Install the new bulb in the reverse order of the removal procedure.

Front fog lights (Some Models), Side direction indicator lights, Brake lights (LED type), Tail lights/Rear side-marker lights (LED type) (Some Models), Tail lights (Boot lid side/Liftgate side) (Some Models), High-mount brake light

The LED bulb cannot be replaced as a single unit because it is an integrated unit.

The LED bulb has to be replaced with the unit. We recommend an Authorised Mazda Repairer when the replacement is necessary.

Rear direction indicator lights, Brake lights/Tail lights/Rear side-marker lights (Bulb type) (Some Models)

Saloon

  1. Make sure the ignition is switched off, and the headlight switch is off.

  2. Pull the centre of each plastic retainer and remove the retainers.

  3. Remove boot end trim.


  4. Pull the centre of each plastic retainer and remove the retainers.

  5. Peel back the boot side trim.


  6. Turn the socket and bulb assembly anticlockwise and remove it.

    Rear direction indicator lights


    Brake lights/Tail lights/Rear side-marker lights (Bulb type)


  7. Disconnect the connector from the unit by pressing the tab on the connector with your finger and pulling the connector.

    Rear direction indicator lights


    Brake lights/Tail lights/Rear side-marker lights (Bulb type)


  8. Disconnect the bulb by pulling it out.

    Rear direction indicator lights, Brake lights/Tail lights/Rear side-marker lights (Bulb type)


  9. Install the new bulb in the reverse order of the removal procedure.

Hatchback

(Left side)

  1. Make sure the ignition is switched off, and the headlight switch is off.

  2. Remove the cover.


  3. Turn the socket and bulb assembly anticlockwise and remove it.

    Rear direction indicator lights


    Brake lights/Tail lights (Bulb type)


  4. Disconnect the connector from the unit by pressing the tab on the connector with your finger and pulling the connector.

    Rear direction indicator lights


    Brake lights/Tail lights (Bulb type)


  5. Disconnect the bulb by pulling it out.

    Rear direction indicator lights, Brake lights/Tail lights (Bulb type)


  6. Install the new bulb in the reverse order of the removal procedure.

  7. Insert the cover tabs and install the cover.


    Verify that the cover is securely installed.

(Right side)

  1. Make sure the ignition is switched off, and the headlight switch is off.

  2. Turn the knob and remove the cover.


  3. Turn the wing bolt and jack screw anticlockwise.


  4. Remove the jack

  5. Turn the socket and bulb assembly anticlockwise and remove it.

    Rear direction indicator lights


    Brake lights/Tail lights/Rear side-marker lights (Bulb type)


  6. Disconnect the connector from the unit by pressing the tab on the connector with your finger and pulling the connector.

    Rear direction indicator lights


    Brake lights/Tail lights/Rear side-marker lights (Bulb type)


  7. Disconnect the bulb by pulling it out.

    Rear direction indicator lights, Brake lights/Tail lights/Rear side-marker lights (Bulb type)


  8. Install the new bulb.

  9. Insert the wing bolt into the jack with the jack screw pointing to the down and turn the wing bolt clockwise to temporarily tighten it.

  10. Turn the jack screw in the direction shown in the figure.


  11. Turn the wing bolt completely to secure the jack.


    If the jack is not completely secured, it could rattle while driving. Make sure the jack screw is sufficiently tightened.

  12. Install the cover in the reverse order of the removal procedure.

  13. Insert the cover tabs and install the cover.


    Verify that the cover is securely installed.

Reverse lights(Saloon), Reverse lights/Rear fog light (Hatchback) (Some Models)

Saloon

  1. Make sure the ignition is switched off, and the headlight switch is off.

  2. Pull the centre of each plastic retainer and remove the retainers.

  3. Peel back the boot lid trim.


  4. Disconnect the electrical connector from the bulb by pressing the tab on the connector with your finger and pulling the connector.


  5. Turn the socket and bulb assembly anticlockwise and remove it.

  6. Disconnect the bulb from the socket.


  7. Install the new bulb in the reverse order of the removal procedure.

Hatchback

  1. Make sure the ignition is switched off, and the headlight switch is off.

  2. Remove the cover.


  3. Disconnect the electrical connector from the bulb by pressing the tab on the connector with your finger and pulling the connector.


  4. Turn the socket and bulb assembly anticlockwise and remove it.

  5. Disconnect the bulb from the socket.


  6. Install the new bulb in the reverse order of the removal procedure.

Rear fog light (Saloon) (Some Models)

  1. Make sure the ignition is switched off, and the headlight switch is off.

  2. Turn the socket and bulb assembly anticlockwise and remove it.

  3. Disconnect the bulb from the socket.


  4. Install the new bulb in the reverse order of the removal procedure.

Number plate lights

Saloon

  1. Make sure the ignition is switched off, and the headlight switch is off.

  2. Pull the centre of each plastic retainer and remove the retainers.

  3. Peel back the boot lid trim.


  4. Disconnect the connector from the unit by pressing the tab on the connector with your finger and pulling the connector.


  5. Turn the socket and bulb assembly anticlockwise and remove it.

  6. Disconnect the bulb from the socket.


  7. Install the new bulb in the reverse order of the removal procedure.

Hatchback

  1. Make sure the ignition is switched off, and the headlight switch is off.

  2. Wrap a flathead screwdriver with a soft cloth to prevent damage to the lens, and then remove the lens by carefully prying on the edge of the lens with a flathead screwdriver.

  3. Disconnect the bulb by pulling it out.


  4. Install the new bulb in the reverse order of the removal procedure.

Replacing Interior Light Bulbs

Overhead lights (Front)/Map lights (Some Models), Overhead lights (Front) (Some Models), Overhead lights (Rear) (Some Models), Vanity mirror lights (Some Models)

  1. Wrap a small flathead screwdriver with a soft cloth to prevent damage to the lens, and then remove the lens by carefully prying on the edge of the lens with the flathead screwdriver.

  2. Disconnect the bulb by pulling it out.

    Overhead lights (Front)/Map lights (Some Models)


    Overhead lights (Front) (Some Models)


    Overhead lights (Rear) (Some Models)


    Vanity mirror lights (Some Models)


  3. Install the new bulb in the reverse order of the removal procedure.

Boot light (Saloon)

  1. Press both sides of the lens cap to remove it.

  2. Disconnect the bulb by pulling it out.


  3. Install the new bulb in the reverse order of the removal procedure.

Luggage compartment light (Hatchback)

  1. Wrap a small flathead screwdriver with a soft cloth to prevent damage to the lens and remove the lens by carefully prying on the edge of the lens with the flathead screwdriver.


  2. Disconnect the connector from the unit by pressing the tab on the connector with your finger and pulling the connector.


  3. Disconnect the bulb by pulling it out.


  4. Install the new bulb in the reverse order of the removal procedure.

Fuses

Your vehicle's electrical system is protected by fuses.


If any lights, accessories, or controls do not work, inspect the appropriate circuit protector. If a fuse has blown, the inside element will be melted.


If the same fuse blows again, avoid using that system and consult an expert repairer, we recommend an Authorised Mazda Repairer as soon as possible.

Fuse Replacement

Replacing the fuses on the vehicle's left side

If the electrical system does not work, first inspect the fuses on the vehicle's left side.


  1. Make sure the ignition is switched off, and other switches are off.

  2. Open the fuse panel cover.

  3. Pull the fuse straight out with the fuse puller provided on the fuse block located in the engine compartment.

  4. Inspect the fuse and replace it if it is blown.

  5. Insert a new fuse of the same amperage rating, and make sure it fits tightly. If it does not fit tightly, have an expert install it. We recommend an Authorised Mazda Repairer.

    If you have no spare fuses, borrow one of the same rating from a circuit not essential to vehicle operation, such as the AUDIO or OUTLET circuit.


    Always replace a fuse with a genuine Mazda fuse or equivalent of the same rating. Otherwise you may damage the electric system.

  6. Reinstall the cover and make sure that it is securely installed.

Replacing the fuses under the bonnet

If the headlights or other electrical components do not work and the fuses in the cabin are normal, inspect the fuse block under the bonnet. If a fuse is blown, it must be replaced. Follow these steps:


  1. Make sure the ignition is switched off, and other switches are off.

  2. Remove the fuse block cover.

  3. If any fuse but the MAIN fuse is blown, replace it with a new one of the same amperage rating.


    Do not replace the main fuse and multiplex slow blow fuse by yourself. Have an Authorised Mazda Repairer perform the replacement:

    Replacing these fuses by yourself is dangerous because they are high current fuses. Incorrect replacement could cause an electrical shock or a short circuit resulting in a fire.

  4. Reinstall the cover and make sure that it is securely installed.

Fuse Panel Description

Fuse block (Engine compartment)


DESCRIPTION

FUSE RATING

PROTECTED COMPONENT

1

FOG

15 A

Front fog lights (Some Models)

2

H/L HI

20 A

Headlight high beam

3

H/CLEAN

20 A

Headlight washer (Some Models)

4

STOP

10 A

Brake lights, Rear fog light (Some Models)

5

ROOM

15 A

Overhead light

6

7.5 A

Engine control system (Some Models)

7

FUEL WARM

15 A

Fuel warmer (Some Models)

8

HAZARD

25 A

Hazard warning flashers, Direction indicator lights

9

ABS/DSCS

30 A

ABS, Dynamic stability control system (Some Models)

10

METER2

7.5 A

11

AUDIO2

7.5 A

Audio system (Some Models)

12

BOSE

25 A

Bose® Sound System-equipped model (Some Models)

13

AUDIO1

15 A

Audio system (Some Models)

14

FUEL PUMP

15 A

Fuel system (Some Models)

15

HID R DRL

15 A

Headlight (RH)*1

16

AT PUMP

15 A

Transaxle control system (Some Models)

17

HORN

15 A

Horn

18

TAIL

15 A

Tail lights, Number plate lights, Position lights

19

ST HEATER

15 A

Heated steering wheel (Some Models)

20

AT

15 A

Transaxle control system

21

R.WIPER

15 A

Rear window wiper (Some Models)

22

A/C

7.5 A

Air conditioner

23

ENGINE3

15 A

Engine control system

24

ENGINE2

15 A

Engine control system

25

ENGINE1

15 A

Engine control system

26

GLOW SIG

5 A

Engine control system (Some Models)

27

EVVT

20 A

Engine control system (Some Models)

28

WIPER

20 A

Front window wiper and washer

29

DCDC REG

30 A

For protection of various circuits (Some Models)

30

EPB L

FUEL.P2

30 A

Electric parking brake (EPB) (LH) (Some Models)

31

ADD FAN DE

40 A

Cooling fan (Some Models)

32

P.WINDOW1

30 A

Power windows

33

H/L LOW R

15 A

Headlight low beam (RH)*2

34

H/L LOW L HID L

15 A

Headlight (LH)*1, Headlight low beam (LH)*2

35

METER1

10 A

Instrument cluster

36

IG2

30 A

For protection of various circuits

37

EPB R

LPG

30 A

Electric parking brake (EPB) (RH) (Some Models)

38

FUEL.P3

FAN DE

40 A

Fuel system (Some Models)

39

DCDC DE

40 A

For protection of various circuits (Some Models)

40

SRS1

7.5 A

Air bag

41

ENGINE. IG1

15 A

Engine control system

42

C/U IG1

15 A

For protection of various circuits

43

METER3

10 A

Instrument cluster (Some Models)

  1. With LED headlights

  2. With halogen headlights

Fuse block (Left side)


DESCRIPTION

FUSE RATING

PROTECTED COMPONENT

1

P.WINDOW3

P.SEAT D

30 A

Power seat (Some Models)

2

D.LOCK

25 A

Power door locks

3

P.WINDOW2

25 A

Power windows

4

SEAT WARM

20 A

Seat warmer (Some Models)

5

R.OUTLET3

15 A

6

SRS2/ESCL

15 A

Electronic steering lock

7

SUNROOF

10 A

Sunroof (Some Models)

8

M.DEF

7.5 A

Mirror defogger (Some Models)

9

R.OUTLET1

15 A

Accessory sockets (Some Models)

10

MIRROR

7.5 A

Power control mirror

11

F.OUTLET

15 A

Accessory sockets

12

ABS IG

AT IND

7.5 A

AT shift indicator (Some Models)

13

SRS1

7.5 A

14

METER1

10 A

15

C/U IG1

15 A

Page top