Recommended Oil
In order to keep the maintenance interval (Search) and to protect the engine from damage caused by poor lubrication, it is vitally important to make use of engine oil with the correct specification. Do not use oils which do not meet the following specifications or requirements. Use of unsuitable oil may lead to engine damage which is not covered by the Mazda Warranty.

Engine oil viscosity, or thickness, has an effect on fuel economy and cold-weather operation (starting and oil flow).
Low-viscosity engine oils can provide improved fuel economy and cold-weather performance.
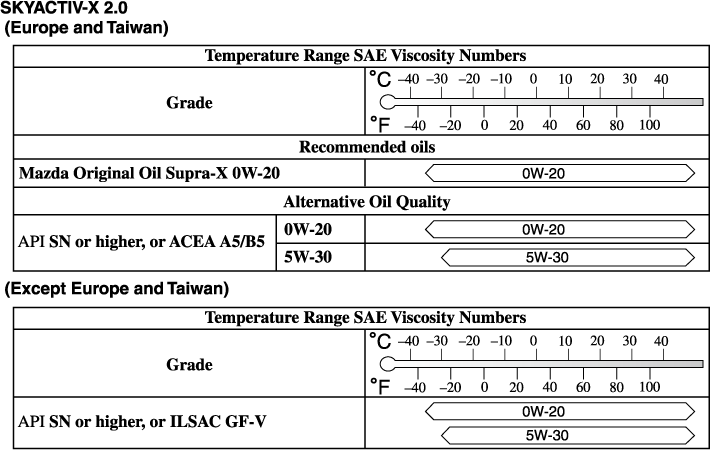
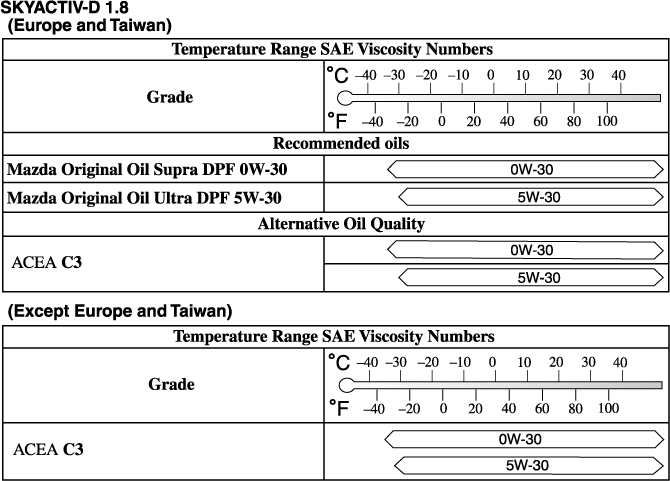
When choosing an oil, consider the temperature range your vehicle will operate in before the next oil change.
Then select the recommended viscosity from the chart.
-
Using oils of viscosity besides those recommended for specific temperature ranges could result in engine damage.
-
(SKYACTIV-D 1.8)
SKYACTIV-D 1.8 uses specified oil. Please confirm the specification in owner's manual. If engine oil other than the specified oil is used, the Diesel Particulate Filter effective period of use will be shortened or the Diesel Particulate Filter may be damaged.


(SKYACTIV-G 1.5, SKYACTIV-G 2.0, SKYACTIV-G 2.5, and SKYACTIV-X 2.0)
-
It is normal for all engines to consume engine oil under normal driving conditions.
Engine oil consumption may be as high as 0.8 L/1,000 km (1 L/800 miles). This may be as a result of evaporation, internal ventilation or burning of the lubricating oil in the working engine. Oil consumption may be higher when the engine is new due to the running-in process. Oil consumption is also dependant on engine speed and engine load. Under extreme driving conditions, oil consumption may be higher.
(SKYACTIV-D 1.8)
-
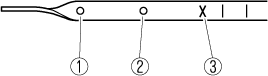
Inspect the engine oil level periodically. When inspecting the engine oil, if the engine oil level is exceeds the “X” mark on the dipstick, replace the engine oil.
When replacing the engine oil, inspect the oil level using the oil dipstick and refill so that the engine oil level is within the range between MIN and MAX as shown in the figure.
-
MIN
-
MAX
-
X Mark
-
-
Whenever the engine oil is replaced, the vehicles engine control unit needs to be reset as soon as possible. Otherwise the wrench indicator light or engine oil warning light may turn on. To reset the engine control unit, consult an expert repairer, we recommend an Authorised Mazda Repairer or refer to the vehicle status monitor section in the MZD Connect Owner's Manual.