Instrument Cluster and Display

Speedometer

The speedometer indicates the speed of the vehicle.

Tachometer

The tachometer shows engine speed in thousands of revolutions per minute (rpm).


Do not run the engine with the tachometer needle in the RED ZONE.

This may cause severe engine damage.


  1. STRIPED ZONE*1

  2. RED ZONE*1

  1. The range varies depending on the type of gauge.


When the tachometer needle enters the STRIPED ZONE, this indicates to the driver that the gears should be shifted before entering the RED ZONE.

Odometer, Trip Meter and Trip Meter Selector

You can switch between the odometer and trip meter display using the TRIP switch.


  1. TRIP switch

  2. Odometer display

  3. Trip meter A display

  4. Trip meter B display

Odometer

The odometer records the total distance the vehicle has been driven.

Trip meter

The driving distance for a specified interval is indicated. Two types (TRIP A, TRIP B) of interval distance and the average fuel economy for each can be measured.


For instance, trip meter A can record the distance from the point of origin, and trip meter B can record the distance from where the fuel tank is filled.


When trip meter A is selected, TRIP A will be displayed. When trip meter B is selected, TRIP B will be displayed.


The trip meter and average fuel economy can be reset by pressing the TRIP switch for 1.5 seconds or more while in each mode.


  • Only the trip meters record tenths of kilometres (miles).

  • The trip record will be erased when:

    • The power supply is interrupted (blown fuse or the battery is disconnected).

    • The vehicle is driven over 9999.9 km (mile).

Engine Coolant Temperature Gauge

Displays the engine coolant temperature. The blue range of the gauge indicates that the engine coolant temperature is low, and the red range of the gauge indicates that the engine coolant temperature is high and overheating.


When the engine coolant temperature gauge needle is in the red range, the engine coolant temperature is extremely high. Drive slowly to reduce engine load. If the engine coolant temperature gauge needle is in the red range, there is the possibility of overheating. Park the vehicle in a safe place immediately and take appropriate measures.

Refer to Overheating (Search).


  • If the engine or engine coolant temperature is high or low, the engine output may be restricted to protect the engine.

Fuel Gauge

The fuel gauge shows approximately how much fuel is remaining in the tank when the ignition is switched ON. We recommend keeping the tank over 1/4 full.


  1. Full

  2. 1/4 Full

  3. Empty


If the low fuel warning light illuminates or the fuel level is very low, refuel as soon as possible.

If inconsistency in engine performance or stalling occurs due to low fuel level conditions, refuel the vehicle as soon as possible and add at least 10 L (2.7 US gal, 2.2 Imp gal) of fuel.

Refer to Low Fuel Warning Indication/Warning Light (Search).


  • After refuelling, it may require some time for the indicator to stabilize. In addition, the indicator may deviate while driving on a slope or curve since the fuel moves in the tank.

  • The direction of the arrow () indicates that the fuel-filler flap is on the left side of the vehicle.

Instrument Panel Illumination

When the lights are turned on with the ignition switched ON, the brightness of the instrument panel illumination is dimmed. However, when the light sensor detects that the surrounding area is bright such as when the lights are turned on in the daytime, the instrument panel illumination does not dim.


  • When the ignition is switched ON in the early evening or at dusk, the instrument panel illumination is dimmed for several seconds until the light sensor detects the brightness of the surrounding area, however, the dimming may cancel after the brightness is detected.

  • When the lights are turned on, the lights-on indicator light in the instrument cluster turns on.

    Refer to Headlights (Search).

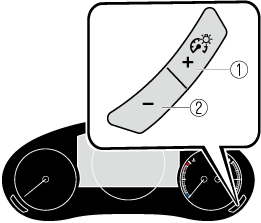
The brightness of the instrument panel and instrument panel illuminations can be adjusted by pressing the instrument panel illumination switch while the instrument panel illumination is dimmed.

  • The brightness increases by pressing the + switch.

  • The brightness decreases by pressing the - switch. If you press the - switch while the instrument cluster is at maximum dimness, a sound is activated to notify you that the current dimmer setting is at maximum dimness.


  1. Bright

  2. Dim

Function for cancelling illumination dimmer

The illumination dimmer can be cancelled by pressing the + switch while the instrument cluster is at maximum dimness and while the ignition is switched ON. If you press the + switch again while the illumination dimmer is cancelled, a sound is activated to notify you that it is cancelled. If the instrument cluster's visibility is reduced due to glare from surrounding brightness, cancel the illumination dimmer.


  • When the illumination dimmer is cancelled, the instrument cluster cannot be dimmed even if the lights are turned on.

  • When the illumination dimmer is cancelled, the screen in the centre display switches to constant display of the daytime screen.

Deceleration Regeneration Charge Display (With M Hybrid)

This displays the status of the charging produced by deceleration regeneration.

Refer to M Hybrid (Search).

Message Display

A message such as the system operation status, a malfunction, or an abnormality is indicated.

Warning/indicator light in instrument cluster turns on/flashes or symbol is indicated on display at same time as message

Check the information regarding the warning/indicator light or indicated symbol.

Refer to If a Warning Indication/Warning Lights (Search).

Refer to If a Indication/Indicator Lights (Search).

Message only is indicated on display

Follow the instructions indicated on the display. For the display content, refer to the next page.

Refer to If a Message Indicated on Multi-information Display (Search).

Page top