The speedometer indicates the speed of the vehicle.
The display mode can be changed from odometer to trip meter A to trip meter B and then back to odometer by pressing the selector while one of them is displayed. The selected mode will be displayed.
Odometer
The odometer records the total distance the vehicle has been driven.
Trip meter
The trip meter can record the total distance of two trips. One is recorded in trip meter A, and the other is recorded in trip meter B.
For instance, trip meter A can record the distance from the point of origin, and trip meter B can record the distance from where the fuel tank is filled.
When trip meter A is selected, pressing the selector again within one second will change to trip meter B mode.
When trip meter A is selected, TRIP A will be displayed. When trip meter B is selected, TRIP B will be displayed.
The trip meter records the total distance the vehicle is driven until the meter is again reset. Return it to “0.0” by depressing and holding the selector for one second or more. Use this meter to measure trip distances and to compute fuel consumption.
(Vehicles with type C/type D audio)
If the fuel economy data is reset using the fuel economy monitor, or trip A is reset using the trip meter when the function which synchronizes the fuel economy monitor and the trip meter is on, the fuel economy data and trip A are reset simultaneously.
Refer to Fuel Economy Monitor (Search).
Only the trip meters record tenths of kilometres (miles).
The trip record will be erased when:
The power supply is interrupted (blown fuse or the battery is disconnected).
The vehicle is driven over 9999.9 km (mile).
The tachometer shows engine speed in thousands of revolutions per minute (rpm).
Do not run the engine with the tachometer needle in the RED ZONE.
This may cause severe engine damage.
When the tachometer needle enters the STRIPED ZONE, this indicates to the driver that the gears should be shifted before entering the RED ZONE.
Displays the engine coolant temperature. The white gauge indicates that the engine coolant temperature is low, and the red gauge indicates that the engine coolant temperature is high and overheating.
If the engine coolant temperature gauge indicator flashes, there is a possibility of overheating. Park the vehicle in a safe place immediately and take appropriate measures. If the vehicle continues to be driven, it could cause damage to the engine.
Refer to Overheating (Search).
The temperature unit (Centigrade/Fahrenheit) of the engine coolant gauge display changes in conjunction with the temperature unit of the outside temperature display.
Refer to Personalisation Features (Search).
During normal driving, the engine coolant temperature stabilizes at 100 °C (210 °F) or less, and the gauge indicates a range lower than 100 °C (210 °F).
If the engine load increases and the engine coolant temperature exceeds 100 °C (210 °F), the gauge indicates the engine coolant temperature.
The fuel gauge shows approximately how much fuel is remaining in the tank when the ignition is switched ON. We recommend keeping the tank over 1/4 full.
If the low fuel warning light illuminates or the fuel level is very low, refuel as soon as possible.
Refer to Warning Indication/Warning Lights (Search).
After refuelling, it may require some time for the indicator to stabilize. In addition, the indicator may deviate while driving on a slope or curve since the fuel moves in the tank.
The display indicating a quarter or less remaining fuel has more segments to show the remaining fuel level in greater detail.
The direction of the arrow () indicates that the fuel-filler flap is on the left side of the vehicle.
(SKYACTIV-D 2.2)
If inconsistency in engine performance or stalling occurs due to low fuel level conditions, refuel the vehicle as soon as possible and add at least 10 L (2.7 US gal, 2.2 Imp gal) of fuel.
(Without auto-light control)
When the position lights are turned on with the ignition switched ON, the brightness of the instrument panel illumination is dimmed.
(With auto-light control)
When the position lights are turned on with the ignition switched ON, the brightness of the instrument panel illumination is dimmed. However, when the light sensor detects that the surrounding area is bright such as when the position lights are turned on in the daytime, the instrument panel illumination does not dim.
(With auto-light control)
When the ignition is switched ON in the early evening or at dusk, the instrument panel illumination is dimmed for several seconds until the light sensor detects the brightness of the surrounding area, however, the dimmer may cancel after the brightness is detected.
When the position lights are turned on, the position lights indicator light in the instrument cluster turns on.
Refer to Headlights (Search).
The brightness of the instrument cluster and instrument panel illuminations can be adjusted by rotating the knob.
The brightness decreases by rotating the knob to the left. A beep sound will be heard when the knob has been rotated to the maximum dim position.
The brightness increases by rotating the knob to the right.
Function for cancelling illumination dimmer
The illumination dimmer can be cancelled by rotating the instrument panel illumination knob to the right until a beep sound is heard while the instrument cluster is dimmed with the ignition switched ON. If the instrument cluster's visibility is reduced due to glare from surrounding brightness, cancel the illumination dimmer.
(With Multi-information Display)
The illumination dimmer can be cancelled by pressing the instrument panel illumination knob.
When the illumination dimmer is cancelled, the instrument cluster cannot be dimmed even if the position lights are turned on.
When the illumination dimmer is cancelled, the screen in the centre display switches to constant display of the daytime screen.
When the ignition is switched ON, the outside temperature is displayed.
Under the following conditions, the outside temperature display may differ from the actual outside temperature depending on the surroundings and vehicle conditions:
Significantly cold or hot temperatures.
Sudden changes in outside temperature.
The vehicle is parked.
The vehicle is driven at low speeds.
Changing the Temperature Unit of the Outside Temperature Display
The outside temperature unit can be switched between Celsius and Fahrenheit using the following procedure.
(Vehicles with Type C/D)
Settings can be changed by operating the centre display screen.
Refer to Personalisation Features (Search).
(Vehicles without Type C/D)
Press the INFO switch with the ignition switched off and continue pressing the INFO switch for 5 seconds or longer while switching the ignition ON. The outside temperature display flashes.
Press the INFO switch to change the outside temperature unit.
Press and hold the INFO switch for 3 seconds or longer while the outside temperature display is flashing. The outside temperature display illuminates.
When the temperature unit indicated in the outside temperature display is changed, the temperature unit indicated in the engine coolant gauge display changes in conjunction with it.
Outside Temperature Warning (Some Models)
When the outside temperature is low, the indication flashes and a beep sound is heard to warn the driver of the possibility of icy roads.
If the outside temperature is lower than about 4 °C (39 °F), the outside temperature display and the mark flashes for about ten seconds and a beep sound is heard once.
If the outside temperature is lower than -20 °C (-4 °F), the beep sound does not operate. However, the mark illuminates.
The setting status of the adjustable speed limiter is displayed.
The vehicle speed preset using the cruise control is displayed.
(European model)
(Except European model)
The following information can be selected by pressing the INFO switch with the ignition switched ON.
Distance-to-empty mode
Average fuel economy mode
Current fuel economy mode
Compass mode
If you have any problems with your trip computer, consult an expert repairer, we recommend an Authorised Mazda Repairer.
Distance-to-empty mode
This mode displays the approximate distance you can travel on the remaining fuel based on the fuel economy.
The distance-to-empty will be calculated and displayed every second.
(European model)
(Except European model)
Even though the distance-to-empty display may indicate a sufficient amount of remaining driving distance before refuelling is required, refuel as soon as possible if the fuel level is very low or the low fuel warning light illuminates.
The display may not change unless you add more than approximately 9 L (2.3 US gal, 1.9 Imp gal) of fuel.
The distance-to-empty is the approximate remaining distance the vehicle can be driven until all the graduation marks in the fuel gauge (indicating the remaining fuel supply) disappear.
If there is no past fuel economy information such as after first purchasing your vehicle or the information is deleted when the battery leads are disconnected, the actual distance-to empty/range may differ from the amount indicated.
Average fuel economy mode
This mode displays the average fuel economy by calculating the total fuel consumption and the total travelled distance since purchasing the vehicle, re-connecting the battery after disconnection, or resetting the data. The average fuel economy is calculated and displayed every minute.
(European model)
(Except European model)
To clear the data being displayed, press the INFO switch for more than 1.5 seconds.
After pressing the INFO switch, - - - L/100 km (- - - mpg) will be displayed for about 1 minute before the fuel economy is recalculated and displayed.
Current fuel economy mode
This mode displays the current fuel economy by calculating the amount of fuel consumption and the distance travelled.
Current fuel economy will be calculated and displayed every 2 seconds.
(European model)
(Except European model)
When you've slowed to about 5 km/h (3 mph), - - - L/100 km (- - - mpg) will be displayed.
Compass mode
The direction the vehicle is moving is displayed in one of the eight cardinal directions while the vehicle is being driven.
(European model)
(Except European model)
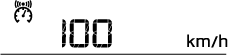
In this mode, the current setting for the vehicle speed alarm is displayed. You can change the vehicle speed setting at which the warning is triggered.
The vehicle speed alarm display is activated at the same time the beep sound is heard. The set vehicle speed flashes several times.
(European model)
(Except European model)
The vehicle speed alarm can be set using the centre display.
Always set the vehicle speed according to the laws and regulations of the country/city in which the vehicle is driven. In addition, always verify the speed of the vehicle using the speedometer.
The vehicle speed alarm function can be set between 30 and 250 km/h (20 and 150 mph).