Audio Set

Basic Operation Method


  • The explanation of functions described in this manual may differ from the actual operation, and the shapes of screens and buttons and the letters and characters displayed may also differ from the actual appearance.

    Additionally, depending on future software updates, the content may successively change without notice.

  • For additional information regarding Mazda Connect, please refer to the following Website.

    http://infotainment.mazdahandsfree.com/

Audio Set has 3 different human interfaces.

  • Commander switch

  • Touch panel

  • Voice recognition with steering switch and microphone

    Refer to Voice Recognition (Search).

Touch panel operation


Do not press the screen strongly or press it with a sharp-pointed object. Otherwise, the screen could be damaged.


For safety reasons, operation of the centre display is disabled while the vehicle is being driven. However, items not displayed in grey can be operated using the commander switch while the vehicle is being driven.


Touch & Tap

  1. Touch or tap on the item indicated on the screen.

  2. The operation is launched and the next item is displayed.


Slide (USB audio only)

  1. Touch the setting item displaying a slider bar.

  2. Touch the slider with your finger and move to the desired level.


Swipe

  1. Touch the screen with your finger and move up or down.

  2. Items which were not displayed can be displayed.


Return to previous screen

  1. Touch the .

Displaying the home screen

  1. Touch the .

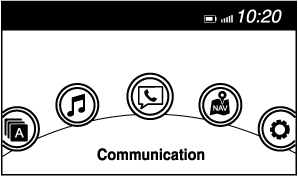
Home screen

Icon

Function

Applications

Information such as average fuel economy, maintenance, and warnings can be verified.

Depending on the grade and specification, the screen display may differ.

Entertainment

Operates audio such as the radio. The audio source most recently used is displayed. An audio source which cannot be used at that time is skipped and the previous audio source is displayed.

To change the audio source, select the icon displayed at the bottom of the screen.

Communication

Bluetooth® related functions are available.

Navigation

Navigation screen is displayed.

If the SD card for the navigation system is not inserted, the compass indicating the direction in which the vehicle is moving is displayed.

The compass may not indicate the correct bearing when the vehicle is stopped or travelling at a slow speed.

Settings

Overall setting menu (Such as display, sound, Bluetooth® and Language).

Depending on the grade and specification, the screen display may differ.

Settings

Display setting

The display settings such as display/non-display and the brightness can be changed.

Refer to Other Equipment/Functions (Search).

Audio sound adjustment

The sound quality settings can be changed.

Refer to Other Equipment/Functions (Search).

Favourites Radio

Selected stations can be registered for convenient operation. Up to 50 stations can be registered. The Favourites list is common to AM, FM and DAB radio.

Registering to Favourites

Long-press the icon to register the current radio station. The registration can also be performed using the following procedure.

  1. Select the icon to display the Favourites list.

  2. Select .

  3. Select .

  4. The station is added to the bottom of the Favourites list.


    If the battery is disconnected, your Favourites list will be not deleted.

Selecting radio station from Favourites

  1. Select the icon to display the Favourites list.

  2. Select the radio frequency to tune in the radio station.

Deleting from Favourites

  1. Select the icon to display the Favourites list.

  2. Select .

  3. Select .

  4. Select the radio frequency you want to delete.

  5. Select .

Changing Favourites list order

  1. Select the icon to display the Favourites list.

  2. Select .

  3. Select .

  4. Select a radio frequency. The selected radio station can be moved.

  5. Slide the radio station or move it using the commander switch, then select .

Radio Data System (RDS)

Alternative frequency (AF)

AF functions on FM stations. Turn on the AF mode. If the radio reception of the current station weakens, the system switches to an alternative station automatically.

If you wish to continue a regional programme, turn on the Region lock (REG) mode.

AF/REG on or off switching

Select the icon while in FM mode to switch to the FM settings screen. AF/REG on or off switching can be performed as follows:

(AF mode on/off)

Select On/Off on the FM settings screen.

(REG mode on/off)

While the AF mode is on, select On/Off.

Traffic announcement (TA)

Select during FM/AM reception to switch to the TA mode.

If a TA broadcast is received while in the TA mode, the TA broadcast intercedes even while using other functions (FM, USB device, AUX, BT audio, Aha™ radio, or Stitcher™ radio), and “Traffic Announcement” is displayed.

If a TA is received on the Entertainment screen, is displayed on the screen. Select to cancel the received TA and return to TA reception stand-by. If a TA is received on a screen other than the Entertainment screen, the selection screens for , , and are displayed on the screen. If is selected, the selection screen turns off when a TA is received while continuing to receive TAs.

Selection from Station List

List of receivable RDS radio stations is displayed. You can easily select the station you want to listen to from the list. If a radio station name is not available, the frequency is displayed. In addition, radio stations which have been programmed to a Genre code (Programme types like Rock, News, and so on) can also be displayed separately by category.


It may take longer to display the station list depending on the reception conditions.

  1. Select the icon to display the radio station list.

  2. Select the radio frequency to tune in the radio station.

(Selecting Genre)

  1. Select the on the station list screen to display the genre list screen.

  2. Select the genre to display the radio station list in the genre.


    Only one Genre can be selected.

What is DAB radio?

DAB radio is a digital broadcasting system for radio.

DAB radio provides a high-quality radio sound source using an auto frequency switching function in boundary areas.

By displaying the radio text, information such as the song name and artist name can be displayed.


This unit is also compatible with DAB radio.

How to use USB mode

Type

Playable data

USB mode

MP3/WMA/AAC/OGG file

This unit does not support a USB 3.0 device. In addition, other devices may not be supported depending on the model or OS version.

The recommended capacity of the USB memory is 16 GB or less.

USB devices formatted to FAT32 are supported (USB devices formatted to other formats such as NTFS are not supported).

Bluetooth®

Bluetooth® Preparation

Device pairing

To use Bluetooth® audio and Hands-Free, the device equipped with Bluetooth® has to be paired to the unit using the following procedure. A maximum of 7 devices including Bluetooth® audio devices and hands-free mobile phones can be paired.


  • The Bluetooth® system may not operate for 1 or 2 minutes after the ignition is switched to ACC or ON. However, this does not indicate a problem. If the Bluetooth® system does not connect automatically after 1 or 2 minutes have elapsed, make sure that the Bluetooth® setting on the device is normal and attempt to reconnect the Bluetooth® device from the vehicle side.

  • If Bluetooth®-enabled devices are used in the following locations or conditions, connection via Bluetooth® may not be possible.

    • The device is in a location hidden from the centre display such as behind or under a seat, or inside the glove compartment.

    • The device contacts or is covered by a metal object or body.

    • The device is set to power-saving mode.

Pairing Procedure

  1. Select the icon on the home screen to display the Settings screen.

  2. Select the tab.

  3. Select .

  4. Turn the Bluetooth® setting on.

  5. Select to display the message and switch to the device operation.

  6. Using your device, perform a search for the Bluetooth® device (Peripheral device).

  7. Select “Mazda” from the device list searched by the device.

  8. (Device with Bluetooth® version 2.0)

    Input the displayed 4-digit pairing code into the device.

    (Device with Bluetooth® version 2.1 or higher)

    Make sure the displayed 6-digit code on the audio is also displayed on the device, and touch the .

    Connection permission and phonebook access permission for your mobile device may be required depending on the mobile device.

  9. If pairing is successful, the functions of the device connected to Bluetooth® are displayed.

  10. (Devices compatible with Mazda E-mail / SMS function)

    SMS (Short Message Service) messages, and E-mail for the device are downloaded automatically. A download permission operation for your device may be required depending on the device.


When Call history and messages are downloaded automatically, each automatic download setting must be on.

Refer to Communication Settings (Search).

After a device is registered, the system automatically identifies the device. By activating Bluetooth® Hands-Free again, or by activating Bluetooth® Hands-Free first after switching the ignition from OFF to ACC, the device connection condition is indicated in the centre display.

IMPORTANT note about pairing and automatic reconnection:

  • If pairing is redone on the same mobile phone device, first clear “Mazda” displayed on the Bluetooth® setting screen of the mobile device.

  • When the OS of the device is updated, the pairing information may be deleted. If this happens, reprogramme the pairing information to the Bluetooth® unit.

  • Before you pair your device, make sure that Bluetooth® is “ON”, both on your phone and on the vehicle.

Changing PIN code

PIN code (4 digits) can be changed.

  1. Select the icon on the home screen to display the Settings screen.

  2. Select the tab.

  3. Select .

  4. Select .

  5. Select .

  6. Input the new PIN code to be set.

  7. Select .

Available Language

The language can be changed.

Refer to Other Equipment/Functions (Search).


Depending on the language, it may only be available for the screen display, but not for the voice recognition.

What is Pandora®?

Pandora® ended services to Australia and New Zealand as of July 31, 2017.

Pandora®*1 is free personalised Internet radio. Simply enter a favourite artist, track, genre, and Pandora® will create a personalised station that plays their music and more like it. Rate songs by giving thumbs-up and thumbs-down feedback to further refine your station, discover new music and help Pandora® play only music you like.

  1. Pandora®, the Pandora® logo, and the Pandora® trade dress are trademarks or registered trademarks of Pandora Media, Inc., used with permission.


  • To operate Pandora® from your Bluetooth® device, perform the following in advance:

    • Create Pandora® account on the Web.

    • Create Pandora® station using Pandora® application.

    • Install Pandora® application on your device.

How to Use Aha™

What is Aha™?

Aha™*1 is an application which can be used to enjoy various Internet content such as Internet radio and podcasts.

Stay connected to your friends activities by getting updates from Facebook and Twitter.

Using the location-based service, nearby services and destinations can be searched or real-time local information can be obtained.

For details on Aha™, refer to “http://www.aharadio.com/”.

  1. Aha™, the Aha™ logo, and the Aha™ trade dress are trademarks or registered trademarks of Harman International Industries, Inc., used with permission.


  • The service content provided by Aha™ varies depending on the country in which the user resides. In addition, the service is not available in some countries.

  • To operate Aha™ from your Bluetooth® device, perform the following in advance:

    • Install the Aha™ application to your device.

    • Create an Aha™ account for your device.

    • Log onto Aha™ using your device.

    • Select the preset station on your device.

  • If the Applications screen is not displayed on the device, Aha™ may not play on the centre display.

Playback

Select the icon on the home screen to display the Entertainment screen. When is selected, the following icons are displayed at the bottom of the centre display. The displayed icon differs depending on the selected station.

In addition, icons other than the following icons may be displayed.

Icon

Function

Displays the Entertainment menu. Use to switch to a different audio source.

Displays the main menu.

Use to switch to other stations.

Displays the content list.

Use to switch to other desired content on the station.

Like*1

Evaluates the current content as “Like”.

Dislike*1

Evaluates the current content as “Dislike”.

Reverses for 15 seconds.

Map

Displays the destination searched by the location based services on the navigation system.

Call

A call can be made to the telephone number of a shop searched using the Location Based Services. Available when a device is connected as a Hands-Free.

Returns to the previous content.

Pauses playback of the content. When selected again, playback resumes.

Goes to the next content.

Fast-forwards for 30 seconds.

Displays sound settings to adjust audio quality level.

Refer to Volume/Display/Sound Controls (Search).

  1. Some stations may use alternate variations of Like and Dislike, based on station type or provider.

Main menu

Select the icon.

Switch the tab and select the station category.

Tab

Function

Presets

Displays the preset station list set on the device.

Select the preset station name to play the station content.

Nearby

Select the desired station.

Guidance is provided to the searched destination near the vehicle's position.

You can designate desired categories previously set using the filter setting on your device.


The available Location Based Services may differ because the services depend on the content provided by Aha™.

Example of use (Location Based Services)

  1. Select the desired station from the “Nearby” tab on the main menu.

    The destination name or address playback starts in the order of the destination name list.

  2. When the icon is selected, the currently displayed destination is displayed on the navigation system.

  3. When the icon is selected, a phone call is placed to the currently displayed destination.

  4. Select the icon to display the content list.

    Selection of other destinations from the list can be made.

Page top