Audio Set [Type B (touchscreen)]

Basic Operation Method


  • The explanation of functions described in this manual may differ from the actual operation, and the shapes of screens and buttons and the letters and characters displayed may also differ from the actual appearance.

    Additionally, depending on future software updates, the content may successively change without notice.

  • For additional information regarding Mazda Connect, please refer to the following Website.

    http://infotainment.mazdahandsfree.com/

Audio Set (Type B) has 3 different human interfaces.

  • Commander switch

  • Touch panel

  • Voice recognition with steering switch and microphone

    Refer to Voice Recognition (Search).

Commander switch operation


For safety reasons, some operations are disabled while the vehicle is being driven.

Volume dial operation

Press the volume knob to mute and pause. However, while an audio source which cannot be paused such as FM radio is playing, only mute is available. Press the volume knob again to resume the audio.

Turn the volume dial to adjust the volume. The volume increases by turning the dial clockwise, and decreases by turning it anticlockwise.

Switches around commander knob

The following operations can be done by pressing the switches around the commander knob.

: Displays the home screen.

: Displays the Entertainment screen.

: Displays the Navigation screen (Only navigation-equipped vehicles). For operation of the Navigation screen, refer to the navigation system manual. If the SD card for the navigation system is not inserted, the compass indicating the direction in which the vehicle is moving is displayed.

: Displays the Favourites screen. Long-press to store particular items in Favourites. (Radio, phonebook and destination of the navigation system can be programmed.)

: Returns to previous screen.

Commander knob operation


(Selection of icons on screen)

  1. Tilt or turn the commander knob and move the cursor to the desired icon.

  2. Press the commander knob and select the icon.


Long-press operation of the commander knob is also possible for some functions.

Touch panel operation


Do not press the screen strongly or press it with a sharp-pointed object. Otherwise, the screen could be damaged.


For safety reasons, operation of the centre display is disabled while the vehicle is being driven. However, items not displayed in grey can be operated using the commander switch while the vehicle is being driven.


Touch & Tap

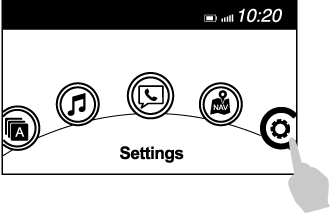
  1. Touch or tap on the item indicated on the screen.

  2. The operation is launched and the next item is displayed.


Slide (USB audio only)

  1. Touch the setting item displaying a slider bar.

  2. Touch the slider with your finger and move to the desired level.
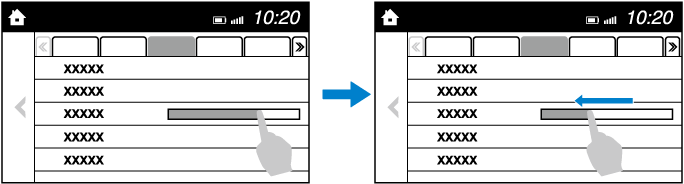
     

Swipe

  1. Touch the screen with your finger and move up or down.

  2. Items which were not displayed can be displayed.


Return to previous screen

  1. Touch the .

Displaying the home screen

  1. Touch the .

Home screen

Icon

Function

Applications

Information such as average fuel economy, maintenance, and warnings can be verified.

Depending on the grade and specification, the screen display may differ.

Entertainment

Operates audio such as the radio and CDs. The audio source most recently used is displayed. An audio source which cannot be used at that time is skipped and the previous audio source is displayed.

To change the audio source, select the icon displayed at the bottom of the screen.

Communication

Bluetooth® related functions are available.

Navigation

Navigation screen is displayed (vehicles with navigation system).

If the SD card for the navigation system is not inserted, the compass indicating the direction in which the vehicle is moving is displayed.

The compass may not indicate the correct bearing when the vehicle is stopped or travelling at a slow speed.

Settings

Overall setting menu (Such as display, sound, Bluetooth® and Language).

Depending on the grade and specification, the screen display may differ.

Settings

Settings for each system

Settings for each system can be changed.

Refer to Other Equipment/Functions (Search).

Operating the Radio

Radio ON

Select the icon on the home screen to display the Entertainment screen. When selecting the desired radio, the following icons are indicated in the lower part of the centre display.

AM/FM Radio

Icon

Function

Displays the Entertainment menu. Use to switch to a different audio source.

Displays the list of receivable RDS radio stations (FM only).*1

Displays the station list.*2

Select to display the frequencies of up to 10 radio stations on the auto memory preset list.

Select the desired frequency.

Displays the Favourites list. Long-press to store radio station currently being aired.

You can search for receivable radio stations.

Scanning stops at each station for about 5 seconds.

Select again to continue receiving the radio station.

You can change the radio frequency manually.

Rotate the commander knob, slide the screen, or touch the radio frequency.

Press or to change the radio frequency one step at a time.

When or is long-pressed, the radio frequency changes continually. It stops when you remove your hand from the icon or the commander knob.

Switches the TA mode on and off.*1

Automatic radio station selection.

When long-pressed, the radio frequency changes continually. It stops when you remove your hand from the icon or the commander knob.

Displays the FM settings screen (FM only).*1

On/Off of Alternative frequency and Region lock can be set.

Displays sound settings to adjust audio quality level.

Refer to Settings (Search).

  1. With Radio Data System (RDS)

  2. Not displayed when listening to FM radio on vehicles with Radio Data System (RDS).


(With Radio Data System (RDS))

When the or icon is selected while FM is selected, each programme is selected.

What is DAB radio?

DAB radio is a digital broadcasting system for radio.

DAB radio provides a high-quality radio sound source using an auto frequency switching function in boundary areas.

By displaying the radio text, information such as the song name and artist name can be displayed.


This unit is also compatible with DAB radio.

DAB radio setting

  1. Select the icon while using DAB radio.

  2. Select the desired item and perform the setting.

    The items which can be set are as follows:

Item

Setting

Function

BAND Settings

Band III/L Band/Both

Frequency band can be changed.

DAB-FM Link

On/Off

On: If the reception condition is bad, an FM station which is providing the same broadcast is searched and switched to.

DAB-DAB Link

On/Off

On: If the reception condition is bad, a DAB station which is providing the same broadcast is searched and switched to.

Radio Text

On/Off

On: Radio text is displayed.


  • The radio text may not be displayed depending on the radio station.

  • The radio text cannot be displayed in DAB-FM mode.

  • If there is no DAB radio signal, “Signal Lost” is displayed on the screen. Change the ensemble or radio station, or perform station list updating.

Operating the Compact Disc (CD) Player (Some Models)

Type

Playable data

Music/MP3/WMA/AAC CD player

  • Music data (CD-DA)

  • MP3/WMA/AAC file


If a disc has both music data (CD-DA) and MP3/WMA/AAC files, playback of the 2 or 3 file types differs depending on how the disc was recorded.

Inserting the CD

Insert the CD into the slot, label-side up. The auto-loading mechanism will set the CD and begin play.


There will be a short lapse before play begins while the player reads the digital signals on the CD.

Ejecting the CD

Press the CD eject button () to eject the CD.

Playback

Select the icon on the home screen with a CD inserted and display the Entertainment screen. When is selected, the following icons are indicated in the lower part of the centre display.

Icon

Function

Displays the Entertainment menu. Use to switch to a different audio source.

(Music CD)

Displays the track list of the CD.

Select the track you want to play.

(MP3/WMA/AAC CD)

Displays the top level folder/file list.

Select the folder you want to select.

The files in the selected folder are displayed.

Select the file you want to play.

(MP3/WMA/AAC CDs only)

Displays the file list of the folder currently being played.

Select the song you want to listen to.

(Music CD)

Replays the song currently being played repeatedly.

Select it again to cancel.

(MP3/WMA/AAC CD)

Replays the song currently being played repeatedly.

When selected again, the songs in the folder are played repeatedly.

Select it again to cancel.

(Music CD)

Plays songs on the CD in random order.

Select it again to cancel.

(MP3/WMA/AAC CD)

Plays songs in the folder in random order.

When selected again, the songs on the CD are played in random order.

Select it again to cancel.

(Music CD)

The beginning of each track on a CD is played to aid in searching for a desired track.

When selected again, the operation is cancelled and the song currently being played continues.

(MP3/WMA/AAC CD)

The beginning of each track in a folder is played to aid in searching for a desired track.

When selected again, the operation is cancelled and the song currently being played continues.


If the audio is operated during scan-play, the track being scan-played is played normally. Then, the audio operation is performed.

If selected within a few seconds of a song which has started to play, the previous song is selected.

If more than a few seconds have elapsed after a song has begun to play, the song currently being played is replayed from the beginning.

Long-press to fast reverse. It stops when you remove your hand from the icon or the commander knob.

Plays a CD. When selected again, playback is temporarily stopped.

Advances to the beginning of the next song.

Long-press to fast forward. It stops when you remove your hand from the icon or the commander knob.

Displays sound settings to adjust audio quality level.

Refer to Settings (Search).

Example of use (When searching for a song from the top level of an MP3/WMA/AAC CD)

  1. Select the icon to display the folder/file list at the top level.

  2. When the folder is selected, folders/file lists in the folder are displayed.

  3. Select the desired song.


  • Select to move to a folder one level higher.

  • The appearance of the repeat and shuffle icons changes depending on the type of operation in which the function is used.

Operating the Digital Versatile Disc (DVD) Player (Some Models)

Type

Playable data

DVD VIDEO/DVD-VR player

DVD VIDEO/DVD-VR file

Inserting the DVD

Insert the DVD into the slot, label-side up. The DVD is inserted automatically and the top menu screen of the DVD disc and controller are displayed.


There will be a short lapse before play begins while the player reads the digital signals on the DVD.

Ejecting the DVD

Press the DVD eject button () to eject the DVD.

Playback

Select the icon on the home screen with a DVD inserted and display the Entertainment screen. When is selected, the DVD top menu screen and the controller are displayed.

When starting the playback by operating the controller, the following icons are displayed at the bottom of the screen.

Icon

Function

Displays the Entertainment menu. Use to switch to a different audio source.

Returns to the DVD menu screen.

Returns to the beginning of the previous chapter if the icon is selected within a few seconds after the playback of the current chapter has started.

Returns to the beginning of the current chapter if the icon is selected a few seconds after the playback of the current chapter has started.

Long-press during playback to fast reverse.

Long-press during pause to play in reverse in slow motion. It stops when you remove your hand from the icon or the commander knob.

Plays the DVD. Select again to pause the playback.

Advances to the beginning of the next chapter.

Long-press during playback to fast forward.

Long-press during pause to play in slow motion. It stops when you remove your hand from the icon or the commander knob.

Changes camera angle each time the icon is selected (usable DVDs only).

Changes display/non-display of the sub titles (usable DVDs only).

Changes the parental lock setting.

Parental lock level and PIN code setting changes are possible.

Pauses the playback and displays the DVD setting screen.

Select to adjust the sound quality.

Refer to Volume/Display/Sound Controls (Search).

Select to change the aspect ratio (horizontal to vertical ratio of the screen). 16:9 Widescreen, 4:3 Letterbox, and 4:3 Pan-scan are available.

Adjusts the screen.

Displays the video setting screen at the bottom of the screen.


  • For safety reasons, images are not displayed while the vehicle is being driven.

  • Slide the of the controller to move the controller.

  • If the mode is switched to DVD mode once the DVD playback has stopped, the playback restarts without displaying the DVD menu screen.

Setting DVD functions

Sound quality and aspect ratio settings can be performed.

Setting sound quality

  1. Select the icon.

  2. Select to adjust the sound quality.

    Refer to Volume/Display/Sound Controls (Search).

Setting aspect ratio

  1. Select the icon.

  2. Select .

  3. Select a desired aspect ratio.

Setting image quality

Brightness, contrast, tint, colour density can be adjusted.

When the icon is selected, the following tabs are displayed at the bottom of the screen.

Tab

Function

Screen brightness can be adjusted using the slider.

Screen contrast can be adjusted using the slider.

Colour tone of the screen can be adjusted using the slider.

Screen colour can be adjusted using the slider.

Screen settings can be reset to initial values.

Select .

How to use AUX mode

Playback

  1. Select the icon on the home screen to display the Entertainment screen.

  2. Select or to switch the USB mode. The following icons are displayed in the lower part of the centre display.

Icon

Function

Displays the Entertainment menu. Use to switch to a different audio source.

Category list is displayed.

Current track list is displayed.

Select a desired track to play it.

Plays the current track repeatedly.

Select it again to play the tracks in the current track list repeatedly.

When selected again, the function is cancelled.

Tracks in the current track list are played randomly.

Select it again to cancel.

Starts playing a track similar to the current track using Gracenote®'s More Like This™.

Select the desired song from the category list to cancel More Like This™.

If selected within a few seconds from the beginning of a song which has started to play, the previous song is selected.

If more than a few seconds have elapsed, the song currently being played is replayed from the beginning.

Long-press to fast reverse. It stops when you remove your hand from the icon or the commander knob.

Track is played. When selected again, playback is temporarily stopped.

Advances to the beginning of the next song.

Long-press to fast forward.

Displays sound settings to adjust audio quality level.

Refer to Settings (Search).


  • If a file name in the USB memory is too long, it could cause operation problems such as not being able to playback the song.

    (Recommended: Within 80 characters)

  • The album art may not display depending on the album art size.

  • To move to the desired location on the track, move the slider indicating the playback time.

  • The appearance of the repeat and shuffle icons changes depending on the type of operation in which the function is used.

Category list

Select the icon to display the following category list.

Select a desired category and item.

Category

Function

Playlist*1

Displays playlists on the device.

Artist

Displays the artist name list.

All the tracks or tracks for each album of the selected artist can be played.

Album

Displays the album name list.

Song

All the tracks in the device are displayed.

Genre

Displays the genre list.

All the tracks or tracks per album or artist in the selected genre can be played.

Audiobook*2

Displays the audiobook list.

Chapters can be selected and played.

Podcast*2

Displays the podcast list.

Episode can be selected and played.

Apple Music Radio*2

Displays Apple Music Radio stations.

A station can be selected and played.

Folder*3

Displays the folder/file list.

  1. Playlist folders of Apple devices are not supported.

  2. Apple device only

  3. USB-Sticks and USB-Android™ device only

Example of use (to play all tracks in USB device)

(Method 1)

  1. Select to display the category list.

  2. Select .

    All the tracks in the USB device are displayed.

  3. Select a desired track.

    The selected track is played. All the tracks in the USB device can be played by continuing playback.


Only the tracks in the desired category selected in Step 2 are played.

(Method 2)*1

  1. Select to display the category list.

  2. Select .

    All the folders in the USB device are displayed.

  3. Select .

    All the tracks in the USB device are displayed.

  4. Select a desired track.

    The selected track is played. All the tracks in the USB device can be played by continuing playback.

  1. Can be operated using an Android™ device or USB flash memory.


Only the tracks in the desired folder selected in Step 3 are played.

How to use the Android Auto™ mode

Insert an Android™ Smartphone-genuine connector cord into the USB terminal indicated by the icon to connect the Smartphone.

Refer to How to connect USB port/Auxiliary jack (Search).


  • When an Android™ Smartphone connected to Bluetooth® is connected to the vehicle's USB terminal, Bluetooth® is used by Android Auto™ and the system switches to Android Auto™ mode.

  • If the Android™ Smartphone is connected to a USB terminal with no icon indicated, the system operates in USB mode.

Display of Android Auto™ Mode Screen

Use any of the following methods to display the Android Auto™ mode screen in the centre display.

  • Select on the home screen, and select from the Applications screen.

  • Select on the home screen.

  • Press and hold on the commander switch.

Android Auto™ mode home screen


The media displayed on the Android Auto™ home screen may differ depending on the use conditions and version of the connected Android™ Smartphone.

No.

Icon

Explanation

Displays the use history of each application. The displayed contents differ depending on the application that has been started and its status.

Switches to the map application.

Switches to the call mode.

Displays the Android Auto™ home screen.

Switches to the Music application.

Switches to the Mazda Connect home screen.

Convenient ways to use Android Auto™ mode

Item

Operation method

Operation using voice recognition*1

Any of the following methods can be used to start the voice recognition mode and operate Android Auto™ by voice.

  • Speak the words, “OK Google”.

  • Select the icon on the Android Auto™ screen.

  • Press and hold the talk button on the audio remote control switch.

To display the NowPlaying screen

When music is playing in Android Auto™ and a screen other than the NowPlaying screen is being displayed, press on the commander switch to display the NowPlaying screen.

To display the MAP screen

When using map route guidance in Android Auto™ and a screen other than the MAP screen is being displayed, press on the commander switch to display the Android Auto™ MAP screen.

To return to the Mazda Connect screen

Press and hold on the commander switch.

  1. The voice recognition function of Mazda Connect cannot be used while Android Auto™ is connected.

To end Android Auto™

To end the Android Auto™ mode, disconnect the Android™-genuine connector cord from the USB terminal or disconnect the Android™ Smartphone from the connector cord.

If Android Auto™ cannot be connected

When the message, “Mobile Device Error”, is displayed and Android Auto™ cannot be connected.

Make sure that the Android™ Smartphone in question is compatible with Android Auto™.

Before trying to reconnect your Android™ Smartphone to the connector cord, do the Bluetooth® device pairing again.

If the Android Auto™ connection setting cannot be changed

Depending on your Android™ Smartphone, the connection setting may have been in charging mode only when the connector cord is connected.

In this case, switch off the Android Auto™ connection setting once, and then switch it back on while connected to USB mode.

The connection setting can be changed to the Android Auto™ connection in the tab on the Settings screen (Search).

Bluetooth®

Introduction

Bluetooth® Hands-Free outline

When a Bluetooth® device (mobile phone) is connected to the vehicle's Bluetooth® unit via radio wave transmission, a call can be made or received by pressing the talk button, pick-up button, or hang-up button on the audio remote control switch, or by operating the centre display. For example, even if a device (mobile phone) is in your coat pocket, a call can be made without taking the device (mobile phone) out and operating it directly.

Bluetooth® audio outline

When a portable audio unit equipped with the Bluetooth® communication function is paired to the vehicle, you can listen to music stored on the paired portable audio device from the vehicle's speakers. It is not necessary to connect the portable audio device to the vehicle's external input terminal. After programming, operate the vehicle audio control panel to play/stop the audio.


  • For your safety, a device can be paired only when the vehicle is parked. If the vehicle starts to move, the pairing procedure will end. Park the vehicle in a safe place before pairing.

  • The communication range of a Bluetooth® equipped device is about 10 meters (32 ft) or less.

  • Basic audio operation is available using voice commands even if Bluetooth® is not connected.

  • For safety reasons, operation of the centre display is disabled while the vehicle is being driven. However, items not displayed in grey can be operated using the commander switch while the vehicle is being driven.


Some Bluetooth® mobile devices are not compatible with the vehicle. Consult an Authorised Mazda Repairer, Mazda's call centre or Web support centre for information regarding Bluetooth® mobile device compatibility:


Phone:

(Germany)

0800 4263 738 (8:00―18:00 Central European Time)

(Except Germany)

00800 4263 7383 (8:00―18:00 Central European Time)

(Worldwide)

49 721 5099 8198 (8:00―18:00 Central European Time)

Web:

http://www.mazdahandsfree.com

Applicable Bluetooth® specification (Recommended)

Ver. 1.1/1.2/2.0 EDR/2.1 EDR/3.0 (conformity)

Component Parts

Microphone (hands-free)

The microphone is used for speaking voice commands or when making a Hands-free call.

Talk button

Activates the voice recognition. In addition, it skips the voice guidance.

Pick-up button

Responds to incoming calls. In addition, after selecting a contact or dialing a number, it places the call when the button is pressed.

Hang-up button

Ends the call or refuses an incoming call. In addition, it ends the voice recognition operation.

Commander switch

The commander switch is used for volume adjustment and display operation. Tilt or turn the commander knob to move the cursor. Press the commander knob to select the icon.

Volume adjustment

The volume dial of the commander switch is used to adjust the volume. Turn the dial to the right to increase volume, to the left to decrease it.

The volume can also be adjusted using the volume button on the steering wheel.


  • Press the volume dial to switch the audio MUTE on and off.

  • If the volume is lower compared to other audio modes, increase the volume from the device side.


Conversation volume and the volume of the voice guidance and ringtone can each be set in advance.

  1. Select the icon on the home screen to display the Communication screen.

  2. Select .

  3. Adjust the and the using the slider.

Bluetooth® Preparation

Device pairing

To use Bluetooth® audio and Hands-Free, the device equipped with Bluetooth® has to be paired to the unit using the following procedure. A maximum of 7 devices including Bluetooth® audio devices and hands-free mobile phones can be paired.


  • The Bluetooth® system may not operate for 1 or 2 minutes after the ignition is switched to ACC or ON. However, this does not indicate a problem. If the Bluetooth® system does not connect automatically after 1 or 2 minutes have elapsed, make sure that the Bluetooth® setting on the device is normal and attempt to reconnect the Bluetooth® device from the vehicle side.

  • If Bluetooth®-enabled devices are used in the following locations or conditions, connection via Bluetooth® may not be possible.

    • The device is in a location hidden from the centre display such as behind or under a seat, or inside the glove compartment.

    • The device contacts or is covered by a metal object or body.

    • The device is set to power-saving mode.

Pairing Procedure

  1. Select the icon on the home screen to display the Settings screen.

  2. Select the tab.

  3. Select .

  4. Turn the Bluetooth® setting on.

  5. Select to display the message and switch to the device operation.

  6. Using your device, perform a search for the Bluetooth® device (Peripheral device).

  7. Select “Mazda” from the device list searched by the device.

  8. (Device with Bluetooth® version 2.0)

    Input the displayed 4-digit pairing code into the device.

    (Device with Bluetooth® version 2.1 or higher)

    Make sure the displayed 6-digit code on the audio is also displayed on the device, and touch the .

    Connection permission and phonebook access permission for your mobile device may be required depending on the mobile device.

  9. If pairing is successful, the functions of the device connected to Bluetooth® are displayed.

  10. (Devices compatible with Mazda E-mail / SMS function)

    SMS (Short Message Service) messages, and E-mail for the device are downloaded automatically. A download permission operation for your device may be required depending on the device.


  • When Call history and messages are downloaded automatically, each automatic download setting must be on.

    Refer to Communication Settings (Search).

  • The E-mail and SMS functions may not be available in some regions.

After a device is registered, the system automatically identifies the device. By activating Bluetooth® Hands-Free again, or by activating Bluetooth® Hands-Free first after switching the ignition from OFF to ACC, the device connection condition is indicated in the centre display.

IMPORTANT note about pairing and automatic reconnection:

  • If pairing is redone on the same mobile phone device, first clear “Mazda” displayed on the Bluetooth® setting screen of the mobile device.

  • When the OS of the device is updated, the pairing information may be deleted. If this happens, reprogramme the pairing information to the Bluetooth® unit.

  • Before you pair your device, make sure that Bluetooth® is “ON”, both on your phone and on the vehicle.

Device selection

If several devices have been paired, the Bluetooth® unit links the device last paired. If you would like to link a different paired device, it is necessary to change the link. The order of device priority after the link has been changed is maintained even when the ignition is switched off.


Connecting other devices

  1. Select the icon on the home screen to display the Settings screen.

  2. Select the tab.

  3. Select .

  4. Turn the Bluetooth® setting on.

  5. Select the name of the device you would like to connect.

  6. selection

    Connects both devices as hands-free and Bluetooth® audio.

    selection

    Connects as a hands-free device.

    selection

    Connects as Bluetooth® audio.


  • The following functions can be used for the Hands-free or audio.

    • Hands-free: Phone calls and E-mail/SMS

    • Audio: Bluetooth® audio, Aha™, Stitcher™ radio

  • The E-mail and SMS functions may not be available in some regions.

Disconnecting a device

  1. Select the icon on the home screen to display the Settings screen.

  2. Select the tab.

  3. Select .

  4. Turn the Bluetooth® setting on.

  5. Select the device name which is currently connected.

  6. Select .

Deleting a device

Selecting and deleting devices

  1. Select the icon on the home screen to display the Settings screen.

  2. Select the tab.

  3. Select .

  4. Turn the Bluetooth® setting on.

  5. Select the device name which you would like to delete.

  6. Select .

  7. Select .

Deleting all devices

  1. Select the icon on the home screen to display the Settings screen.

  2. Select the tab.

  3. Select .

  4. Select .

  5. Select .

  6. Select .

Changing PIN code

PIN code (4 digits) can be changed.

  1. Select the icon on the home screen to display the Settings screen.

  2. Select the tab.

  3. Select .

  4. Select .

  5. Select .

  6. Input the new PIN code to be set.

  7. Select .

Available Language (Some Models)

The language can be changed.

Refer to Other Equipment/Functions (Search).


Depending on the language, it may only be available for the screen display, but not for the voice recognition.

Bluetooth® Audio

Applicable Bluetooth® specification (Recommended)

Ver. 1.1/1.2/2.0 EDR/2.1 EDR/3.0 (conformity)

Response profile

  • A2DP (Advanced Audio Distribution Profile) Ver. 1.0/1.2

  • AVRCP (Audio/Video Remote Control Profile) Ver. 1.0/1.3/1.4


A2DP is a profile which transmits only audio to the Bluetooth® unit. If your Bluetooth® audio device corresponds only to A2DP, but not AVRCP, you cannot operate it using the control panel of the vehicle's audio system. In this case, only the operations on the mobile device are available the same as when a portable audio device for a non-compliant Bluetooth® device is connected to the AUX terminal.

Function

A2DP

AVRCP

Ver. 1.0

Ver. 1.3

Ver. 1.4

Playback

X

X

X

X

Pause

X

X

X

X

File (Track) up/down

X

X

X

Reverse

X

X

Fast-forward

X

X

Text display

X

X

Repeat

Depends on device

Depends on device

Shuffle

Depends on device

Depends on device

Scan

Depends on device

Depends on device

Folder up/down

Depends on device

X: Available

—: Not available


  • The battery consumption of Bluetooth® audio devices increases while Bluetooth® is connected.

  • If a general mobile phone device is USB connected during music playback over the Bluetooth® connection, the Bluetooth® connection is disconnected. For this reason, you cannot have music playback over a Bluetooth® connection and music playback using a USB connection at the same time.

  • If a device which supports AVRCP Ver. 1.6 or higher is connected, song information may not display correctly.

  • The system may not operate normally depending on the Bluetooth® audio device.

Switching to Bluetooth® audio mode

To listen to music or voice audio recorded to a Bluetooth® audio device, switch to the Bluetooth® audio mode to operate the audio device using the audio system control panel. Any Bluetooth® audio device must be paired to the vehicle's Bluetooth® unit before it can be used.

Refer to Bluetooth® Preparation (Type B) (Search).

  1. Turn on the Bluetooth® audio device's power.

  2. Switch the ignition to ACC or ON.

  3. Select the icon on the home screen to display the Entertainment screen.

  4. When is selected, switches to the Bluetooth® audio mode to begin playback.


  • If the Applications screen is not displayed on the device, Bluetooth® audio may not play on the centre display.

  • If Bluetooth® audio is used after using Aha™ or Stitcher™ radio, the application on the mobile device has to be closed first.

  • If the Bluetooth® audio device does not begin playback, select the icon.

  • If the mode is switched from Bluetooth® audio mode to another mode (radio mode), audio playback from the Bluetooth® audio device stops.

Playback

To listen to a Bluetooth® audio device over the vehicle's speaker system, switch the mode to Bluetooth® audio mode. (Refer to “Switching to Bluetooth® audio mode”)

After switching to the Bluetooth® audio mode, the following icons are displayed in the lower part of the display. Icons which can be used differ depending on the version of the Bluetooth® audio device which you are currently using.

Icon

Function

Displays the Entertainment menu. Use to switch to a different audio source.

(AVRCP Ver. 1.4 only)

Displays the top level folder/file list.

Select the folder which you want to select.

The files in the selected folder are displayed.

Select the file you want to play.

(AVRCP Ver. 1.3 or higher)

Replays the song currently being played repeatedly.

When selected again, the songs in the folder are played repeatedly.

Select it again to cancel.

Icons change when the song is repeated or the folder is repeated.

(AVRCP Ver. 1.3 or higher)

Plays songs in the folder in random order.

When selected again, the songs on the device are played in random order.

Select it again to cancel.

Icons change during folder shuffle or device shuffle.

Scans the titles in a folder and plays the beginning of each song to aid in finding a desired song.

When selected again, the beginning of each song on the device is played.

When selected again, the operation is cancelled and the song currently being played continues.

Returns to the beginning of the previous song.

Long-press to fast reverse. It stops when you remove your hand from the icon or the commander knob.

Plays the Bluetooth® audio. When selected again, playback is temporarily stopped.

Advances to the beginning of the next song.

Long-press to fast forward. It stops when you remove your hand from the icon or the commander knob.

Displays sound settings to adjust audio quality level.

Refer to Settings (Search).

Bluetooth® Audio Device Information Display

When connecting a Bluetooth® audio device, the unit searches the following information from the database stored in the vehicle and it is displayed on the screen. The database information stored in this device uses database information in the Gracenote® music recognitions service.

AVRCP Ver. lower than 1.3

AVRCP Ver. 1.3

AVRCP Ver. 1.4 or higher

Device name

X

X

X

Remaining battery charge of device

X

X

X

Song name

X

X

Artist name

X

X

Album name

X

X

Playback time

X

X

Genre name

X

X

Album art image

X

X

X: Available

—: Not available


Some information may not display depending on the device, and if the information cannot be displayed, “Unknown - - -” is indicated.

Refer to Gracenote® Database (Search) for the method of updating the database.

How to Use Aha™

What is Aha™?

Aha™*1 is an application which can be used to enjoy various Internet content such as Internet radio and podcasts.

Stay connected to your friends activities by getting updates from Facebook and Twitter.

Using the location-based service, nearby services and destinations can be searched or real-time local information can be obtained.

For details on Aha™, refer to “http://www.aharadio.com/”.

  1. Aha™, the Aha™ logo, and the Aha™ trade dress are trademarks or registered trademarks of Harman International Industries, Inc., used with permission.


  • The service content provided by Aha™ varies depending on the country in which the user resides. In addition, the service is not available in some countries.

  • To operate Aha™ from your Bluetooth® device, perform the following in advance:

    • Install the Aha™ application to your device.

    • Create an Aha™ account for your device.

    • Log onto Aha™ using your device.

    • Select the preset station on your device.

  • If the Applications screen is not displayed on the device, Aha™ may not play on the centre display.

How to Use Stitcher™ Radio

Bluetooth® Hands-Free

Making a Call

For Mazda Connect, making calls is possible using any of the following 6 methods:

  • Phonebook downloaded from Bluetooth® device (mobile phone) (voice recognition function can be used)

  • Favourites

  • Call record

  • Dialing a telephone number (voice recognition function can be used)

  • “Redial” - Voice recognition command for making a call to the latest outgoing call record.

  • “Call back” - Voice recognition command for making a call to the latest incoming call record.

Phonebook Usage

Telephone calls can be made by saying the contact name in the downloaded phonebook or the name of a person whose phone number has been registered in the Bluetooth® Hands-Free. Refer to Import contact (Download Phonebook).

  1. Press the talk button.

  2. Wait for the beep sound.

  3. Say: “Call XXXXX... (Ex. “John”) Mobile”. (You can also say, “Home”, “Work”, or “Other” instead of “Mobile”, depending on how you set up your contact information.)

  4. Follow the voice guidance to make the call, or simple press the pick-up button on the steering switch during or after the guidance to make the call.

Screen operation

  1. Select the icon on the home screen to display the Communication screen.

  2. Select to display the contact list.

  3. Select the contact you would like to call to display the details for the contact.

  4. Select the desired phone number to make the call.

Import contact (Download Phonebook)

Phonebook data from your device (Mobile phone) can be sent and registered to your Bluetooth® Hands-Free phonebook using Bluetooth®.

(Automatic downloading)

The “Auto Download Contacts” setting must be on. When hands-free is connected to the device, the phonebook is downloaded automatically.

Refer to Communication Settings (Search).

(Manually downloading)

If the “Auto Download Contacts” setting is off, download the phonebook using the following procedure.

  1. Select the icon on the home screen to display the Communication screen.

  2. Select to display the contact list.

  3. Select .

  4. Select or to switch to the device operation.

  5. If is selected, select .

  6. Download will be started from the mobile phone.


  • If “Import All Contacts” is performed after saving the phonebook to the Bluetooth® unit, the phonebook will be overwritten.

  • A maximum of 1,000 contacts can be registered to the phonebook.

  • Phonebook, incoming/outgoing call record, and favourite memories are exclusive to each mobile phone to protect privacy.

Favourites Contacts

A maximum of 50 contacts can be registered. It will take less time to make a call after registering the telephone number. In addition, you do not have to look for the person you want to call in the phonebook.

Registering to your favourites

  1. Select the icon on the home screen to display the Communication screen.

  2. Select to display the favourites list.

  3. Select .

  4. Select or .

  5. Select from the displayed list.


When “Add New Contact” is selected, information such as the selected person’s name is also registered. In addition, when “Add New Contact Details” is selected, only the telephone number of the selected person is registered.

Calling a favourite

  1. Select the icon on the home screen to display the Communication screen.

  2. Select to display the favourites list.

  3. (If only one phone number is registered to contact)

    Select the contact information you would like to call. Go to Step 5.

    (If multiple phone numbers are registered to contact)

    Select the contact you would like to call to display the screen indicating the details for the contact. Go to Step 4.

  4. Select the phone number you would like to call.

  5. Select .

Deleting a favourite

  1. Select the icon on the home screen to display the Communication screen.

  2. Select to display the favourites list.

  3. Select .

  4. Select .

  5. Select the contact information which you would like to delete.

  6. Select .

Changing the display order of your favourites list

  1. Select the icon on the home screen to display the Communication screen.

  2. Select to display the favourites list.

  3. Select .

  4. Select .

  5. The contact can be moved after it is selected.

  6. Slide the contact or move it using the commander switch, then select .

Changing contact name of your favourites

  1. Select the icon on the home screen to display the Communication screen.

  2. Select to display the favourites list.

  3. Select .

  4. Select .

  5. Select the contact to display the keyboard screen.

  6. If a new name is input and is selected, the contact name is stored.


If the contact is long-pressed when the favourites list is displayed, the contact information can be edited (deleted, moved).

Telephone Number Input


Practice this while parked until you are confident you can do it while driving in a non-taxing road situation. If you are not completely comfortable, make all calls from a safe parking position, and only start driving when you can devote your full attention to driving.

  1. Select the icon on the home screen to display the Communication screen.

  2. When is pressed, the dial pad is displayed.

  3. Input the telephone number using the dial pad.

  4. Select to make the call.

Numeral or symbol entry

Use the dial pad.

Long-press the to input +.

Select to delete the currently input value.

Long-press to delete all input values.

Redial Function

Makes a call to the last person called (latest person on outgoing call record) from the mobile phone/vehicle.

  1. Press the talk button.

  2. Wait for the beep sound.

  3. Say: “Redial”

Call back Function

Makes a call to the last person who called your (latest person on incoming call record) mobile phone/vehicle.

  1. Press the talk button.

  2. Wait for the beep sound.

  3. Say: “Call back”

Receiving an Incoming Call

When an incoming call is received, the incoming call notification screen is displayed. The “Incoming Call Notifications” setting must be on.

Refer to Communication Settings (Search).

To accept the call, press the pick-up button on the audio control switch or select on the screen.

To reject the call, press the hang-up button on the audio control switch or select on the screen.

The following icons are displayed on the screen during a call. Icons which can be used differ depending on use conditions.

Icon

Function

Displays the Communication menu.

Ends the call.

Transferring a call from hands-free to a mobile phone

Communication between the Bluetooth® unit and a device (mobile phone) is cancelled, and an incoming call will be received by the device (mobile phone) like a standard call.

Transferring a call from a device (mobile phone) to hands-free

Communication between devices (mobile phone) can be switched to Bluetooth® Hands-Free.

Mute

The microphone can be muted during a call.

When selected again, the mute is cancelled.

To make a 3-way call, select the contacts from the following:

: Call History is displayed.

: The phonebook is displayed.

: The dial pad is displayed. Input the phone number.

The device may be unusable depending on the contractual content.

The call on hold is made to make a 3-way call.

The device may be unusable depending on the contractual content.

Switches the call on hold.

DTMF (Dual Tone Multi-Frequency Signal) Transmission

This function is used when transmitting DTMF via the dial pad. The receiver of a DTMF transmission is generally a home telephone answering machine or a company's automated guidance call centre.

Input the number using a dial pad.


  • If the ignition is switched off during a hands-free call, the line is transferred to the device (Mobile phone) automatically.

  • If the DTMF code has two or more digits or symbols, each one must be transmitted individually.

Call Interrupt

A call can be interrupted to receive an incoming call from a third party.

When is selected or the pick-up button on the steering wheel is pressed, the current call is held and the system switches to the new incoming call.

When is selected, the current call is ended and the system switches to the new incoming call (GSM network only).

When is selected or the hang-up button on the steering wheel is pressed, an incoming call is refused.


  • The function may not be available depending on the contractual content of the mobile device.

  • The function may not be operable depending on the type of the telephone network and the mobile device.

Receiving and Replying to Messages (available only with E-mail/SMS compatible phones)


The E-mail and SMS functions may not be available in some regions.

SMS (Short Message Service) messages, and E-mail received by connected devices can be downloaded, displayed, and played (read by the system).

Additionally, replies can also be made to calls and messages in the received messages.

Downloading messages

Up to 20 new messages can be downloaded and displayed from a connected device.


For E-mail, 20 messages for each account can be downloaded.

(Automatic downloading)

The “Auto Download Email” (E-mail) or “Auto Download SMS” (SMS) setting must be on. A message is downloaded automatically when the Bluetooth® unit is connected to the device.

Refer to Communication Settings (Search).

(Manually downloading)

When the “Auto Download Email” (E-mail) or “Auto Download SMS” (SMS) setting is off, the message is downloaded using the following procedure.

  1. Select the icon on the home screen to display the Communication screen.

  2. Select or to display the Inbox.

  3. Select .

  4. Download will be started from the mobile phone.


  • Attached data is not downloaded.

  • Messages up to 1 kilobyte (E-mail)/140-bytes (SMS) can be downloaded.

  • A message list is created for each device.

  • If the connected device does not correspond to MAP 1.0, the AT command is used to download. The downloaded message indicates that it is already read.

  • Downloading using the AT command may not function depending on the connected device.

  • If an iPhone is connected, the following functions cannot be used.

    • Downloading past messages

    • Replying to messages

  • iPhone is a trademark of Apple Inc., registered in the U.S. and other countries.

Receiving messages

(Method 1)

When a device receives a message, a message received notification is displayed. The “Email Notifications” (E-mail) or “SMS Notifications” (SMS) setting must be on.

Refer to Communication Settings (Search).

Select and display the message.

(Method 2)

  1. Select the icon on the home screen to display the Communication screen.

  2. Select and display the new message list for E-mail and SMS.

  3. Select the message you would like to display.


The following icons are displayed in the lower part of the details on the message. Icons which can be used differ depending on use conditions.

Icon

Function

Displays the Communication menu.

Displays the inbox.

Plays back a message.

When selected again, playback is temporarily stopped.

Displays the previous message.

Displays the next message.

Only replies to the sender of the currently displayed message.

Select the sentence on the displayed reply screen and select the sentence for sending from the preset message.

Select .

(Only E-mail)

Replies to all members including CC.

Select the sentence on the displayed reply screen and select the sentence for sending from the preset message.

Select .

Makes a call to a person who sent a message.

For E-mail, this function may not work depending on the device.

Deletes a message.

The messages stored in a device is also deleted.


Up to 3 preset messages can be selected.

Example of use (verify unread E-mail)

  1. Select the icon on the home screen to display the Communication screen.

  2. Select to display the inbox.


  3. Select the unread message displayed in bold.

  4. The details of the message are displayed and replying to the message, making a call, or playback can be performed.

Changing account for displaying (E-mail only)

  1. Select .

  2. Select the account which you would like to display. Only the messages for the selected account are displayed in the inbox.

Editing preset messages

  1. Select the icon on the home screen to display the Communication screen.

  2. Select .

  3. Select .

  4. Select the preset message which you would like to edit. The keyboard screen is displayed.

  5. When the message is input and is selected, the message is stored as a preset message.


  • Select the icon to change the language.

  • Select the icon to switch between capitalized and lower-case characters.

  • Select the icon to return to the previous screen without storing the edit.

Communication Settings

Select the icon on the home screen to display the Communication screen.

Select to change the setting.

Item

Setting

Function

Bluetooth®

Go to Bluetooth® setting menu.

Refer to Bluetooth® Preparation (Search).

Incoming Call Notifications

On/Off

Notifies when an incoming call is received.

Auto Download SMS

On/Off

Downloads SMS automatically when the Bluetooth® unit is connected to the device.

SMS Notifications

On/Off

Notifies when a new SMS is received.

Auto Download Email*1

On/Off

Downloads E-mail automatically when the Bluetooth® unit is connected to the device.

Email Notifications

On/Off

Notifies when a new E-mail is received.

Auto Download Call History

On/Off

Downloads Call History automatically when the Bluetooth® unit is connected to the device.

Auto Download Contacts*1

On/Off

Downloads the phonebook automatically when the Bluetooth® unit is connected to the device.

Ringtone

Fixed/In-band/Off

The type of ring tone can be changed. Three selections are available including the standard ring tone set on the vehicle, the ring tone registered to your Bluetooth® device, or no ring tone.

Phone Volume

Adjusts using the slider.

Adjusts the conversation volume.

VR and Ringtone

Adjusts using the slider.

Adjusts the voice guidance and ringtone volume.

Contacts Sort Order

First Name, Last Name

Displays the contact information in alphabetical order of the first name.

Last Name, First Name

Displays the contact information in alphabetical order of the last name.

Preset Messages

Edits the preset message.

Refer to Receiving and Replying to Messages (available only with E-mail/SMS compatible phones) (Search).

Reset

Initializes all Communication Settings.

  1. Depending on the device, it may be necessary to acquire download permission on the device side.


The E-mail and SMS functions may not be available in some regions.

Voice Recognition

Basic Operation Method

Activating Voice Recognition

Press the talk button.

Ending Voice Recognition

Use one of the following methods:

  • Press the hang-up button.

  • Say, “Cancel”.

  • Operate the commander switch or the centre display (only when vehicle is stopped).

Skipping Voice Guidance (for faster operation)

Press and release the talk button.

Troubleshooting for Voice Recognition

If you do not understand an operation method while in the voice recognition mode, say “Tutorial” or “Help”.

Commands useable anytime during voice recognition

“Go Back” and “Cancel” are commands which can be used at anytime during voice recognition.

Returning to previous operation

To return to the previous operation, say, “Go Back” while in voice recognition mode.

Cancel

To put the Bluetooth® Hands-Free system in standby mode, say, “Cancel” while in voice recognition mode.

To prevent a deterioration in the voice recognition rate and voice quality, the following points should be observed:

  • The voice recognition cannot be performed while voice guidance or the beep sound is operating. Wait until the voice guidance or the beep sound is finished before saying your commands.

  • Phone related commands are available only when your phone is connected via Bluetooth®. Make sure your phone is connected via Bluetooth® before you operate phone related voice commands.

  • Music play commands, such as Play Artist and Play Album can be used only in USB audio mode.

  • Do not speak too slowly or loudly (no loud voice).

  • Speak clearly, without pausing between words or numbers.

  • Dialects or different wording other than hands-free prompts cannot be recognised by voice recognition. Speak in the wording specified by the voice commands.

  • It is not necessary to face the microphone or approach it. Speak the voice commands while maintaining a safe driving position.

  • Close the windows and/or the sunroof to reduce loud noises from outside the vehicle, or turn down the airflow of the air-conditioning system while Bluetooth® Hands-Free is being used.

  • Make sure the vents are not directing air up towards the microphone.


If the voice recognition performance is not satisfactory.

Refer to Troubleshooting (Search).

Voice Command List

Voice command

When the talk button is pressed and the following command is spoken, the audio or navigation can be operated. The commands in the () can be omitted. The specified name and number are put into the {}.

Standard command

Voice command

Function

Help

Usable commands can be verified.

Tutorial

Basic voice commands and methods of use can be verified.

(Navigate/Take me/Drive) Home

Set the destination to Home.

Communication (phone) related command

Voice command

Function

Call {name in phonebook} (mobile/home/work/other)

Example: “Call John Mobile”

Call to the contact in the downloaded phonebook.

Refer to Making a Call (Search).

Redial

Call to the last contact you called.

Refer to Making a Call (Search).

Callback

Call to the last contact who called you.

Refer to Making a Call (Search).

Entertainment (audio) related command

Voice command

Function

Corresponding audio source

(Go to/Play) Bluetooth (Audio)

Switches the audio source to BT audio.

Can also switch to each audio source by similarly using commands such as FM, AM, or USB.

All

Play Artist {Artist name}

Plays the selected artist.

USB

Navigation related command (Some Models)

For the navigation screen voice commands, refer to the separate navigation system manual.


  • Some commands cannot be used depending on the grade and specification.

  • Some commands cannot be used depending on the device connection conditions and the use conditions.

  • The commands are examples of the available commands.

Applications


Depending on the grade and specification, the screen display may differ.

Select the icon on the home screen to display the Applications screen. The following information can be verified.

Top screen

Item

Function

Fuel Economy Monitor

Fuel Consumption Display

Control Status Display

Effectiveness Display

Ending Screen Display

Refer to Fuel Economy Monitor (Search).

Vehicle Status Monitor

Warning Guidance

Warnings currently active can be verified.

Refer to If a Warning Light Turns On or Flashes (Search).

Maintenance

Scheduled Maintenance

Tyre Rotation

Oil Change

Refer to Maintenance Monitor (Type B audio) (Search).

Apple CarPlay

Refer to How to use Apple CarPlay (Search).

Android Auto

Refer to How to use Android Auto™ mode (Search).

Troubleshooting

Apple CarPlay use-related issues

Symptom

Cause

Solution method

Apple CarPlay cannot launch even though an Apple-genuine connector cord is inserted into the USB port and it is connected to my iPhone.

You used the wrong USB port.

Use the USB port displaying the mark to start Apple CarPlay.

The error message, “Mobile device error” is displayed after connecting my iPhone to the USB port.

There is mis-communication between the vehicle's audio system and your iPhone.

Disconnect the connector cord from the USB port once and then reconnect it.

The icon of the application I want to use is not displayed on the home screen of Apple CarPlay.

Only applications compatible with Apple CarPlay are displayed on the screen.

Contact the application's supplier.

Voice recognition using Siri is poor or incorrect for commands or contact names.

There are many possible reasons for this such as:

  1. Poor network connectivity

  2. Road noise/sound of air blowing from air conditioner

  3. Incorrect iPhone language setting

  1. Use the commander switch to complete the task or wait until there is sufficient network connectivity before using Siri again.

  2. For better voice recognition, speak loud and clear.

  3. Make sure that the iPhone language is set correctly (Example: US English vs UK English).

If you are still having difficulty using Siri, visit the Apple support site or contact Apple.

There is a difference in the audio volume between Bluetooth® audio and Apple CarPlay.

Check the volume of the audio on the device connected via Bluetooth®. The volume on some devices connected via Bluetooth® can be adjusted.

Android Auto™ use-related issues

Symptom

Cause

Solution method

The Android Auto™ mode does not launch even though the Android™-genuine connector cord is inserted into the USB port and it is connected to my Android™ Smartphone.

The Android Auto™ application has not been downloaded to your Android™ Smartphone.

To use Android Auto™ with your vehicle, the Android Auto™ application is required on your Android™ Smartphone. Download the Android Auto™ application from the Google store™.

You used the wrong USB port.

Use the USB port displaying the mark to start the Android Auto™ mode.

The error message, “Mobile device error” is displayed after connecting my Android™ Smartphone to the USB port.

There is mis-communication between the vehicle's audio system and your Android™ Smartphone.

Disconnect the connector cord from the USB port once and then reconnect it.

Your Android™ Smartphone cannot be paired because another device is connected via Bluetooth®.

Disconnect the other device's Bluetooth® connection, disconnect the connector cord of the Android™ Smartphone from the USB terminal once, and then reconnect it.

The icon of the application I want to use is not displayed on the home screen while in Android Auto™ mode.

Only applications compatible with Android Auto™ are displayed on the screen.

Contact the application's supplier.

  • Voice recognition is poor or incorrect.

  • Voice recognition responds slowly or it does not work.

If you are having difficulty using the voice recognition, visit the Android Auto™ support site or contact Google™.

There is a difference in the audio volume between Bluetooth® audio and Android Auto™.

Check the volume of the audio on the device connected via Bluetooth®. The volume on some devices connected via Bluetooth® can be adjusted.

Mazda Bluetooth® Hands-Free Customer Service

If you have any problems with Bluetooth®, contact our toll-free customer service centre.

Phone:

(Germany)

0800 4263 738 (8:00―18:00 Central European Time)

(Except Germany)

00800 4263 7383 (8:00―18:00 Central European Time)

(Worldwide)

49 721 5099 8198 (8:00―18:00 Central European Time)

Web:

http://www.mazdahandsfree.com

Bluetooth® Device pairing, connection problems

Symptom

Cause

Solution method

Unable to perform pairing

Make sure that the Bluetooth® device is compatible with the Bluetooth® unit, and that Bluetooth® and Find Mode*1 are on and the airplane mode is off in the Bluetooth® device setting. Turn off the power of the Bluetooth® device once, then turn it back on. If pairing is still not possible after this, contact an expert repairer, we recommend an Authorised Mazda Repairer or Mazda Bluetooth® Hands-Free Customer Service.

Pairing cannot be performed again

The pairing information paired to the Bluetooth® unit or device is not recognised correctly.

Perform pairing using the following procedure:

  1. Delete the applicable Bluetooth® device on the Mazda Connect.

  2. Delete “Mazda” from the Bluetooth® search screen of the Bluetooth® device.

  3. Perform pairing again.

If pairing is not possible after trying the procedure, turn off the power of the Bluetooth® device once, then turn it back on. If pairing is still not possible after this, contact an expert repairer, we recommend an Authorised Mazda Repairer or Mazda Bluetooth® Hands-Free Customer Service.

It takes time for automatic connection

There are a lot of paired Bluetooth® devices.

Delete the pairing information for unused Bluetooth® devices.

If it takes time for an automatic connection even though the above operation has been done, do a manual connection.

Unable to perform pairing

The Bluetooth® function and the Find Mode/Visible setting*1 on the device may turn off automatically after a period of time has elapsed depending on the device.

Check whether the Bluetooth® function and the Find Mode/Visible setting*1 on the device are turned on and pairing or reconnect.

Does not connect automatically when starting the engine

Automatically connects, but then disconnects suddenly

Disconnects intermittently

The device is in a location in which radio wave interference can occur easily, such as inside a bag in a rear seat, in a rear pocket of a pair of pants.

Move the device to a location in which radio wave interference is less likely to occur.

Does not connect automatically when starting the engine

The pairing information is updated when the device OS is updated.

Perform pairing using the following procedure:

  1. Delete the applicable Bluetooth® device on the Mazda Connect.

  2. Delete “Mazda” from the Bluetooth® search screen of the Bluetooth® device.

  3. Perform pairing again.

If pairing is not possible after trying the procedure, turn off the power of the Bluetooth® device once, then turn it back on. If pairing is still not possible after this, contact an expert repairer, we recommend an Authorised Mazda Repairer or Mazda Bluetooth® Hands-Free Customer Service.

  1. Setting which detects the existence of a device external to the Bluetooth® unit.


  • When the OS of the device is updated, the pairing information may be deleted. If this happens, reprogramme the pairing information to the Bluetooth® unit.

  • If you pair your phone which has already been paired to your vehicle more than once in the past, you need to delete “Mazda” on your mobile device. Then, execute the Bluetooth® search on your mobile device once again, and pair to a newly detected “Mazda”.

  • Before you pair your device, make sure that Bluetooth® is “ON”, both on your phone and on the vehicle.

  • If Bluetooth®-enabled devices are used in the following locations or conditions, connection via Bluetooth® may not be possible.

    • The device is in a location hidden from the centre display such as behind or under a seat, or inside the glove compartment.

    • The device contacts or is covered by a metal object or body.

    • The device is set to power-saving mode.

  • Different Bluetooth®-enabled devices can be used for Bluetooth® Hands-Free and Bluetooth® audio. For example, device A can be connected as a Bluetooth® Hands-Free device and device B can be connected as a Bluetooth® audio device. However, the following may occur when they are used at the same time.

    • The Bluetooth® connection of the device is disconnected.

    • Noise occurs in the Hands-Free audio.

    • Hands-Free operates slowly.

Voice recognition related problems

Symptom

Cause

Solution method

Poor voice recognition

  • Excessive, slow speech.

  • Excessive, forceful speech (shouting).

  • Speaking before the beep sound has ended.

  • Loud noise (speaking or noise from outside/inside vehicle).

  • Airflow from A/C is blowing against the microphone.

  • Speaking in off-standard expressions (dialect).

Regarding the causes indicated on the left, be careful with how you speak. In addition, when numbers are spoken in a sequence, recognition ability will improve if no stop is placed between the numbers.

False recognition of numbers

Poor voice recognition

There is a malfunction in the microphone.

A poor connection or malfunction with the microphone may have occurred. Consult an expert repairer, we recommend an Authorised Mazda Repairer.

Phone-related voice recognition is disabled

There is a problem with the connection between the Bluetooth® unit and the device.

If there is any malfunction after checking the pairing situation, check for device pairing or connection problems.

Names in the phonebook are not easily recognised

The Bluetooth® system is under a condition in which recognition is difficult.

By carrying out the following measures, the rate of recognition will improve.

  • Clear memory from the phonebook which is not used very often.

  • Avoid shortened names, use full names. (Recognition improves the longer the name is. By not using names such as “Mum”, “Dad”, recognition will improve.)

When operating the audio, a song name is not recognised

Song names cannot be recognised by voice.

You want to skip guidance

Guidance can be skipped by quickly pressing and releasing the talk button.

Regarding problems with calls

Symptom

Cause

Solution method

When starting a call, vehicle noise from the other party can be heard

For about 3 seconds after starting a call, the Bluetooth® unit's Noise Suppression function requires time to adapt to the call environment.

This does not indicate a problem with the device.

The other party cannot be heard or the speaker's voice is quiet

The volume is set at zero or low.

Increase the volume.

Other problems

Symptom

Cause

Solution method

The indication for the remaining battery is different between the vehicle and the device

The indication method is different between the vehicle and the device.

When a call is made from the vehicle, the telephone number is updated in the incoming/outgoing call record but the name does not appear

The number has not been registered into the phonebook.

If the number has been registered into the phonebook, the incoming/outgoing call record is updated by the name in the phonebook when the engine is restarted.

The cell phone does not synchronize with the vehicle regarding the incoming/outgoing call record

Some types of cell phones do not synchronize automatically.

Operate the cell phone for synchronization.

It takes a long time to complete the function for changing the language

A maximum of 60 seconds is required.

Page top