To remove the aerial, turn it anticlockwise.
To install the aerial, turn it clockwise.
Make sure the aerial is securely installed.
To prevent damage to the aerial, remove it before passing beneath a low overhead clearance.
When leaving your vehicle unattended, we recommend that you remove the aerial and store it inside the vehicle.
Always adjust the audio while the vehicle is stopped:
Do not adjust the audio control switches while driving the vehicle. Adjusting the audio while driving the vehicle is dangerous as it could distract your attention from the vehicle operation which could lead to a serious accident.
Even if the audio control switches are equipped on the steering wheel, learn to use the switches without looking down at them so that you can keep your maximum attention on the road while driving the vehicle.
For the purposes of safe driving, adjust the audio volume to a level that allows you to hear sounds outside of the vehicle including car horns and particularly emergency vehicle sirens.
To prevent the battery from being discharged, do not leave the audio system on for a long period of time when the engine is not running.
If a cellular phone or CB radio is used in or near the vehicle, it could cause noise to occur from the audio system, however, this does not indicate that the system has been damaged.
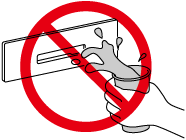
Do not spill any liquid on the audio system.
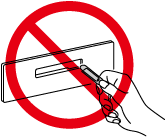
Do not insert any objects, other than CDs, into the slot.
AM characteristics
AM signals bend around such things as buildings or mountains and bounce off the ionosphere.
Therefore, they can reach longer distances than FM signals.
Because of this, two stations may sometimes be picked up on the same frequency at the same time.
FM characteristics
An FM broadcast range is usually about 40―50 km (25―30 miles) from the source. Because of extra coding needed to break the sound into two channels, stereo FM has even less range than monaural (non-stereo) FM.
Signals from an FM transmitter are similar to beams of light because they do not bend around corners, but they do reflect. Unlike AM signals, FM signals cannot travel beyond the horizon. Therefore, FM stations cannot be received at the great distances possible with AM reception.
Atmospheric conditions can also affect FM reception. High humidity will cause poor reception. However, cloudy days may provide better reception than clear days.
Multipath noise
Since FM signals can be reflected by obstructions, it is possible to receive both the direct signal and the reflected signal at the same time. This causes a slight delay in reception and may be heard as a broken sound or a distortion. This problem may also be encountered when in close proximity to the transmitter.
Flutter/Skip noise
Signals from an FM transmitter move in straight lines and become weak in valleys between tall buildings, mountains, and other obstacles. When a vehicle passes through such an area, the reception conditions may change suddenly, resulting in annoying noise.
Weak signal noise
In suburban areas, broadcast signals become weak because of distance from the transmitter. Reception in such fringe areas is characterised by sound breakup.
Strong signal noise
This occurs very close to a transmitter tower. The broadcast signals are extremely strong, so the result is noise and sound breakup at the radio receiver.
Station drift noise
When a vehicle reaches the area of two strong stations broadcasting at similar frequencies, the original station may be temporarily lost and the second station picked up. At this time there will be some noise from this disturbance.
Condensation phenomenon
Immediately after turning on the heater when the vehicle is cold, the CD or optical components (prism and lens) in the CD player may become clouded with condensation. At this time, the CD will eject immediately when placed in the unit. A clouded CD can be corrected simply by wiping it with a soft cloth. Clouded optical components will clear naturally in about an hour. Wait for normal operation to return before attempting to use the unit.
Handling the CD player
The following precautions should be observed.
Do not use deformed or cracked CDs. The disc may not eject resulting in a malfunction.
Do not use non-conventional discs such as heart-shaped, octagonal discs, etc. The disc may not eject resulting in a malfunction.
If the memory portion of the CD is transparent or translucent, do not use the disc.
A new CD may have rough edges on its inner and outer perimeters. If a disc with rough edges is used, proper setting will not be possible and the CD player will not play the CD. In addition, the disc may not eject resulting in a malfunction. Remove the rough edges in advance by using a ball-point pen or pencil as shown in the following figure. To remove the rough edges, rub the side of the pen or pencil against the inner and outer perimeter of the CD.
When driving over uneven surfaces, the sound may jump.
CDs bearing the logo shown in the illustration can be played. No other discs can be played.
Use discs that have been legitimately produced. If illegally-copied discs such as pirated discs are used, the system may not operate properly.
Be sure never to touch the signal surface when handling the CDs. Pick up a CD by grasping the outer edge or the edge of the hole and the outer edge.
Do not stick paper or tape on the CD. Avoid scratching the reverse side (the side without a label). The disc may not eject resulting in a malfunction.
Dust, finger smudges, and dirt can decrease the amount of light reflected from the signal surface, thus affecting sound quality. If the CD should become soiled, gently wipe it with a soft cloth from the centre of the CD to the edge.
Do not use record sprays, antistatic agents, or household spray cleaners. Volatile chemicals such as benzine and thinner can also damage the surface of the CD and must not be used. Anything that can damage, warp, or fog plastic should never be used to clean CDs.
The CD player ejects the CD if the CD is inserted upside down. Also dirty and/or defective CDs may be ejected.
Do not insert cleaning discs in the CD player.
Do not insert any disc with a peel-off seal affixed to it.
This unit may not be able to play certain CD-R/CD-RWs made using a computer or music CD recorder due to disc characteristics, scratches, smudges, dirt, etc., or due to dust or condensation on the lens inside the unit.
Storing CDs in the vehicle exposed to direct sunlight or high temperature may damage the CD-R/CD-RWs, and make them unplayable.
CD-R/CD-RW exceeding 700 MB cannot be played.
This unit may not be able to play certain discs made using a computer due to the application (writing software) setting used. (For details, consult the store where the application was purchased.)
It is possible that certain text data, such as titles, recorded on a CD-R/CD-RW may not be displayed when musical data (CD-DA) is playing.
The period from when a CD-RW is inserted to when it begins playing is longer than a normal CD or CD-R.
Completely read the instruction manual and cautions for CD-R/CD-RWs.
Do not use discs with cellophane tape adhering, partially peeled off labels, or adhesive material exuding from the edges of the CD label. Also, do not use discs with a commercially-available CD-R label affixed. The disc may not eject resulting in a malfunction.
MP3 stands for MPEG Audio Layer 3, which is standardised voice compression established by the ISO*1 working group (MPEG).
Use of MP3 allows for audio data to be compressed to approximately a tenth of the source data size.
This unit plays files with the extension (.mp3) as MP3 files.
International Organisation for Standardisation
Do not use an audio file extension on files other than audio files. In addition, do not change the audio file extension. Otherwise, the unit will not recognise the file correctly resulting in noise or a malfunction.
Supply of this product only conveys a license for private, non-commercial use and does not convey a license nor imply any right to use this product in any commercial (i.e. revenue-generating) real time broadcasting (terrestrial, satellite, lead and/or any other media), broadcasting/streaming via the Internet, intranets and/or other networks or in other electronic content distribution systems, such as pay-audio or audio-on-demand applications. An independent license for such use is required. For details, please visit http://www.mp3licensing.com.
This audio system handles MP3 files that have been recorded on CD-R/CD-RW/CD-ROMs.
When naming an MP3 file, be sure to add an MP3 file extension (.mp3) after the file name.
The number of characters which can be displayed is restricted.
WMA is short for Windows Media*1 Audio and is the audio compression format used by Microsoft*1.
Audio data can be created and stored at a higher compression ratio than MP3.
This unit plays files with the extension (.wma) as WMA files.
Windows Media and Microsoft are registered trademarks of Microsoft Corporation U.S. in the United States and other countries.
Do not use an audio file extension on files other than audio files. In addition, do not change the audio file extension. Otherwise, the unit will not recognise the file correctly resulting in noise or a malfunction.
WMA files written under specifications other than the indicated specification may not play normally or files or folder names may not display correctly.
The file extension may not be provided depending on the computer operating system, version, software, or settings. In this case, add the file extension “.wma” to the end of the file name, and then write it to the disc/memory.
AAC stands for Advanced Audio Coding, which is standardised voice compression established by the ISO*1 working group (MPEG). Audio data can be created and stored at a higher compression ratio than MP3.
This unit plays files with the extensions (.aac*2/.m4a/.wav*2) as the AAC files.
Do not use an audio file extension on files other than audio files. In addition, do not change the audio file extension. Otherwise, the unit will not recognise the file correctly resulting in noise or a malfunction.
AAC files written under specifications other than the indicated specification may not play normally or files or folder names may not display correctly.
The file extension may not be provided depending on the computer operating system, version, software, or settings. In this case, add the file extension “.aac*2 ”, “.m4a”, or “.wav*2” to the end of the file name, and then write it to the memory.
International Organisation for Standardisation
Type B/Type C
Condensation phenomenon
Immediately after turning on the heater when the vehicle is cold, the DVD or optical components (prism and lens) in the DVD player may become clouded with condensation. At this time, the DVD will eject immediately when placed in the unit. A clouded DVD can be corrected simply by wiping it with a soft cloth. Clouded optical components will clear naturally in about an hour. Wait for normal operation to return before attempting to use the unit.
Handling the DVD player
The following precautions should be observed.
Do not use deformed or cracked DVDs. The disc may not eject resulting in a malfunction.
Do not use non-conventional discs such as heart-shaped, etc. The disc may not eject resulting in a malfunction.
If the memory portion of the DVD is transparent or translucent, do not use the disc.
A new DVD may have rough edges on its inner and outer perimeters. If a disc with rough edges is used, proper setting will not be possible and the DVD player will not play the DVD. In addition, the disc may not eject resulting in a malfunction. Remove the rough edges in advance by using a ball-point pen or pencil as shown in the following figure. To remove the rough edges, rub the side of the pen or pencil against the inner and outer perimeter of the DVD.
When driving over uneven surfaces, the sound may jump.
DVDs bearing the logo shown in the illustration or DVD-R/DVDR/DVD-RW/DVD
RW written with video data (DVD-Video/DVD-VR file) can be played.
Use discs that have been legitimately produced. If illegally-copied discs such as pirated discs are used, the system may not operate properly.
Be sure never to touch the signal surface when handling the DVDs. Pick up a DVD by grasping the outer edge or the edge of the hole and the outer edge.
Do not stick paper or tape on the DVD. Avoid scratching the reverse side (the side without a label). The disc may not eject resulting in a malfunction.
Dust, finger smudges, and dirt can decrease the amount of light reflected from the signal surface, thus affecting sound quality. If the DVD should become soiled, gently wipe it with a soft cloth from the centre of the DVD to the edge.
Do not use record sprays, antistatic agents, or household spray cleaners. Volatile chemicals such as benzine and thinner can also damage the surface of the DVD and must not be used. Anything that can damage, warp, or fog plastic should never be used to clean DVDs.
The DVD player ejects the DVD if the DVD is inserted upside down. Also dirty and/or defective DVDs may be ejected.
Do not insert cleaning discs in the DVD player.
Do not insert any disc with a peel-off seal affixed to it.
This unit may not be able to play certain DVD-R/DVDR/DVD-RW/DVD
RWs made using a computer or DVD recorder due to disc characteristics, scratches, smudges, dirt, etc., or due to dust or condensation on the lens inside the unit.
Storing DVDs in the vehicle exposed to direct sunlight or high temperature may damage the DVD-R/DVDR/DVD-RW/DVD
RWs, and make them unplayable.
This unit may not be able to play certain discs made using a computer due to the application (writing software) setting used. (For details, consult the store where the application was purchased.)
Completely read the instruction manual and cautions for DVD-R/DVDR/DVD-RW/DVD
RWs.
Do not use discs with cellophane tape adhering, partially peeled off labels, or adhesive material exuding from the edges of the DVD label. Also, do not use discs with a commercially-available DVD-R label affixed. The disc may not eject resulting in a malfunction.
The conditions in which a DVD video can be played may be pre-determined depending on the intentions of the disc software creator. Functions may not operate as the user intends because this DVD player operates according to the design intentions of the software creator. Always refer to the instructions accompanying the disc to be played.
Manufactured under license by Dolby Labouratories, Inc.. Dolby and the double-D symbol are trademarks of Dolby Labouratories.
Video data (DVD-Video/DVD-VR files) written to DVD/DVD-R/DVDR/DVD-RW/DVD
RW can be played.
This unit is compatible for playback of dual-layer DVD/DVD-R.
Regional number for this unit is [2] or [3] (regional number depends on market).
DVD-Video/DVD-VR files written under specifications other than the indicated specification may not play normally or files or folder names may not display correctly.
Mark indicating on disc
Marks indicated on discs or packages are as follows:
Mark |
Meaning |
|||
---|---|---|---|---|
NTSC |
PAL |
Indicates a colour TV system (broadcast system depends on market). |
||
![]() |
Indicates the number of audio tracks. The number indicates the number of audio recordings. |
|||
![]() |
Indicates the number of subtitled languages. The number indicates the number of recorded languages. |
|||
![]() |
Number of angles. The number indicates the number of recorded angles. |
|||
![]() |
![]() |
Indicates the screen modes which can be selected. “16:9” indicates a wide screen and “4:3” indicates a standard screen. |
||
![]() |
![]() |
![]() |
Indicates the region code for which a disc can be played. ALL indicates global applicability, and a number indicates applicability based on region. |
Glossary
DVD-Video
DVD-Video is a video image storing standard determined by the DVD forum.
“MPEG2”, a global standard in digital compression technologies, has been adopted which compresses on average about 1/40th of the image data and stores it. In addition, a variable-rate coding technology, which changes the assigned information amount according to the shape of the screen image, has been adopted. Audio information can be stored using Dolby digital instead of PCM (Pulse Code Modulation) and more realistic sounding audio can be enjoyed.
In addition, various, supplementary functions such as multi-language availability are provided for enhanced enjoyment.
DVD-VR
DVD-VR is short for DVD Video Recording Format; video image storing standard determined by the DVD forum.
Multi-angle
One of the DVD player's functions. Because scenes can be recorded in multiple angles (camera position), users can choose a desired angle.
Multi-language
As a function of the DVD player, audio or subtitles for the same video images can be stored in multiple languages and the language can be selected freely.
Region code
DVD players and discs are assigned codes for each market region and only discs manufactured for that specific region can be played.
A disc cannot be played if the region code assigned to the player is not indicated on the disc.
In addition, even if a region code is not indicated on the disc, disc playback may be prohibited depending on the region. In this case, a disc may not be playable in this DVD player.
OGG is the audio compression format for Xiph. Org Foundation.
Audio data can be created and stored at a higher compression ratio than MP3.
This unit plays files with the extension (.ogg) as OGG files.
Do not use an audio file extension on files other than audio files. In addition, do not change the audio file extension. Otherwise, the unit will not recognise the file correctly resulting in noise or a malfunction.
OGG files written under specifications other than the indicated specification may not play normally or files or folder names may not display correctly.
The file extension may not be provided depending on the computer operating system, version, software, or settings. In this case, add the file extension “.ogg” to the end of the file name, and then write it to the disc/memory.
This unit plays audio files as follows:
Extension |
Playback with this unit |
---|---|
.mp3 |
MP3 |
.wma |
WMA |
.aac*1 |
AAC |
.m4a |
|
.wav*1 |
WAV |
.ogg*1 |
OGG |
Do not use an audio file extension on files other than audio files. In addition, do not change the audio file extension. Otherwise, the unit will not recognise the file correctly resulting in noise or a malfunction.
Playback may not be possible depending on the type and condition of the USB flash memory even if the audio file complies with the standard.
A copyright protected WMA/AAC file cannot be played in this unit.
(Type B/Type C)
If a file name in the USB memory is too long, it could cause operation problems such as not being able to playback the song.
(Recommended: Within 80 characters)
The order of the music data stored in the device may differ from the playback order.
To prevent loss or damage of stored data, we recommend that you always back up your data.
If a device exceeds the maximum electric current value of 1,000 mA, it may not operate or recharge when connected.
Do not pull out the USB device while in the USB mode (only pull it out while in FM/AM radio or CD mode).
The device will not operate if the data is password protected.
MP3/WMA/AAC/OGG*1 files written under specifications other than the indicated specification may not play normally or files/folder names may not display correctly.
Type B/Type C
This unit supports playback of music files recorded to an iPod.
iPod is a trademark of Apple Inc., registered in the U.S. and other countries.
The iPod may not be compatible depending on the model or OS version. In this case, an error message is displayed.
Remove the iPod when it is not in use. Because the iPod is not designed to withstand excessive changes in temperature inside the cabin, it could be damaged or the battery may deteriorate due to the excessive temperature or humidity inside the cabin if it is left in the vehicle.
If data in the iPod is lost while it is connected to the unit, Mazda cannot guarantee recovery of any lost data.
If the iPod battery is deteriorated, the iPod may not recharge and playback may not be possible when it is connected to the unit.
For details on using the iPod, refer to the iPod instruction manual.
When connecting the iPod to a USB port, all commands are made from the audio unit. iPod control is not possible.
The audio unit cannot display images or videos stored in an iPod.
Power ON/OFF
Switch the ignition to ACC or ON. Press the power/volume dial to turn the audio system on. Press the power/volume dial again to turn the audio system off.
Volume adjustment
To adjust the volume, turn the power/volume dial. Turn the power/volume dial clockwise to increase volume, anticlockwise to decrease it.
Audio sound adjustment
Press the menu button () to select the function. The selected function will be indicated.
Turn the audio control dial to adjust the selected functions as follows:
Indication |
Setting value |
|
---|---|---|
Turn Anticlockwise |
Turn Clockwise |
|
AF (Setting Alternative Frequency (AF)) |
Off |
On |
REG (Setting Regional Programme (REG)) |
Off |
On |
ALC (Automatic volume adjustment) |
Level decrease |
Level increase |
BASS (Low pitch sound) |
Decrease bass |
Increase bass |
TREB (Treble sound) |
Decrease treble |
Increase treble |
FADE (Front/back volume balance) |
― |
Reduces volume of front speakers |
BAL (Left/right volume balance) |
Shift the sound to the left |
Shift the sound to the right |
BEEP (Audio operation sound) |
Off |
On |
12Hr (12 Hr/24 Hr time adjustment) |
12Hr (Flashing) |
24Hr (Flashing) |
If not operated for several seconds, the display returns to the previous display. To reset bass, treble, fade, and balance, press the menu button () for 2 seconds. The unit will beep and “CLEAR” will be displayed.
AF (Setting Alternative Frequency (AF))
The AF function of the Radio Data System (RDS) can be set on or off.
Refer to Operating the Radio (Search).
REG (Setting Regional Programme (REG))
The REG function of the Radio Data System (RDS) can be set on or off.
Refer to Operating the Radio (Search).
ALC (Automatic volume adjustment)
The automatic level control (ALC) changes the audio volume automatically according to the vehicle speed. The faster the vehicle speed, the higher the volume increases. ALC has ALC OFF and ALC LEVEL 1 to 7 modes. At ALC LEVEL 7, the amount that the volume can increase is at the maximum. Select the mode according to the driving conditions.
BEEP (Audio operation sound)
The setting for the operation sound when pressing and holding a button can be changed. The initial setting is ON. Set to OFF to mute the operation sound.
12Hr 24Hr (12 Hr/24 Hr time adjustment)
Rotating the audio control dial switches the display between 12 and 24-hour clock time (Search).
Setting the time
The clock can be set at any time when the ignition is switched to ACC or ON.
To adjust the time, press the clock button () for about 2 seconds until a beep is heard.
The clock's current time will flash.
Time adjustment
To adjust the time, press the hour/minute set button (,
) while the clock's current time is flashing.
The hours advance while the hour set button () is pressed. The minutes advance while the minute set button (
) is pressed.
Press the clock button () again to start the clock.
Time resetting
Press the clock button () for about 2 seconds until a beep is heard.
Press the :00 button (1).
When the button is pressed, the time will be reset as follows:
(Example)
12:01―12:29→12:00
12:30―12:59→1:00
When the :00 button (1) is pressed, the seconds will start at “00”.
Switching between 12 and 24-hour clock time:
Press the menu button () several times until 12 and 24-hour clock time are displayed. Turn the audio control dial in either direction, select the desired clock setting while the preferred clock time is flashing.
Radio ON
Press a band selector button () to turn the radio on.
Band selection
Successively pressing the band selector button () switches the bands as follows: FM1→FM2→MW/LW.
The selected mode will be indicated.
If the FM broadcast signal becomes weak, reception automatically changes from STEREO to MONO for reduced noise.
Tuning
The radio has the following tuning methods: Manual, Seek, Scan, Preset channel, and Auto memory tuning. The easiest way to tune stations is to set them on preset channels.
Manual tuning
Select the station by pressing the tuning button (,
) lightly.
Seek tuning
Automatic search for radio stations starts when the tuning button (,
) is pressed until a beep sound is heard. The search stops when a station is found.
If you continue to press and hold the button, the frequency will continue changing without stopping.
Scan tuning
Press and hold the scan button () to automatically sample strong stations. Scanning stops at each station for about 5 seconds. To hold a station, press and hold the scan button (
) again during this interval.
Preset channel tuning
The 6 preset channels can be used to store 6 MW/LW and 12 FM stations.
To set a channel first select MW/LW, FM1, or FM2. Tune to the desired station.
Press a channel preset button for about 2 seconds until a beep is heard. The preset channel number or station frequency will be displayed. The station is now held in the memory.
Repeat this operation for the other stations and bands you want to store. To tune one in the memory, select MW/LW, FM1, or FM2 and then press its channel preset button. The station frequency or the channel number will be displayed.
Radio Data System (RDS)
The radio data system (RDS) does not function if it is out of the system's service coverage area.
Alternative frequency (AF)
AF functions on FM stations. Press the menu button () and select the AF mode to turn it on and “AF” will be displayed. If the radio reception of the current station weakens, the system switches to an alternative station automatically.
If you wish to continue a regional programme, press the menu button () and select the REG mode to turn it on. “REG ON” is displayed. To cancel it, press the audio control dial and select the REG mode to turn it off. “REG OFF” is displayed.
Traffic announcement (TA)
If the traffic announcement button () is pressed, the unit switches to TA mode and “TA” is displayed.
If a TA broadcast is received while in the TA mode, the TA broadcast intercedes even while using other functions (FM, CD, USB device, AUX, or BT audio), and “Traffic Info” is displayed.
During a TA broadcast, press the traffic announcement button () to end the broadcast and return to the previous mode.
Programme-type information (PTY)
Some FM stations transmit programme-type codes. This code enables alternative stations transmitting the same programme-type code to be found quickly.
Press the programme-type information button (,
) while in FM mode. The programme-type code and “PTY” will be displayed during reception. If there is no programme-type code, “None” will be displayed.
(To choose a programme-type:)
Press the Programme-type information button (,
) when the programme-type code is displayed.
Operate any one of the following:
Press the pre-programmed channel preset button (1 to 6).
Press the Programme-type information button (,
).
(To scan for programme-type information:)
Press the Programme-type information button (,
) when the programme-type code is displayed.
Press the Programme-type information button (,
) until the beep sounds.
The unit will scan for broadcasts, if none are found, “Nothing” will be displayed and the unit will return to the previously tuned band.
(To store programme types in the channel preset buttons:)
Press the Programme-type information button (,
) when the programme-type code is displayed.
Press the Programme-type information button (,
) and select the programme type.
While the programme type is displayed, press a channel preset button for about 2 seconds.
Emergency broadcast
If an emergency broadcast is received, the emergency broadcast intercedes even while using other functions (FM, CD, USB device, AUX, or BT audio), and “Alarm!” is displayed.
When the emergency broadcast ends, the system will return to the previous mode.
Type |
Playable data |
---|---|
Music/MP3/WMA/AAC CD player |
|
If a disc has both music data (CD-DA) and MP3/WMA/AAC files, playback of the two or three file types differs depending on how the disc was recorded.
Inserting the CD
Insert the CD into the slot, label-side up. The auto-loading mechanism will set the CD and begin play.
There will be a short lapse before play begins while the player reads the digital signals on the CD.
Ejecting the CD
Press the CD eject button () to eject the CD.
Playback
Press the media button () to switch to CD mode and start playback.
The CD mode cannot be selected if a CD has not been inserted.
Pause
To stop playback, press the Play/Pause button (4).
Press the button again to resume playback.
Fast-forward/Reverse
Press and hold the fast-forward button () to advance through a track at high speed. Press and hold the reverse button (
) to reverse through a track at high speed.
Track search
Press the track up button () once to skip forward to the beginning of the next track.
Press the track down button () within a few seconds after playback begins to track down to the beginning of the previous track.
Press the track down button () after a few seconds have elapsed to start playback from the beginning of the current track.
Folder search (during MP3/WMA/AAC CD playback)
To change to the previous folder, press the folder down button (), or press the folder up button (
) to advance to the next folder.
Music scan
During music CD playback
This function scans the titles on a CD and plays 10 seconds of each song to aid you in finding a song you want to listen to.
Press and hold the scan button () during playback to start the scan play operation (the track number will flash). Press and hold the scan button (
) again to cancel scan playback.
During MP3/WMA/AAC CD playback
This function scans the titles in a folder currently being played and plays 10 seconds of each song to aid you in finding a song you want to listen to. Press and hold the scan button () during playback to start the scan play operation (the track number will flash).
Press and hold the scan button () again to cancel scan playback.
If the unit is left in scan, normal playback will resume where scan was selected.
Repeat playback
During music CD playback
Press the repeat button (1) during playback to play the current track repeatedly. “TRACK RPT” is displayed ( is displayed next to RPT at the bottom of the display area).
Press the button again to cancel the repeat playback.
During MP3/WMA/AAC CD playback
(Track repeat)
Press the repeat button (1) during playback to play the current track repeatedly. “TRACK RPT” is displayed ( is displayed next to RPT at the bottom of the display area).
To cancel the repeat playback, press the button again after 3 seconds.
(Folder repeat)
Press the repeat button (1) during playback, and then press the button again within 3 seconds to play the tracks in the current folder repeatedly. “FOLDER RPT” is displayed ( is displayed next to RPT at the bottom of the display area).
Press the button again to cancel the repeat playback.
Random playback
Tracks are randomly selected and played.
During music CD playback
Press the random button (2) during playback to play the tracks on the CD randomly. “DISC RDM” is displayed ( is displayed next to RDM at the bottom of the display area).
Press the button again to cancel the random playback.
During MP3/WMA/AAC CD playback
(Folder random)
Press the random button (2) during playback to play the tracks in the folder randomly. “FOLDER RDM” is displayed ( is displayed next to RDM at the bottom of the display area).
To cancel the random playback, press the button again after 3 seconds.
(CD random)
Press the random button (2) during playback, and then press the button again within 3 seconds to play the tracks on the CD randomly. “DISC RDM” is displayed ( is displayed next to RDM at the bottom of the display area).
Press the button again to cancel the random playback.
Switching the display
The information displayed on the audio display changes as follows each time the text button (3) is pressed during playback.
Music CD
Button |
Information displayed on audio display |
---|---|
![]() |
Track number/Elapsed time |
Track number |
|
Track name |
|
Album name |
|
Artist name |
MP3/WMA/AAC CD
Button |
Information displayed on audio display |
---|---|
![]() |
File number/Elapsed time |
Folder number/File number |
|
File name |
|
Folder name |
|
Album name |
|
Song name |
|
Artist name |
The information viewable in the display is only CD information (such as artist name, song title) which has been recorded to the CD.
This unit cannot display some characters. Characters which cannot be displayed are indicated by an asterisk ().
Display scroll
Only 13 characters can be displayed at one time. To display the rest of the characters of a long title, press and hold the text button (3). The display scrolls the next 13 characters. Press and hold the text button (3) again after the last 13 characters have been displayed to return to the beginning of the title.
The number of characters which can be displayed is restricted.
Message display
If “CHECK CD” is displayed, it means that there is some CD malfunction. Check the CD for damage, dirt, or smudges, and then properly reinsert it. If the message appears again, insert another known good CD. If the message continues to appear, take the unit to an expert repairer, we recommend an Authorised Mazda Repairer for service.
Audio can be heard from the vehicle's speakers by connecting a commercially-available portable audio unit to the auxiliary jack.
Use a commercially-available, non-impedance (3.5) stereo mini plug lead. Contact an expert repairer, we recommend an Authorised Mazda Repairer for details.
In addition, audio can be played from the vehicle audio device by connecting a USB device to the USB port.
Refer to AUX/USB mode (Search).
If you see an error indication on the audio display, find the cause in the chart. If you cannot clear the error indication, take the vehicle to an expert repairer, we recommend an Authorised Mazda Repairer.
Indication |
Cause |
Solution |
---|---|---|
CHECK CD |
CD is inserted upside down |
Insert the CD properly. If the error indication continues to display, consult an expert repairer, we recommend an Authorised Mazda Repairer. |
CD is defective |
Insert another CD properly. If the error indication continues to display, consult an expert repairer, we recommend an Authorised Mazda Repairer. |
TOUCH & TAP
Touch or tap on the item indicated on the screen.
The operation is launched and the next item is displayed.
SLIDE
Touch the setting item displaying a slider bar.
Touch the slider with your finger and move to the desired level.
SWIPE
Touch the screen with your finger and move up or down.
Items which were not displayed can be displayed.
Return to previous screen
Touch the .
Displaying the home screen
Touch the .
Icon |
Function |
---|---|
![]() |
Applications Information such as average fuel economy, maintenance, and warnings can be verified. Depending on the grade and specification, the screen display may differ. |
![]() |
Entertainment Operates audio such as the radio and CDs. The audio source most recently used is displayed. An audio source which cannot be used at that time is skipped and the previous audio source is displayed. To change the audio source, select the |
![]() |
Communication Bluetooth® related functions are available. |
![]() |
Navigation Navigation screen is displayed (vehicles with navigation system). If the SD card for the navigation system is not inserted, the compass indicating the direction in which the vehicle is moving is displayed. The compass may not indicate the correct bearing when the vehicle is stopped or travelling at a slow speed. |
![]() |
Settings Overall setting menu (Such as display, sound, Bluetooth® and Language). Depending on the grade and specification, the screen display may differ. |
Volume adjustment
Turn the commander switch volume dial. The volume switch on the steering switch can also be pressed.
Display setting
Select the icon on the home screen to display the Settings screen.
Select the tab to select the item you would like to change.
Display OFF/Clock
The centre display can be turned off. Select to turn the display off.
When is selected the centre display turns off and the clock is displayed.
The centre display can be turned back on as follows:
Touch the centre display.
Operate the commander switch.
Daytime/nighttime (Mode) screen setting
The daytime or nighttime screen can be selected.
: Switches screen automatically according to headlight illumination condition*1
: Daytime screen setting
: Nighttime screen setting
The display is constantly on daytime screen when the illumination dimmer is cancelled.
Brightness adjustment
Adjust the centre display brightness using the slider.
Contrast adjustment
Adjust the centre display contrast using the slider.
Display setting reset
All of the screen setting values can be reset to their initial settings.
Select .
Select .
Audio sound adjustment
Select the icon on the home screen to display the Settings screen.
Select the tab to select the item you would like to change.
Indication |
Setting value |
---|---|
Bass (Low pitch sound) |
|
Treble (Treble sound) |
|
Fade (Front/Rear volume balance) |
Front: Front speaker volume enhancement Rear: Rear speaker volume enhancement |
Balance (Left/right volume balance) |
Right: Right speaker volume enhancement Left: Left speaker volume enhancement |
ALC*1 (Automatic volume adjustment) |
Off―Adjustment at seven levels |
Bose® AudioPilot*2 (Automatic volume adjustment) |
On/Off |
Beep (Audio operation sound) |
On/Off |
Standard audio
Bose® Sound System
ALC (Automatic volume adjustment)
The automatic level control (ALC) is a feature that automatically adjusts audio volume and sound quality according to the vehicle speed. The volume increases in accordance with the increase in vehicle speed, and decreases as vehicle speed decreases.
Bose® AudioPilot (Automatic volume adjustment)
When driving, background noise can interfere with enjoying music.
AudioPilot®*3 noise compensation technology continuously adjusts the music to compensate for background noise and vehicle speed.
It reacts only to sustained noise sources and not intermittent ones, such as speed bumps.
An enhanced DSP algorithm allows faster and more effective compensation for unusual situations, such as driving on a very rough road or at high speeds.
In addition, a system is equipped which switches the audio to the optimum acoustics corresponding to the opening and closing of the soft top/roof.
The acoustic switching function is linked to the operation of the top lock lever/retractable fastback switch and audio playback is muted for about 1 second while switching.
*3 AudioPilot® is a registered trademark of Bose Corporation.
Radio ON
Select the icon on the home screen to display the Entertainment screen. When selecting the desired radio, the following icons are indicated in the lower part of the centre display.
AM/FM Radio
Icon |
Function |
---|---|
![]() |
Displays the Entertainment menu. Use to switch to a different audio source. |
![]() |
Displays the station list. Select Select the desired frequency. |
![]() |
Displays the Favourites list. Long-press to store radio station currently being aired. |
![]() |
You can search for receivable radio stations. Scanning stops at each station for about five seconds. Select again to continue receiving the radio station. |
![]() |
You can change the radio frequency manually. Rotate the commander knob, slide the screen, or touch the radio frequency. Press When |
![]() |
Automatic radio station selection. When long-pressed, the radio frequency changes continually. It stops when you remove your hand from the icon or the commander knob. |
![]() |
|
![]() |
Displays sound settings to adjust audio quality level. Refer to Volume/Display/Sound Controls (Search). |
Favourites Radio
Selected stations can be registered for convenient operation. Up to 50 stations can be registered. The Favourites list is common to AM and FM radio.
Registering to Favourites
Long-press the icon to register the current radio station. The registration can also be performed using the following procedure.
Select the icon to display the Favourites list.
Select .
Select .
The station is added to the bottom of the Favourites list.
If the battery is disconnected, your Favourites list will not be deleted.
Selecting radio station from Favourites
Select the icon to display the Favourites list.
Select the radio frequency to tune in the radio station.
Deleting from Favourites
Select the icon to display the Favourites list.
Select .
Select .
Select the radio frequency you want to delete.
Select .
Changing Favourites list order
Select the icon to display the Favourites list.
Select .
Select .
Select a radio frequency. The selected radio station can be moved.
Slide the radio station or move it using the commander switch, then select .
Radio ON
Select the icon on the home screen to display the Entertainment screen. When selecting the desired radio, the following icons are indicated in the lower part of the centre display.
AM/FM Radio
Icon |
Function |
---|---|
![]() |
Displays the Entertainment menu. Use to switch to a different audio source. |
![]() |
Displays the list of receivable RDS radio stations (FM only). |
![]() |
Displays the station list (AM only). Select Select the desired frequency. |
![]() |
Displays the Favourites list. Long-press to store radio station currently being aired. |
![]() |
You can search for receivable radio stations. Scanning stops at each station for about five seconds. Select again to continue receiving the radio station. |
![]() |
You can change the radio frequency manually. Rotate the commander knob, slide the screen, or touch the radio frequency. Press When |
![]() |
Switches the TA mode on and off. |
![]() |
Automatic radio station selection. When long-pressed, the radio frequency changes continually. It stops when you remove your hand from the icon or the commander knob. |
![]() |
|
![]() |
Displays the FM settings screen (FM only). On/Off of Alternative frequency and Region lock can be set. |
![]() |
Displays sound settings to adjust audio quality level. Refer to Volume/Display/Sound Controls (Search). |
When the or
icon is selected while FM is selected, each programme is selected.
Favourites Radio
Selected stations can be registered for convenient operation. Up to 50 stations can be registered. The Favourites list is common to AM, FM and DAB radio (Some Models).
Registering to Favourites
Long-press the icon to register the current radio station. The registration can also be performed using the following procedure.
Select the icon to display the Favourites list.
Select .
Select .
The station is added to the bottom of the Favourites list.
If the battery is disconnected, your Favourites list will be not deleted.
Selecting radio station from Favourites
Select the icon to display the Favourites list.
Select the radio frequency to tune in the radio station.
Deleting from Favourites
Select the icon to display the Favourites list.
Select .
Select .
Select the radio frequency you want to delete.
Select .
Changing Favourites list order
Select the icon to display the Favourites list.
Select .
Select .
Select a radio frequency. The selected radio station can be moved.
Slide the radio station or move it using the commander switch, then select .
Radio Data System (RDS)
Alternative frequency (AF)
AF functions on FM stations. Turn on the AF mode. If the radio reception of the current station weakens, the system switches to an alternative station automatically.
If you wish to continue a regional programme, turn on the Region lock (REG) mode.
AF/REG on or off switching
Select the icon while in FM mode to switch to the FM settings screen. AF/REG on or off switching can be performed as follows:
(AF mode on/off)
Select On/Off on the FM settings screen.
(REG mode on/off)
While the AF mode is on, select On/Off.
Traffic announcement (TA)
Select during FM/AM reception to switch to the TA mode.
If a TA broadcast is received while in the TA mode, the TA broadcast intercedes even while using other functions (FM, CD, USB device, AUX, BT audio, Aha™ radio, or Stitcher™ radio), and “Traffic Announcement” is displayed.
If a TA is received on the Entertainment screen, is displayed on the screen. Select
to cancel the received TA and return to TA reception stand-by. If a TA is received on a screen other than the Entertainment screen, the selection screens for
,
, and
are displayed on the screen. If
is selected, the selection screen turns off when a TA is received while continuing to receive TAs.
Selection from Station List
List of receivable RDS radio stations is displayed. You can easily select the station you want to listen to from the list. If a radio station name is not available, the frequency is displayed. In addition, radio stations which have been programmed to a Genre code (Programme types like Rock, News, and so on) can also be displayed separately by category.
It may take longer to display the station list depending on the reception conditions.
Select the icon to display the radio station list.
Select the radio frequency to tune in the radio station.
(Selecting Genre)
Select the on the station list screen to display the genre list screen.
Select the genre to display the radio station list in the genre.
Only one Genre can be selected.
Type |
Playable data |
---|---|
Music/MP3/WMA/AAC CD player |
|
If a disc has both music data (CD-DA) and MP3/WMA/AAC files, playback of the two or three file types differs depending on how the disc was recorded.
Inserting the CD
Insert the CD into the slot, label-side up. The auto-loading mechanism will set the CD and begin play.
There will be a short lapse before play begins while the player reads the digital signals on the CD.
Ejecting the CD
Press the CD eject button () to eject the CD.
Playback
Select the icon on the home screen with a CD inserted and display the Entertainment screen. When
is selected, the following icons are indicated in the lower part of the centre display.
Icon |
Function |
---|---|
![]() |
Displays the Entertainment menu. Use to switch to a different audio source. |
![]() |
(Music CD) Displays the track list of the CD. Select the track you want to play. (MP3/WMA/AAC CD) Displays the top level folder/file list. Select the folder you want to select. The files in the selected folder are displayed. Select the file you want to play. |
![]() |
(MP3/WMA/ACC CDs only) Displays the file list of the folder currently being played. Select the song you want to listen to. |
![]() |
(Music CD) Replays the song currently being played repeatedly. Select it again to cancel. (MP3/WMA/AAC CD) Replays the song currently being played repeatedly. When selected again, the songs in the folder are played repeatedly. Select it again to cancel. |
![]() |
(Music CD) Plays songs on the CD in random order. Select it again to cancel. (MP3/WMA/AAC CD) Plays songs in the folder in random order. When selected again, the songs on the CD are played in random order. Select it again to cancel. |
![]() |
(Music CD) The beginning of each track on a CD is played to aid in searching for a desired track. When selected again, the operation is cancelled and the song currently being played continues. (MP3/WMA/AAC CD) The beginning of each track in a folder is played to aid in searching for a desired track. When selected again, the operation is cancelled and the song currently being played continues.
If the audio is operated during scan-play, the track being scan-played is played normally. Then, the audio operation is performed. |
![]() |
If selected within a few seconds of a song which has started to play, the previous song is selected. If more than a few seconds have elapsed after a song has begun to play, the song currently being played is replayed from the beginning. Long-press to fast reverse. It stops when you remove your hand from the icon or the commander knob. |
![]() |
Plays a CD. When selected again, playback is temporarily stopped. |
![]() |
Advances to the beginning of the next song. Long-press to fast forward. It stops when you remove your hand from the icon or the commander knob. |
![]() |
Displays sound settings to adjust audio quality level. Refer to Volume/Display/Sound Controls (Search). |
Example of use (When searching for a song from the top level of an MP3/WMA/AAC CD)
Select the icon to display the folder/file list at the top level.
When the folder is selected, folders/file lists in the folder are displayed.
Select the desired song.
Select to move to a folder one level higher.
The appearance of the repeat and shuffle icons changes depending on the type of operation in which the function is used.
Type |
Playable data |
---|---|
DVD VIDEO/DVD-VR player |
DVD VIDEO/DVD-VR file |
Inserting the DVD
Insert the DVD into the slot, label-side up. The DVD is inserted automatically and the top menu screen of the DVD disc and controller are displayed.
There will be a short lapse before play begins while the player reads the digital signals on the DVD.
Ejecting the DVD
Press the DVD eject button () to eject the DVD.
Playback
Select the icon on the home screen with a DVD inserted and display the Entertainment screen. When
is selected, the DVD top menu screen and the controller are displayed.
When starting the playback by operating the controller, the following icons are displayed at the bottom of the screen.
Icon |
Function |
---|---|
![]() |
Displays the Entertainment menu. Use to switch to a different audio source. |
![]() |
Returns to the DVD menu screen. |
![]() |
Returns to the beginning of the previous chapter if the icon is selected within a few seconds after the playback of the current chapter has started. Returns to the beginning of the current chapter if the icon is selected a few seconds after the playback of the current chapter has started. Long-press during playback to fast reverse. Long-press during pause to play in reverse in slow motion. It stops when you remove your hand from the icon or the commander knob. |
![]() |
Plays the DVD. Select again to pause the playback. |
![]() |
Advances to the beginning of the next chapter. Long-press during playback to fast forward. Long-press during pause to play in slow motion. It stops when you remove your hand from the icon or the commander knob. |
![]() |
Changes camera angle each time the icon is selected (usable DVDs only). |
![]() |
Changes display/non-display of the sub titles (usable DVDs only). |
![]() |
Changes the parental lock setting. Parental lock level and PIN code setting changes are possible. |
![]() |
Pauses the playback and displays the DVD setting screen. Select Refer to Volume/Display/Sound Controls (Search). Select |
![]() |
Adjusts the screen. Displays the video setting screen at the bottom of the screen. |
For safety reasons, images are not displayed while the vehicle is being driven.
Slide the of the controller to move the controller.
If the mode is switched to DVD mode once the DVD playback has stopped, the playback restarts without displaying the DVD menu screen.
Setting DVD functions
Sound quality and aspect ratio settings can be performed.
Setting sound quality
Select the icon.
Select to adjust the sound quality.
Refer to Volume/Display/Sound Controls (Search).
Setting aspect ratio
Select the icon.
Select .
Select a desired aspect ratio.
Setting image quality
Brightness, contrast, tint, colour density can be adjusted.
When the icon is selected, the following tabs are displayed at the bottom of the screen.
Tab |
Function |
---|---|
![]() |
Screen brightness can be adjusted using the slider. |
![]() |
Screen contrast can be adjusted using the slider. |
![]() |
Colour tone of the screen can be adjusted using the slider. |
![]() |
Screen colour can be adjusted using the slider. |
![]() |
Screen settings can be reset to initial values. Select |
Audio can be heard from the vehicle's speakers by connecting a commercially-available portable audio unit to the auxiliary jack.
Use a commercially-available, non-impedance (3.5) stereo mini plug lead.
In addition, audio can be played from the vehicle audio device by connecting a USB device to the USB port.
Refer to AUX/USB mode (Search).
Depending on the grade and specification, the screen display may differ.
Select the icon on the home screen to display the Settings screen.
Switch the tab and select the setting item you want to change.
You can customize settings in the setup display as follows:
Tab |
Item |
Function |
|
---|---|---|---|
Display |
Refer to Volume/Display/Sound Controls (Search). |
||
Safety |
Blind Spot Monitoring Volume Other |
Refer to Personalisation Features (Search). |
|
Sound |
Refer to Volume/Display/Sound Controls (Search). |
||
Clock |
Adjust Time |
Displays the currently set time is displayed. Press AM/PM can only be selected with the 12-hour clock display. |
|
GPS Sync |
Synchronizes with GPS when turned on. When turned off, the time can be changed from “Adjust Time”. |
||
Time Format |
Changes the display between 12 and 24-hour clock time. |
||
Time Zone Select |
When it's not synchronized with GPS, select the region you want to specify. |
||
Daylight Savings Time |
Turns the daylight saving time setting on/off. When ON, the time advances 1 hour. When OFF, it returns to normal time. |
||
Vehicle |
Rain Sensing Wiper Door Lock Other |
Refer to Personalisation Features (Search). |
|
Devices |
Bluetooth® |
Refer to Bluetooth® Preparation (Search). |
|
Network Management |
Wi-Fi™ is used to obtain Navi POI/Real Time Traffic function (Such as gas prices, weather, nearest restaurant) |
||
System |
Tool Tips |
Turns button explanations ON/OFF. |
|
Language |
Changes the language. |
||
Temperature |
Changes the setting between Fahrenheit and Celsius. |
||
Distance |
Changes the setting between miles and kilometres. |
||
Music Database Update |
Used to update Gracenote®. Gracenote is used with USB Audio, and provides:
Gracenote can be downloaded from the Mazda Handsfree Website. Refer to Gracenote Database (Type B/Type C) (Search). |
||
Factory Reset |
Memory and settings are initialized to the factory settings. The initialization launches by selecting the |
||
About |
Agreements and Disclaimers |
Verify the disclaimer and agree. |
|
Version Information |
Can verify the current audio unit OS version and Gracenote Database version. |
Depending on the grade and specification, the screen display may differ.
Select the icon on the home screen to display the Applications screen. The following information can be verified.
Top screen |
Item |
Function |
|
---|---|---|---|
Fuel Economy Monitor |
Fuel Consumption Control Status Effectiveness Display Settings |
Refer to Fuel Economy Monitor (Search). |
|
Vehicle Status Monitor |
Maintenance |
Scheduled Maintenance Tyre Rotation Oil Change |
Refer to Maintenance Monitor (Search). |
Warning Guidance |
Warnings currently active can be verified. |
Refer to If a Warning Light Turns On or Flashes (Search). |
Without Bluetooth® Hands-Free
With Bluetooth® Hands-Free