

 Read this first


When the Roof Cannot be Closed
When the Roof Cannot be Closed
If the roof cannot be closed electrically by pressing the retractable fastback switch, verify the roof operation conditions first.
Refer to Operation Conditions (Search).
If the roof cannot be closed even after the operation conditions are all met, have it checked at an Authorised Mazda Repairer.
If you are unable to have the roof checked at an Authorised Mazda Repairer, the roof can be closed manually as an emergency measure.
The procedure for manually closing the roof is as follows:
-
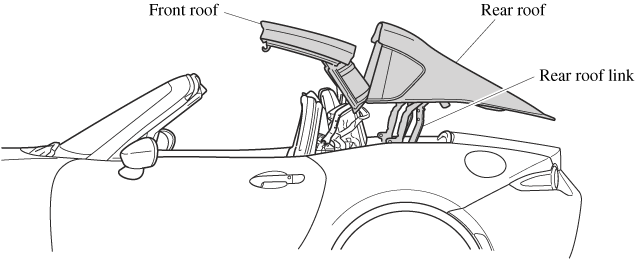
Opening the rear roof
Release the locks of the rear roof and open it.
-
Closing the front roof
Lift up the front roof and close it.
-
Closing the rear roof
Tie the ropes to the rear roof links and close the rear roof.
-
Do not drive the vehicle with the roof partially open. The vehicle operation may be affected by the wind and could result in an accident.
-
Do not perform the procedure in a strong wind as it could cause an unexpected accident.
-
Two adults are required to perform the procedure, especially when lifting up the front roof. Do not do it alone so as not to cause injury or vehicle damage.
-
Some steps in the procedure require using multiple tools at the same time and a certain level of technical expertise. In addition, holding your body extended over the car can result in muscle strains so Mazda recommends having the roof checked at an Authorised Mazda Repairer.


-
This procedure is for manually closing the roof as an emergency measure. After closing the roof manually, electric operation is not possible until the system is restored by an Authorised Mazda Repairer.
-
Using a flashlight will facilitate the procedure.


