Flat Tyre
Flat Tyre (Some Models)
Either run-flat tyres or conventional tyres are equipped on your Mazda depending on the specification, therefore the procedure for repairing a flat tyre differs depending on the type of tyre. Before driving, make sure which type of tyre is equipped on your Mazda. If you cannot identify your tyre type, consult an expert repairer (we recommend an Authorised Mazda Repairer).
How to Identify Your Tyre Type
Run-flat tyre
A run-flat tyre has a and/or
indication on the side wall.

Conventional tyre
A conventional tyre does not have a and/or
indication on the side wall.
Vehicle with Run-flat Tyres
Have the tyres checked or perform the appropriate repair as soon as possible by an expert repairer (we recommend an Authorised Mazda Repairer):
When the flat tyre warning light illuminates or the tyre pressure warning beep sound is heard, it is dangerous to drive the vehicle at high speeds, or perform sudden manoeuvring or braking. Vehicle drivability could worsen and result in an accident.
When the flat tyre warning light illuminates or the tyre pressure warning beep sound is heard, decrease vehicle speed immediately and avoid sudden manoeuvring and braking.
If a run-flat tyre is punctured, the FLAT TIRE warning light illuminates in the instrument cluster, and a beep sound is heard for about 30 seconds.

Until the flat tyre is changed, the beep sound is heard for about 30 seconds every time the ignition is switched ON.
Vehicles with run-flat tyres can be driven even with a punctured tyre under the following conditions.
Maximum vehicle speed with a punctured run-flat tyre: 80 km/h (49 mph)
Maximum driving distance with a punctured run-flat tyre: 80 km (49 miles)
The maximum driving distance may be shorter depending on the driving conditions.
If a run-flat tyre is punctured, carefully drive the vehicle to the nearest Mazda Repairer and have the tyre changed.
-
A spare tyre or emergency flat tyre repair kit is not equipped on vehicles with run-flat tyres as standard.
-
Replacing a punctured run-flat tyre with a new run-flat tyre is recommended.
-
Do not use run-flat tyres and conventional tyres on the same vehicle.
Vehicle with Conventional Tyres
Tool Storage
Your vehicle may or may not be equipped with a spare tyre, jack, and wheel brace. For details, consult an expert repairer (we recommend an Authorised Mazda Repairer).
Tools are stored in the locations illustrated in the diagram.

Jack (Some Models)
To remove the jack
-
Remove the cover.
-
Turn the wing bolt and jack screw anticlockwise.
To secure the jack
-
Insert the wing bolt into the jack with the jack screw pointing back and turn the wing bolt clockwise to temporarily tighten it.
-
Turn the jack screw clockwise.
-
Turn the wing bolt completely to secure the jack.
If the jack is not completely secured, it could rattle while driving. Make sure the jack screw is sufficiently tightened.
-
Insert the cover tabs and install the cover.
Maintenance
-
Always keep the jack clean.
-
Make sure the moving parts are kept free from dirt or rust.
-
Make sure the screw thread is adequately lubricated.
Emergency Flat Tyre Repair Kit (Some Models)
The emergency flat tyre repair kit included with your Mazda is for a temporary repair of a slightly damaged flat tyre resulting from running over nails or similar sharp objects on the road surface.
Perform the emergency flat tyre repair without removing the nail or similar sharp object which punctured the tyre.
Your vehicle is not equipped with a spare tyre. In the event of a flat tyre, use the emergency flat tyre repair kit to repair the tyre temporarily. When doing the repair, refer to the instructions included in the emergency flat tyre repair kit. If an emergency repair was performed on a flat tyre using the emergency flat tyre repair kit, have an expert repairer (we recommend an Authorised Mazda Repairer), repair or replace the tyre as soon as possible.
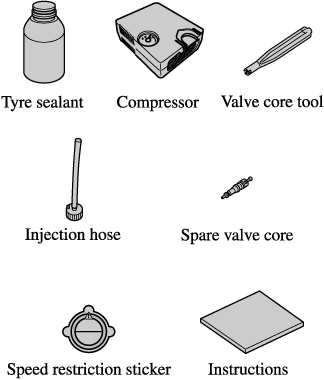
About the Emergency Flat Tyre Repair Kit
Using the Emergency Flat Tyre Repair Kit
-
Move the vehicle off the right-of-way to a safe place on a level and hard surface where the vehicle does not obstruct traffic.
-
Shift the shift lever to the 1 or Reverse (R) position for a manual transmission, and shift the selector lever to the P position for an automatic transmission.
-
Apply the parking brake with the brake pedal depressed and turn off the engine.
-
If necessary, flash the hazard warning lights and set up the roadside emergency triangle.
-
Unload passengers and cargo and remove the emergency flat tyre repair kit.
-
Shake the tyre sealant well.
If the bottle is shaken after the injection hose is screwed on, tyre sealant could spray out from the injection hose. Tyre sealant contacting clothing or other objects may be impossible to remove. Shake the bottle before screwing on the injection hose.
The sealant hardens easily and injecting it will be difficult under cold weather conditions (0 °C (32 °F) or below). Warm the sealant inside the vehicle to facilitate injection.
-
Remove the cap from the bottle. Screw on the injection hose with the bottle's inner cap left on to break the inner cap.
-
Remove the valve cap from the flat tyre. Press the back of a valve core tool to the core of the tyre valve and bleed all the remaining air.
If there is air remaining in the tyre when the valve core is removed, the valve core could fly out. Remove the valve core carefully.
-
Turn the valve core anticlockwise with the valve core tool and remove the valve core.
-
Insert the injection hose into the valve.
-
Hold the bottom of the bottle upright, squeeze the bottle with your hands, and inject the entire amount of tyre sealant into the tyre.
-
Pull out the injection hose from the valve.
The tyre sealant cannot be reused. Purchase a new tyre sealant kit at an Authorised Mazda Repairer.
-
Reinsert the valve core into the valve and turn it clockwise to install it.
Do not throw away the empty tyre sealant bottle after use. Return the empty tyre sealant bottle to an Authorised Mazda Repairer when replacing the tyre. The empty tyre sealant bottle will need to be used to extract and dispose of the used sealant from the tyre.
-
After that, install the injection hose to the tab of the bottle to prevent leakage of any remaining sealant.
-
Adhere the speed restriction sticker to an area where it can be viewed easily by the driver.
Do not adhere the speed restriction sticker to the padded area on the steering wheel:
Adhering the speed restriction sticker to the padded area on the steering wheel is dangerous because the air bag may not operate (deploy) normally resulting in serious injury. In addition, do not adhere the sticker to areas where warning lights or the speedometer cannot be viewed.
-
Pull out the air compressor hose and the air compressor plug from the air compressor.
-
Install the air compressor hose to the tyre valve.
-
Insert the air compressor plug into the accessory socket inside the vehicle and switch the ignition to ACC.
Refer to Accessory Sockets (Search).
When inserting the air compressor plug into or removing it from the accessory socket, make sure that the air compressor switch is off. When turning the air compressor on/off, use the air compressor switch.
-
Turn the air compressor switch on and inflate the tyre carefully to the correct inflation pressure.
-
Check the tyre inflation pressure label driver's door frame for the correct tyre inflation pressure.
-
Do not operate the air compressor for a continuous 10 minutes or longer because using it for long periods could cause a malfunction.
-
If the tyre inflation pressure does not increase, repair of the tyre is not possible. If the tyre does not reach the specified tyre inflation pressure within 10 minutes, it may have received extensive damage. In this case, the repair using the emergency flat tyre repair kit was not successful. Contact an expert repairer (we recommend an Authorised Mazda Repairer).
-
If the tyre has been over-inflated, loosen the screw cap on the air compressor and bleed some of the air out.
-
-
When the tyre inflates to the specified tyre inflation pressure, turn the air compressor switch off, turn the sleeve of the air compressor hose to the left, and pull it out of the tyre valve.
-
Install the tyre valve cap.
-
Put the emergency flat tyre repair kit into the boot.
-
Start driving immediately to spread the sealant in the tyre.
Carefully drive the vehicle at a speed of 80 km/h (50 mph) or less. If the vehicle is driven at a speed of 80 km/h (50 mph) or more, the vehicle may vibrate.
(With tyre pressure monitoring system)
If the tyre is not properly inflated, the tyre pressure monitoring system warning light will illuminate.
-
After driving the vehicle for about 10 minutes or 5 km (3 miles), connect the air compressor to the tyre using Step 17 of the procedure, and check the tyre inflation pressure using the tyre pressure gauge on the air compressor. If the tyre inflation pressure is lower than the specified tyre inflation pressure, turn the air compressor on and wait until it reaches the specified tyre inflation pressure.
If the tyre inflation pressure has decreased below 130 kPa (1.3 kgf/cm2 or bar, 18.9 psi), stop driving and contact an expert repairer (we recommend an Authorised Mazda Repairer):
The repair using the emergency flat tyre repair kit was not successful.
If you see a decrease in the tyre inflation pressure, even if Steps 17 to 24 of the procedure are performed repeatedly, stop driving:
Contact an expert repairer (we recommend an Authorised Mazda Repairer).
Before checking the tyre inflation pressure using the tyre pressure gauge, turn the air compressor switch off.
-
The emergency flat tyre repair is completed successfully if the tyre inflation pressure does not decrease. Carefully drive the vehicle to the nearest expert repairer (we recommend an Authorised Mazda Repairer) immediately and have the flat tyre replaced. Replacement with a new tyre is recommended. If the tyre is to be repaired or reused, consult an expert repairer (we recommend an Authorised Mazda Repairer).
-
If an emergency flat tyre repair has been performed using the emergency flat tyre repair kit, Mazda recommends that the tyre be replaced with a new one as soon as possible. If the tyre is to be repaired or reused, consult an expert repairer (we recommend an Authorised Mazda Repairer).
-
The wheel can be reused if the sealant adhering to it is removed. However, replace the valve with a new one.
-
Inspecting the Emergency Flat Tyre Repair Kit
Inspect the emergency flat tyre repair kit at regular intervals.
-
Check the tyre sealant period of effective use.
-
Check the operation of the tyre compressor.
The tyre sealant has a period of effective use. Check the period of effective use indicated on the bottle label and do not use it if it has expired. Have the tyre sealant replaced at an expert repairer (we recommend an Authorised Mazda Repairer) before the period of effective use has expired.
Changing a Tyre
Be sure to follow the directions for changing a tyre:
Changing a tyre is dangerous if not done properly. The vehicle can slip off the jack and seriously injure someone.
No person should place any portion of their body under a vehicle that is supported by a jack.
Never allow anyone inside a vehicle supported by a jack:
Allowing someone to remain in a vehicle supported by a jack is dangerous. The occupant could cause the vehicle to fall resulting in serious injury.
-
Park on a hard, level surface off the right-of-way and firmly set the parking brake.
-
Put a vehicle with an automatic transmission in Park (P), a manual transmission in Reverse (R) or 1, and turn off the engine.
-
Turn on the hazard warning flasher.
-
Have passengers get out of the vehicle and away from the vehicle and traffic.
-
Remove the jack and tool (Search).
-
Block the wheel diagonally opposite the tyre to be changed. When blocking a wheel, place a tyre block both in front and behind the tyre.
When blocking a tyre, use rocks or wood blocks of sufficient size if possible to hold the tyre in place.
Removing a Tyre
When jacking-up a vehicle, always shift the shift lever to 1st or R (manual transmission vehicle) or shift the selector lever to P (automatic transmission vehicle), apply the parking brake, and place wheel blocks in the position diagonally opposed to the jack:
Changing a flat tyre without using wheel blocks is dangerous because the vehicle may move and fall off the jack even with the shift lever in 1st or R, or the select lever is in P, which could result in an accident.
-
Loosen the wheel nuts by turning them anticlockwise one turn each, but do not remove any wheel nuts until the tyre has been raised off the ground.
-
Place the jack on the ground.
-
Turn the jack screw in the direction shown in the figure and adjust the jack head so that it is close to the jack-up position.
-
Place the jack under the jack-up position closest to the tyre being changed with the jack head squarely under the jack-up point.
-
Continue raising the jack head gradually by rotating the screw with your hand until the jack head is inserted into the jack-up position.
Use only the front and rear jacking positions recommended in this manual:
Attempting to jack the vehicle in positions other than those recommended in this manual is dangerous. The vehicle could slip off the jack and seriously injure or even kill someone. Use only the front and rear jacking positions recommended in this manual.
Do not jack up the vehicle in a position other than the designated jack-up position or place any objects on or under the jack:
Jacking up the vehicle in a position other than the designated jack-up position or placing objects on or under the jack is dangerous as it could deform the vehicle body or the vehicle could fall off the jack resulting in an accident.
Use only the jack provided with your Mazda:
Using a jack that is not designed for your Mazda is dangerous. The vehicle could slip off the jack and seriously injure someone.
Never place objects under the jack:
Jacking the vehicle with an object under the jack is dangerous. The jack could slip and someone could be seriously injured by the jack or the falling vehicle.
When raising the jack head into the jacking position and aligning the groove in the jack head with the rail under the vehicle body, the top of the jack head contacts the vehicle's underbody without the rail contacting the bottom of the groove.
-
Insert the jack lever and attach the wheel brace to tyre jack.
-
Turn the jack handle clockwise and raise the vehicle high enough so that the tyre is raised off the ground and can be removed. Before removing the wheel nuts, make sure your Mazda is firmly in position and that it cannot slip or move.
Do not jack up the vehicle higher than is necessary:
Jacking up the vehicle higher than is necessary is dangerous as it could destabilize the vehicle resulting in an accident.
Do not start the engine or shake the vehicle while it is jacked up:
Starting the engine or shaking the vehicle while it is jacked up is dangerous as it could cause the vehicle to fall off the jack resulting in an accident.
Never go under the vehicle while it is jacked up:
Going under the vehicle while it is jacked up is dangerous as it could result in death or serious injury if the vehicle were to fall off the jack.
-
Remove the wheel nuts by turning them anticlockwise; then remove the wheel.
Mounting the Tyre
-
Remove dirt and grime from the mounting surfaces of the wheel and hub, including the hub bolts, with a cloth.
Make sure the mounting surfaces of the wheel, hub and wheel nuts are clean before changing or replacing tyres:
When changing or replacing a tyre, not removing dirt and grime from the mounting surfaces of the wheel, hub and hub bolts is dangerous. The wheel nuts could loosen while driving and cause the tyre to come off, resulting in an accident.
-
Mount the tyre.
-
Install the wheel nuts with the bevelled edge inward; tighten them by hand.
Do not apply oil or grease to wheel nuts and bolts and do not tighten the wheel nuts beyond the recommended tightening torque:
Applying oil or grease to wheel nuts and bolts is dangerous. The wheel nuts could loosen while driving and cause the tyre to come off, resulting in an accident. In addition, wheel nuts and bolts could be damaged if tightened more than necessary.
-
Turn the wheel brace anticlockwise and lower the vehicle.
-
Use the wheel brace to tighten the nuts in the order shown.
If you are unsure of how tight the nuts should be, have them inspected at an expert repairer (we recommend an Authorised Mazda Repairer).
Nut tightening torque
N·m (kgf·m, ft·lbf)
108―147 (12―14, 80―108)
Always securely and correctly tighten the wheel nuts:
Improperly or loosely tightened wheel nuts are dangerous. The wheel could wobble or come off. This could result in loss of vehicle control and cause a serious accident.
Be sure to reinstall the same nuts you removed or replace them with metric nuts of the same configuration:
Because the wheel studs and wheel nuts on your Mazda have metric threads, using a non-metric nut is dangerous. On a metric stud, it would not secure the wheel and would damage the stud, which could cause the wheel to slip off and cause an accident.
-
Remove the tyre blocks and store the tools and jack.
-
Check the inflation pressure. Refer to Tyres (Search).
Do not drive with any tyres that have incorrect air pressure:
Driving on tyres with incorrect air pressure is dangerous. Tyres with incorrect pressure could affect handling and result in an accident. When you check the regular tyres' air pressure, check the spare tyre, too.