


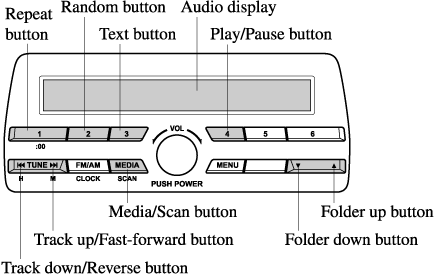
Audio Set [Type A (non-touchscreen)]


Power/Volume/Sound Controls
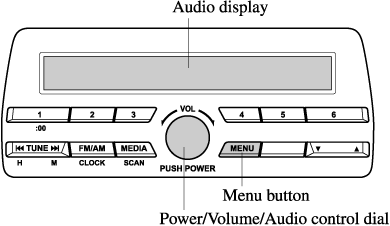
Power ON/OFF
Switch the ignition to ACC or ON. Press the power/volume dial to turn the audio system on. Press the power/volume dial again to turn the audio system off.
Volume adjustment
To adjust the volume, turn the power/volume dial. Turn the power/volume dial clockwise to increase volume, anticlockwise to decrease it.
Audio sound adjustment
-
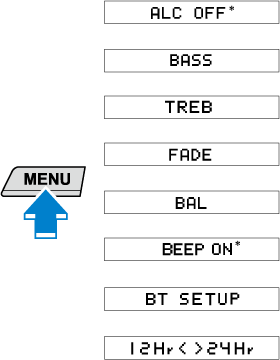
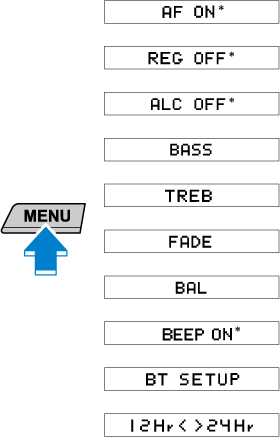
Press the menu button (
 ) to select the function. The selected function will be indicated.
 -
Turn the audio control dial to adjust the selected functions as follows:
|
Indication |
Setting value |
|
|---|---|---|
|
Turn Anticlockwise |
Turn Clockwise |
|
|
AF*1 (Setting Alternative Frequency (AF)) |
Off |
On |
|
REG*1 (Setting Regional Programme (REG)) |
Off |
On |
|
ALC (Automatic volume adjustment) |
Level decrease |
Level increase |
|
BASS (Low pitch sound) |
Decrease bass |
Increase bass |
|
TREB (Treble sound) |
Decrease treble |
Increase treble |
|
FADE (Front/back volume balance) |
Shift the sound to the front |
Shift the sound to the rear |
|
BAL (Left/right volume balance) |
Shift the sound to the left |
Shift the sound to the right |
|
BEEP (Audio operation sound) |
Off |
On |
|
BT SETUP*2 |
Select mode |
|
|
12Hr (12 Hr/24 Hr time adjustment) |
12Hr (Flashing) |
24Hr (Flashing) |
 24Hr
24Hr*1 With Radio Data System (RDS)
*2 Depending on the model, this function may not be available.
If not operated for several seconds, the display returns to the previous display. To reset bass, treble, fade, and balance, press the menu button () for 2 seconds. The unit will beep and “CLEAR” will be displayed.


AF (Setting Alternative Frequency (AF)) (Some Models)
The AF function of the Radio Data System (RDS) can be set on or off.
Refer to Radio Data System (RDS) (Search).
REG (Setting Regional Programme (REG)) (Some Models)
The REG function of the Radio Data System (RDS) can be set on or off.
Refer to Radio Data System (RDS) (Search).
ALC (Automatic volume adjustment)
The automatic level control (ALC) changes the audio volume automatically according to the vehicle speed. The faster the vehicle speed, the higher the volume increases. ALC has ALC OFF and ALC LEVEL 1 to 7 modes. At ALC LEVEL 7, the amount that the volume can increase is at the maximum. Select the mode according to the driving conditions.
BEEP (Audio operation sound)
The setting for the operation sound when pressing and holding a button can be changed. The initial setting is ON. Set to OFF to mute the operation sound.
BT SETUP mode (Some Models)
Music and other audio such as voice data recorded on portable audio devices and mobile phones available on the market which are equipped with the Bluetooth® transmission function can be listened to via wireless transmission over the vehicle's speakers. Using the BT SETUP mode, these devices can be programmed to the Bluetooth® unit or changed (Search).
12Hr  24Hr (12 Hr/24 Hr time adjustment)
Rotating the audio control dial switches the display between 12 and 24-hour clock time (Search).
Clock
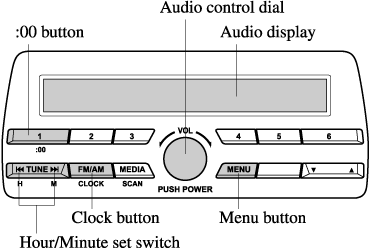
Setting the time
Time resetting
-
Press the clock button (
 ) for about 2 seconds until a beep is heard.
 -
Press the :00 button (1).
-
When the button is pressed, the time will be reset as follows:
(Example)
12:01―12:29→12:00
12:30―12:59→1:00
-
When the :00 button (1) is pressed, the seconds will start at “00”.
-
Switching between 12 and 24-hour clock time:
Press the menu button (
) several times until 12 and 24-hour clock time are displayed. Turn the audio control dial in either direction, select the desired clock setting while the preferred clock time is flashing.
Operating the Radio
Radio ON
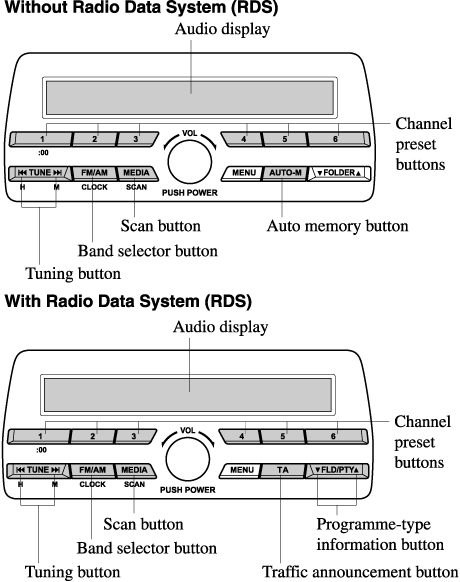
Press a band selector button () to turn the radio on.
Band selection
Successively pressing the band selector button () switches the bands as follows: FM1→FM2→AM (Without Radio Data System (RDS)), MW/LW (With Radio Data System (RDS)).
The selected mode will be indicated.
If the FM broadcast signal becomes weak, reception automatically changes from STEREO to MONO for reduced noise.
Tuning
The radio has the following tuning methods: Manual, Seek, Scan, Preset channel, and Auto memory tuning. The easiest way to tune stations is to set them on preset channels.
Manual tuning
Select the station by pressing the tuning button ( ,
,  ) lightly.
Seek tuning
Automatic search for radio stations starts when the tuning button (, ) is pressed until a beep sound is heard. The search stops when a station is found.
If you continue to press and hold the button, the frequency will continue changing without stopping.
Scan tuning
Press and hold the scan button ( ) to automatically sample strong stations. Scanning stops at each station for about 5 seconds. To hold a station, press and hold the scan button () again during this interval.
Preset channel tuning
The 6 preset channels can be used to store 6 AM (Without Radio Data System (RDS)), MW/LW (With Radio Data System (RDS)) and 12 FM stations.
-
To set a channel first select AM (Without Radio Data System (RDS)), MW/LW (With Radio Data System (RDS)), FM1, or FM2. Tune to the desired station.
-
Press a channel preset button for about 2 seconds until a beep is heard. The preset channel number or station frequency will be displayed. The station is now held in the memory.
-
Repeat this operation for the other stations and bands you want to store. To tune one in the memory, select AM (Without Radio Data System (RDS)), MW/LW (With Radio Data System (RDS)), FM1, or FM2 and then press its channel preset button. The station frequency or the channel number will be displayed.
Auto memory tuning (Without Radio Data System (RDS))
This is especially useful when driving in an area where the local stations are not known.
Press and hold the auto memory button ( ) for about 2 seconds until a beep is heard; the system will automatically scan and temporarily store up to 6 stations with the strongest frequencies in each selected band in that area.
After scanning is completed, the station with the strongest frequency will be tuned and its frequency displayed. Press and release the auto memory button () to recall stations from the auto-stored stations. One stored station will be selected each time and its frequency and channel number will be displayed.
Radio Data System (RDS) (Some Models)
The radio data system (RDS) does not function if it is out of the system's service coverage area.
Alternative frequency (AF)
AF functions on FM stations. Press the menu button () and select the AF mode to turn it on and “AF” will be displayed. If the radio reception of the current station weakens, the system switches to an alternative station automatically.
If you wish to continue a regional programme, press the menu button () and select the REG mode to turn it on. “REG ON” is displayed. To cancel it, press the audio control dial and select the REG mode to turn it off. “REG OFF” is displayed.
Traffic announcement (TA)
If the traffic announcement button ( ) is pressed, the unit switches to TA mode and “TA” is displayed.
If a TA broadcast is received while in the TA mode, the TA broadcast intercedes even while using other functions (FM, CD, USB device, AUX, or BT audio), and “Traffic Info” is displayed.
During a TA broadcast, press the traffic announcement button () to end the broadcast and return to the previous mode.
Programme-type information (PTY)
Some FM stations transmit programme-type codes. This code enables alternative stations transmitting the same programme-type code to be found quickly.
Press the programme-type information button ( ,
, ) while in FM mode. The programme-type code and “PTY” will be displayed during reception. If there is no programme-type code, “None” will be displayed.
(To choose a programme-type:)
-
Press the Programme-type information button (
,) when the programme-type code is displayed. -
Operate any one of the following:
-
Press the pre-programmed channel preset button (1 to 6).
-
Press the Programme-type information button (
,).
-
(To scan for programme-type information:)
-
Press the Programme-type information button (
,) when the programme-type code is displayed. -
Press the Programme-type information button (
,) until the beep sounds.The unit will scan for broadcasts, if none are found, “Nothing” will be displayed and the unit will return to the previously tuned band.
(To store programme types in the channel preset buttons:)
-
Press the Programme-type information button (
,) when the programme-type code is displayed. -
Press the Programme-type information button (
,) and select the programme type. -
While the programme type is displayed, press a channel preset button for about 2 seconds.
Emergency broadcast
If an emergency broadcast is received, the emergency broadcast intercedes even while using other functions (FM, CD, USB device, AUX, or BT audio), and “Alarm!” is displayed.
When the emergency broadcast ends, the system will return to the previous mode.
Operating the Compact Disc (CD) Player (Some Models)
|
Type |
Playable data |
|---|---|
|
Music/MP3/WMA/AAC CD player |
|
If a disc has both music data (CD-DA) and MP3/WMA/AAC files, playback of the 2 or 3 file types differs depending on how the disc was recorded.
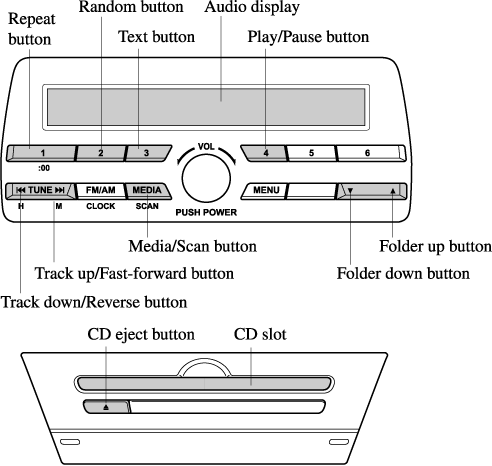
Inserting the CD
Insert the CD into the slot, label-side up. The auto-loading mechanism will set the CD and begin play.
There will be a short lapse before play begins while the player reads the digital signals on the CD.
Ejecting the CD
Press the CD eject button ( ) to eject the CD.
Playback
Press the media button () to switch to CD mode and start playback.
Pause
To stop playback, press the Play/Pause button (4).
Press the button again to resume playback.
Fast-forward/Reverse
Press and hold the fast-forward button () to advance through a track at high speed. Press and hold the reverse button () to reverse through a track at high speed.
Track search
Press the track up button () once to skip forward to the beginning of the next track.
Press the track down button () within a few seconds after playback begins to track down to the beginning of the previous track.
Press the track down button () after a few seconds have elapsed to start playback from the beginning of the current track.
Folder search (during MP3/WMA/AAC CD playback)
To change to the previous folder, press the folder down button (), or press the folder up button () to advance to the next folder.
Music scan
During music CD playback
This function scans the titles on a CD and plays 10 seconds of each song to aid you in finding a song you want to listen to.
Press and hold the scan button () during playback to start the scan play operation (the track number will flash). Press and hold the scan button () again to cancel scan playback.
During MP3/WMA/AAC CD playback
This function scans the titles in a folder currently being played and plays 10 seconds of each song to aid you in finding a song you want to listen to. Press and hold the scan button () during playback to start the scan play operation (the track number will flash).
Press and hold the scan button () again to cancel scan playback.
If the unit is left in scan, normal playback will resume where scan was selected.
Repeat playback
During music CD playback
-
Press the repeat button (1) during playback to play the current track repeatedly. “TRACK RPT” is displayed (
 is displayed next to RPT at the bottom of the display area).
 -
Press the button again to cancel the repeat playback.
During MP3/WMA/AAC CD playback
(Track repeat)
-
Press the repeat button (1) during playback to play the current track repeatedly. “TRACK RPT” is displayed (
is displayed next to RPT at the bottom of the display area). -
To cancel the repeat playback, press the button again after 3 seconds.
(Folder repeat)
-
Press the repeat button (1) during playback, and then press the button again within 3 seconds to play the tracks in the current folder repeatedly. “FOLDER RPT” is displayed (
 is displayed next to RPT at the bottom of the display area).
 -
Press the button again to cancel the repeat playback.
Random playback
Tracks are randomly selected and played.
During music CD playback
-
Press the random button (2) during playback to play the tracks on the CD randomly. “DISC RDM” is displayed (
 is displayed next to RDM at the bottom of the display area).
 -
Press the button again to cancel the random playback.
During MP3/WMA/AAC CD playback
(Folder random)
-
Press the random button (2) during playback to play the tracks in the folder randomly. “FOLDER RDM” is displayed (
is displayed next to RDM at the bottom of the display area). -
To cancel the random playback, press the button again after 3 seconds.
(CD random)
-
Press the random button (2) during playback, and then press the button again within 3 seconds to play the tracks on the CD randomly. “DISC RDM” is displayed (
is displayed next to RDM at the bottom of the display area). -
Press the button again to cancel the random playback.
Switching the display
The information displayed on the audio display changes as follows each time the text button (3) is pressed during playback.
Music CD
|
Button |
Information displayed on audio display |
|---|---|
 |
Track number/Elapsed time |
|
Track number |
|
|
Track name |
|
|
Album name |
|
|
Artist name |
|
MP3/WMA/AAC CD
|
Button |
Information displayed on audio display |
|---|---|
|
File number/Elapsed time |
|
Folder number/File number |
|
|
File name |
|
|
Folder name |
|
|
Album name |
|
|
Song name |
|
|
Artist name |
|
-
The information viewable in the display is only CD information (such as artist name, song title) which has been recorded to the CD.
-
This unit cannot display some characters. Characters which cannot be displayed are indicated by an asterisk (
 ).
).
Display scroll
Only 13 characters can be displayed at one time. To display the rest of the characters of a long title, press and hold the text button (3). The display scrolls the next 13 characters. Press and hold the text button (3) again after the last 13 characters have been displayed to return to the beginning of the title.
How to use AUX mode
-
Switch the ignition to ACC or ON.
-
Press the power/volume dial to turn the audio system on.
-
Press the media button (
) of the audio unit to change to the AUX mode.

-
When the device is not connected to the auxiliary jack, the mode does not switch to the AUX mode.
-
Adjust the audio volume using the portable audio device or audio unit.
-
Audio adjustments other than audio volume can only be done using the portable audio device.
-
If the connection plug is pulled out from the auxiliary jack while in AUX mode, noise may occur.
How to use USB mode
|
Type |
Playable data |
|---|---|
|
USB mode |
MP3/WMA/AAC file |
This unit does not support a USB 3.0 device. In addition, other devices may not be supported depending on the model or OS version.
Playback
-
Switch the ignition to ACC or ON.
-
Press the power/volume dial to turn the audio system on.
-
Press the media button (
) to switch to the USB mode and start playback.
-
Some devices such as smart phones may require a setting change to allow operation using a USB connection.
-
When the USB device is not connected, the mode does not switch to USB mode.
-
When there is no playable data in the USB device, “NO CONTENTS” is flashed.
-
Playback of the USB device is in the order of the folder numbers. Folders which have no MP3/WMA/AAC files are skipped.
-
Do not remove the USB device while in the USB mode. The data may be damaged.
Pause
To stop playback, press the play/pause button (4).
Press the button again to resume playback.
Fast-forward/Reverse
Press and hold the fast-forward button () to advance through a track at high speed.
Press and hold the reverse button () to reverse through a track at high speed.
Track search
Press the track up button () once to skip forward to the beginning of the next track.
Press the track down button () within a few seconds after playback begins to track down to the beginning of the previous track.
Press the track down button () after a few seconds have elapsed to start playback from the beginning of the current track.
Folder search
To change to the previous folder, press the folder down button (), or press the folder up button () to advance to the next folder.
Music scan
This function scans the titles in a folder currently being played and plays 10 seconds of each song to aid you in finding a song you want to listen to.
Press and hold the scan button () during playback to start the scan play operation (the track number will flash). Press and hold the scan button () again to cancel scan playback.
If the unit is left in scan, normal playback will resume where scan was selected.
Repeat playback
Track repeat
-
Press the repeat button (1) during playback to play the current track repeatedly. “TRACK RPT” is displayed (
is displayed next to RPT at the bottom of the display area). -
To cancel the repeat playback, press the button again after 3 seconds.
Folder repeat
-
Press the repeat button (1) during playback, and then press the button again within 3 seconds to play the tracks in the current folder repeatedly. “FOLDER RPT” is displayed (
is displayed next to RPT at the bottom of the display area). -
Press the button again to cancel the repeat playback.
Random playback
Tracks are randomly selected and played.
Folder random
-
Press the random button (2) during playback to play the tracks in the folder randomly. “FOLDER RDM” is displayed (
is displayed next to RDM at the bottom of the display area). -
To cancel the random playback, press the button again after 3 seconds.
All random
-
Press the random button (2) during playback, and then press the button again within 3 seconds to play the tracks in the USB device randomly. “ALL RDM” is displayed (
is displayed next to RDM at the bottom of the display area). -
Press the button again to cancel the random playback.
Switching the display
The information displayed on the audio display changes as follows each time the text button (3) is pressed during playback.
|
Button |
Information displayed on audio display |
|---|---|
|
File number/Elapsed time |
|
Folder number/File number |
|
|
File name |
|
|
Folder name |
|
|
Album name |
|
|
Song name |
|
|
Artist name |
|
-
The information (artist name, music name) is displayed only when the USB device information in the USB device has information which can be displayed on the screen.
-
This unit cannot display some characters. Characters which cannot be displayed are indicated by an asterisk (
).
Display scroll
Only 13 characters can be displayed at one time. To display the rest of the characters of a long title, press and hold the text button (3). The display scrolls the next 13 characters. Press and hold the text button (3) again after the last 13 characters have been displayed to return to the beginning of the title.
How to use iPod mode
An iPod may not be compatible depending on the model or OS version. In this case, an error message is displayed.
The iPod functions on the iPod cannot be operated while it is connected to the unit because the unit controls the iPod functions.
Playback
-
Switch the ignition to ACC or ON.
-
Press the power/volume dial to turn the audio system on.
-
Press the media button (
) to switch to the iPod mode and start playback.
-
When an iPod is not connected, the mode does not switch to the iPod mode.
-
When there is no playable data in the iPod, “NO CONTENTS” is flashed.
-
Do not remove the iPod while in the iPod mode. Otherwise, the data could be damaged.
Pause
To stop playback, press the play/pause button (4).
Press the button again to resume playback.
Fast-forward/Reverse
Press and hold the fast-forward button () to advance through a track at high speed.
Press and hold the reverse button () to reverse through a track at high speed.
Track search
Press the track up button () once to skip forward to the beginning of the next track.
Press the track down button () within a few seconds (depends on iPod software version) after playback begins to track down to the beginning of the previous track.
Press the track down button () after a few seconds (depends on iPod software version) have elapsed to start playback from the beginning of the current track.
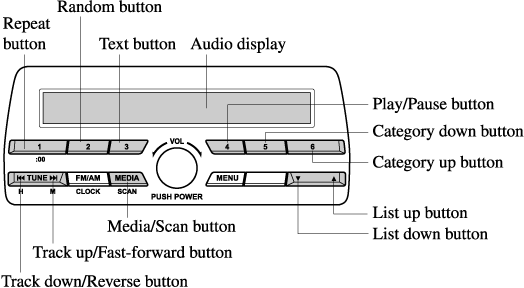
Category search
Press the category down button (5) to select the previous category and press the category up button (6) to select the next category.
The types of categories include Playlist, Artist, Album, Song, Podcast, Genre, Composer, and Audio book.
List search
Press the list down button () to select the previous list and press the list up button () to select the next list.
Music scan
This function scans the titles in a list currently being played and plays 10 seconds of each song to aid you in finding a song you want to listen to.
Press and hold the scan button () during playback to start the scan play operation (the track number will flash). Press and hold the scan button () again to cancel scan playback.
If the unit is left in scan, normal playback will resume where scan was selected.
Repeat playback
-
Press the repeat button (1) during playback to play the current track repeatedly. “TRACK RPT” is displayed (
is displayed next to RPT at the bottom of the display area). -
Press the button again to cancel the repeat playback.
Random playback
Tracks are randomly selected and played.
Song random
-
Press the random button (2) during playback to play the tracks in the list randomly. “SONG RDM” is displayed (
is displayed next to RDM at the bottom of the display area). -
To cancel the random playback, press the button again after 3 seconds.
Album random
-
Press the random button (2) during playback, and then press the button again within 3 seconds to play the tracks in the iPod randomly. “ALBUM RDM” is displayed (
is displayed next to RDM at the bottom of the display area). -
Press the button again to cancel the random playback.
The track number being played randomly is in the order of the iPod shuffle table.
Switching the display
The information displayed on the audio display changes as follows each time the text button (3) is pressed during playback.
|
Button |
Information displayed on audio display |
|---|---|
|
File number/Elapsed time |
|
File number |
|
|
Category name |
|
|
Artist name |
|
|
Album name |
|
|
Song name |
|
-
The information (artist name, music name) is displayed only when the iPod has information which can be displayed.
-
This unit cannot display some characters. Characters which cannot be displayed are indicated by an asterisk (
).
Display scroll
13 characters can be displayed at one time. To display the rest of the characters of a long title, press and hold the text button (3). The display scrolls the next 13 characters. Press and hold the text button (3) again after the last 13 characters have been displayed to return to the beginning of the title.
Error Indications
If you see an error indication on the display, take appropriate action according to the following methods. If you cannot clear the error indication, take the vehicle to an expert repairer, we recommend an Authorised Mazda Repairer.
CHECK CD
If “CHECK CD” is displayed, it means that there is some CD malfunction. Check the CD for damage, dirt, or smudges, and then properly reinsert it. If the message appears again, insert another known good CD.
CHECK USB
When the message “CHECK USB” is displayed, it indicates that there is some error in the USB device. Verify that the content recorded in the USB device has MP3/WMA/AAC files and re-connect correctly.
CHECK iPod
If the message “CHECK iPod” is displayed, it indicates that there is a malfunction in the iPod. Verify that the content recorded in the iPod has playable files and connect correctly.
Bluetooth® (Some Models)
Introduction
Bluetooth® Hands-Free outline
When a Bluetooth® device (mobile phone) is connected to the vehicle's Bluetooth® unit, a call can be made or received by pressing the talk button, pick-up button, or hang-up button on the audio remote control switch. For example, even if a device (mobile phone) is in your coat pocket, a call can be made without taking the device (mobile phone) out and operating it directly.
Bluetooth® audio outline
When a portable audio unit equipped with the Bluetooth® communication function is paired to the vehicle, you can listen to music stored on the paired portable audio device from the vehicle's speakers. It is not necessary to connect the portable audio device to the vehicle's external input terminal. After programming, operate the vehicle audio control panel to play/stop the audio.
-
For your safety, a device can be paired only when the vehicle is parked. If the vehicle starts to move, the pairing procedure will end. Park the vehicle in a safe place before pairing.
-
The communication range of a Bluetooth® equipped device is about 10 meters (32 ft) or less.
-
Basic audio operation is available using voice commands even if Bluetooth® is not connected.
Some Bluetooth® mobile devices are not compatible with the vehicle. Consult an Authorised Mazda Repairer, Mazda's call centre or Web support centre for information regarding Bluetooth® mobile device compatibility:
Phone:
(Germany)
0800 4263 738 (8:00―18:00 Central European Time)
(Except Germany)
00800 4263 7383 (8:00―18:00 Central European Time)
(Worldwide)
 49 721 5099 8198 (8:00―18:00 Central European Time)
Web:
Applicable Bluetooth® specification (Recommended)
Ver. 2.0
Component Parts
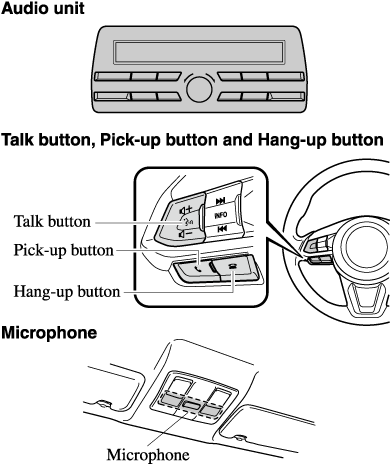
Microphone (hands-free)
The microphone is used for speaking voice commands or when making a Hands-free call.
Talk button
Activates the voice recognition. In addition, it skips the voice guidance.
Pick-up button
Responds to incoming calls. In addition, after selecting a contact or dialing a number, it places the call when the button is pressed.
Hang-up button
Ends the call or refuses an incoming call. In addition, it ends the voice recognition operation.
Volume adjustment
The power/volume dial of the audio unit is used to adjust the volume. Turn the dial to the right to increase volume, to the left to decrease it.
The volume can also be adjusted using the volume button on the steering wheel.
If the volume is lower compared to other audio modes, increase the volume from the device side.
Bluetooth® Preparation (Some Models)
The language used for the words “password” and “pin code” appearing in the Bluetooth® Preparation, differs depending on the market.
-
password
Except Thailand: password
Thailand: passcode
-
pin code
Except Thailand: pin code
Thailand: pairing code
Bluetooth® Hands-Free Preparation
Pairing code setting
The 4-digit pairing code setting for registration of your cell phone (pairing) can be set beforehand.
-
Press the pick-up button or talk button with a short press.
-
Say: [Beep] “Setup”
-
Prompt: “Select one of the following: Pairing options, confirmation prompts, language, password, select phone or select music player.”
-
Say: [Beep] “Pairing options”
-
Prompt: “Select one of the following: Pair, Edit, Delete, List, or Set pin Code.”
-
Say: [Beep] “Set pin code”
-
Prompt: “Your current pin code is XXXX. Do you want to change it to a different pairing pin code?”
-
Say: [Beep] “Yes”
-
Prompt: “Please say a 4-digit pairing code.”
-
Say: [Beep] “YYYY”
-
Prompt: “YYYY is this correct?”
-
Say: [Beep] “Yes” or “No”
-
If “Yes”, go to Step 14. If “No”, the procedure returns to Step 9.
-
Prompt: “Your new pairing pin code is YYYY. Use this pin code when pairing devices to the Hands free system. Do you want to pair a device now?”
-
Say: [Beep] “Yes” or “No”
-
If “Yes”, the system switches to the device registration mode. If “No”, the system returns to standby status.
Device pairing (Bluetooth® Hands-Free)
To use Bluetooth® Hands-Free, the device equipped with Bluetooth® has to be paired to the Bluetooth® unit using the following procedure.
A maximum of seven devices including hands-free mobile phones and Bluetooth® audio devices can be paired to one vehicle.
-
A device can be paired only when the vehicle is parked. If the vehicle starts to move, the pairing procedure will end. Pairing is dangerous while driving - pair up your device before you start driving. Park the car in a safe place before paired.
-
If a Bluetooth® device has already been paired to the vehicle as a Bluetooth® audio device, it does not need to be paired again when using the device as a hands-free mobile phone. Conversely, it does not need to be paired again as a Bluetooth® audio device if it has already been paired as a hands-free mobile phone.
-
Since the communication range of a Bluetooth® equipped device is about 10 m (32 ft), if a device is placed within a 10 m (32 ft) radius of the vehicle, it may be detected/paired unintentionally while another device is being paired.
-
Activate the Bluetooth® application of the device.
-
Press the pick-up button or talk button with a short press.
-
Say: [Beep] “Setup”
-
Prompt: “Select one of the following: Pairing options, confirmation prompts, language, password, select phone or select music player.”
-
Say: [Beep] “Pairing options”
-
Prompt: “Select one of the following: Pair, edit, delete, list, or set pin code.”
-
Say: [Beep] “Pair”
-
Prompt: “Start the pairing process on your Bluetooth® device. Your pin code is 0000 (XXXX). Input this on your Bluetooth® device. See device manual for instructions.”
-
Using the device, perform a search for the Bluetooth® device (Peripheral device).
-
Select “Mazda” from the device list searched by the device.
-
Input the 4-digit pairing code to the device.
-
Prompt: “Please say the name of the device after the beep.”
-
Say: [Beep] “XXXX - - -” (Speak a “device tag”, an arbitrary name for the device.)
Example: “Stan's device.”
Say a paired “device tag” within 10 seconds.
If more than 2 devices are to be paired, they cannot be paired with the same or similar “device tag”.
-
Prompt: “Adding XXXXXX - - - (Ex. “Stan's device”) (Device tag). Is this correct?”
-
Say: [Beep] “Yes”
-
Prompt: “Pairing complete”
After a device is registered, the system automatically identifies the device. By activating Bluetooth® Hands-Free again, or by activating Bluetooth® Hands-Free first after switching the ignition from OFF to ACC, the system reads out a voice guidance, “XXXXXX - - - (Ex. “Stan's device”) (Device tag) is connected”.
-
When the pairing is completed, the
 symbol is displayed.
 -
Some Bluetooth® audio devices need a certain amount of time before the
symbol is displayed. -
Device registration can also be done by operating the audio unit.
-
Depending on the device, the registration status may be lost after a certain period of time. If this occurs, repeat the entire process from Step 1.
Registered device read-out
Bluetooth® Hands-Free can read-out the devices registered to its system.
Do this function only when parked. It is too distracting to attempt while driving and you may make too many errors to be effective.
-
Press the pick-up button or talk button with a short press.
-
Say: [Beep] “Setup”
-
Prompt: “Select one of the following: Pairing options, confirmation prompts, language, password, select phone or select music player.”
-
Say: [Beep] “Pairing options”
-
Prompt: “Select one of the following: Pair, edit, delete, list, or set pin code.”
-
Say: [Beep] “List”
-
Prompt: “XXXXX..., XXXXX..., XXXXX... (Ex. Device A, device B, device C)” (The voice guidance reads out the device tags registered to the hands-free system.)
Press the talk button with a short press during the read-out at the desired device, and then say one of the following voice commands to execute it.
-
“Select phone”: Selects device (Mobile phone) when the talk button is short-pressed.
-
“Select music player”: Selects device (Music player) when the talk button is short-pressed.
-
“Edit”: Edits device when the talk button is short-pressed.
-
“Continue”: Continues the list read-out.
-
“Delete”: Deletes the registered device when the talk button is short-pressed.
-
“Previous”: Returns to the previous device in read-out when the talk button is short-pressed.
-
-
Prompt: “End of list, would you like to start from the beginning?”
-
Say: [Beep] “No”
-
Prompt: “Returning to main menu.”
Device selection (Bluetooth® Hands-Free)
If several devices have been paired, the Bluetooth® unit links the device last paired. If you would like to link a different paired device, it is necessary to change the link. The order of device priority after the link has been changed is maintained even when the ignition is switched off.
(Hands-free phone)
-
Press the pick-up button or talk button with a short press.
-
Say: [Beep] “Setup”
-
Prompt: “Select one of the following: Pairing options, confirmation prompts, language, password, select phone or select music player.”
-
Say: [Beep] “Select phone”
-
Prompt: “Please say the name of the device you would like to select. Available devices are XXXXX... (Ex. device A), XXXXX... (Ex. device B), XXXXX... (Ex. device C). Which device please?”
-
Say: [Beep] “X” (Say the number for the mobile phone to be connected.)
-
Prompt: “XXXXX... (Ex. device B...) (Registered device tag) is this correct?”
-
Say: [Beep] “Yes”
-
Prompt: “XXXXX... (Ex. device B...) (Device tag) selected.”
(Music player)
-
Press the pick-up button or talk button with a short press.
-
Say: [Beep] “Setup”
-
Prompt: “Select one of the following: Pairing options, confirmation prompts, language, password, select phone or select music player.”
-
Say: [Beep] “Select music player”
-
Prompt: “Please say the name of the device you would like to select. Available devices are XXXXX... (Ex. device A), XXXXX... (Ex. device B), XXXXX... (Ex. device C). Which device please?”
-
Say: [Beep] “X” (Say the number for the music player to be connected.)
-
Prompt: “XXXXX... (Ex. device B...) (Registered device tag) is this correct?”
-
Say: [Beep] “Yes”
-
Prompt: “XXXXX... (Ex. device B...) (Device tag) selected.”
-
When the selected device connection is completed, the
or  symbol is displayed.
 -
Some Bluetooth® audio devices need a certain amount of time before the
or symbol is displayed. -
Device (Music player) selection can also be done by operating the panel button.
Deleting a device (Bluetooth® Hands-Free)
Registered devices (Mobile phone) can be deleted individually or collectively.
Do this function only when parked. It is too distracting to attempt while driving and you may make too many errors to be effective.
-
Press the pick-up button or talk button with a short press.
-
Say: [Beep] “Setup”
-
Prompt: “Select one of the following: Pairing options, confirmation prompts, language, password, select phone or select music player.”
-
Say: [Beep] “Pairing options”
-
Prompt: “Select one of the following: Pair, edit, delete, list, or set pin code.”
-
Say: [Beep] “Delete”
-
Prompt: “Please say the name of the device you would like to delete. Available devices are XXXXX... (Ex. device A), XXXXX... (Ex. device B), XXXXX... (Ex. device C), or all. Which device please?”
-
Say: [Beep] “X” (Say the number of the device to be deleted.)
-
Prompt: “Deleting XXXXX... (Ex. device B...) (Registered device tag). Is this correct?”
-
Say: [Beep] “Yes”
-
Prompt: “Deleted”
Registered device editing (Bluetooth® Hands-Free)
-
Press the pick-up button or talk button with a short press.
-
Say: [Beep] “Setup”
-
Prompt: “Select one of the following: Pairing options, confirmation prompts, language, password, select phone or select music player.”
-
Say: [Beep] “Pairing options”
-
Prompt: “Select one of the following: Pair, edit, delete, list, or set pin code.”
-
Say: [Beep] “Edit”
-
Prompt: “Please say the name of the device you would like to edit. Available devices are XXXXX... (Ex. device A), XXXXX... (Ex. device B), XXXXX... (Ex. device C). Which device please?”
-
Say: [Beep] “X” (Say the number of the device to be edited.)
-
Prompt: “New name please?”
-
Say: [Beep] “XXXXX... (Ex. device C)” (Speak a “device tag”, an arbitrary name for the device.)
-
Prompt: “XXXXX... (Ex. device C) (Device tag), is this correct?”
-
Say: [Beep] “Yes”
-
Prompt: “New name saved.”
Bluetooth® Audio Preparation
Bluetooth® audio device set-up
Bluetooth® audio pairing, changes, deletions, and display of paired device information can be performed.
-
The mode changes as follows each time the menu button (
) is pressed. Select “BT SETUP”.Without Radio Data System (RDS)
With Radio Data System (RDS)
* Depending on the mode selected, the indication changes.
-
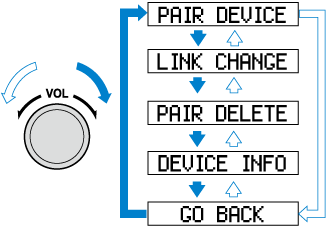
Turn the audio control dial and select a desired mode.
Display
Mode
Function
PAIR DEVICE
Pairing mode
Bluetooth® audio device pairing
LINK CHANGE
Link change mode
Changing link to Bluetooth® audio device
PAIR DELETE
Pairing deletion mode
Deleting link to Bluetooth® audio device
DEVICE INFO
Device information display mode
Displaying vehicle's Bluetooth® unit information
-
Press the audio control dial to determine the mode.
Bluetooth® audio device pairing (Bluetooth® Audio)
Any Bluetooth® audio device must be paired to the vehicle's Bluetooth® unit before it can be listened to over the vehicle's speakers.
A maximum of seven devices including Bluetooth® audio devices and hands-free mobile phones can be paired to one vehicle.
-
If a Bluetooth® device has already been paired to the vehicle as a hands-free mobile phone, it does not need to be paired again when using the device as a Bluetooth® audio device. Conversely, it does not need to be paired again as a hands-free mobile phone if it has already been paired as a Bluetooth® audio device.
-
Device registration can also be done using voice recognition.
Concerning the operation of a Bluetooth® audio device itself, refer to its instruction manual.
Some Bluetooth® audio devices have PIN codes (four digits). Refer to the audio device's instruction manual because the pairing procedure differs depending on whether it has a PIN code or not.
Pairing a Bluetooth® audio device which has a four-digit PIN code
-
Using the audio control dial, select the pairing mode “PAIR DEVICE” in the “BT SETUP” mode. (Refer to “Bluetooth® audio device set-up” for details.)
-
Press the audio control dial to determine the mode.
After “ENTER PIN” is displayed on the audio display for 3 seconds, “PIN 0000” is displayed and the PIN code can be input.
-
Input the PIN code of your Bluetooth® audio device by pressing channel preset buttons 1 to 4 while “PIN 0000” is displayed.
Press channel preset button 1 to input the first digit, 2 for the second, 3 for the third, and 4 for the forth. For example, if the PIN code were “4213”, press channel preset button 1 four times (1, 2, 3, 4), button 2 twice (1, 2), button 3 once (1), and button 4 three times (1, 2, 3). If the “PIN 0000” display disappears before finishing the PIN code input, repeat the procedure from Step 1.
Some devices accept only a particular pairing code (Usually, “0000” or “1234”).
If pairing cannot be completed, refer to the owner's manual of your mobile device, and try those numbers if necessary.
-
Press the audio control dial while the input PIN code is displayed.
“PAIRING” flashes on the display.
-
Operate the Bluetooth® audio device and set it to the pairing mode while “PAIRING” is flashing.
-
When the pairing is completed, “
” and “PAIR SUCCESS” are displayed after about 10 — 30 seconds, after which “PAIR SUCCESS” continues to be displayed for 3 seconds, and then the unit returns to the normal display.
-
Some Bluetooth® audio devices need a certain amount of time before the “
” symbol is displayed. -
If the pairing failed, “Err” flashes for 3 seconds.
-
Pairing cannot be performed while the vehicle is moving. If you attempt to perform pairing while the vehicle is moving, “PAIR DISABLE” is displayed.
-
If seven Bluetooth® audio devices have already been paired to the vehicle, pairing cannot be performed and “MEMORY FULL” is displayed. Delete one paired device to pair another one.
-
Pairing a Bluetooth® audio device which does not have a four-digit PIN code
-
Using the audio control dial, select the pairing mode “PAIR DEVICE” in the “BT SETUP” mode. (Refer to “Bluetooth® audio set up” for details.)
-
Press the audio control dial to determine the mode. After “ENTER PIN” is displayed on the audio display for 3 seconds, “PIN 0000” is displayed and the PIN code can be input.
-
Press the audio control dial while “PIN 0000” is displayed.
“PAIRING” flashes on the audio display.
-
Operate the Bluetooth® audio device and set it to the pairing mode while “PAIRING” is flashing.
-
As the Bluetooth® audio device requires a PIN code, input “0000”.
-
When the pairing is completed, “
” and “PAIR SUCCESS” are displayed after about 10 — 30 seconds, after which “PAIR SUCCESS” continues to be displayed for 3 seconds, and then the unit returns to the normal display.
-
If pairing cannot be completed, try “1234” instead. Refer to the owner's manual of your mobile device for the right PIN code.
-
Some Bluetooth® audio devices need a certain amount of time before the “
” symbol is displayed. -
If the pairing failed, “Err” flashes for 3 seconds.
-
Pairing cannot be performed while the vehicle is moving. If you attempt to perform pairing while the vehicle is moving, “PAIR DISABLE” is displayed.
-
If seven Bluetooth® audio devices have already been paired to the vehicle, pairing cannot be performed and “MEMORY FULL” is displayed. Delete one paired device to pair another one.
-
Device selection (Bluetooth® Audio)
If several devices have been paired, the Bluetooth® unit links the device last paired. If you would like to link a different paired device, it is necessary to change the link. The order of device priority after the link has been changed is maintained even when the ignition is switched off.
-
Using the audio control dial, select the link change mode “LINK CHANGE” in the “BT SETUP” mode. (Refer to “Bluetooth® audio device set-up” for details.)
-
Press the audio control dial to determine the mode.
-
The name of the currently linked Bluetooth® audio device is displayed.
If no Bluetooth® audio device is currently linked, the name of the first device among the paired devices is displayed.
-
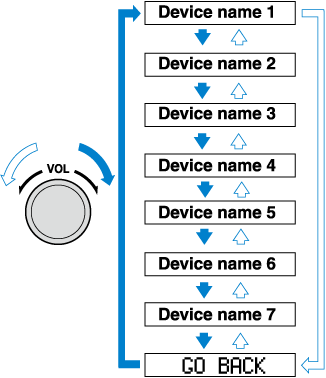
Turn the audio control dial to select the name of the device you would like to link.
-
Press the audio control dial to select the device you would like to link.
The “
” symbol disappears, and “PAIRING” flashes in the audio display.
When “GO BACK” is selected and the audio control dial is pressed, the display returns to “LINK CHANGE”.
-
If the link to the desired device is successful, the “
” symbol is displayed again, together with “LINK CHANGED”. “LINK CHANGED” is displayed for 3 seconds, then it returns to the normal display.
-
Some Bluetooth® audio devices need a certain amount of time before the “
” symbol is displayed. -
If a hands-free type mobile phone has been the most recently paired device, the Bluetooth® unit links this device. If you would like to use a Bluetooth® audio type device which has been previously paired to the Bluetooth® unit, the link must be changed to this device.
-
If an error occurs while trying to link a device, “Err” flashes in the display for 3 seconds, and the display returns to “LINK CHANGE”. If this occurs, check the pairing status of the Bluetooth® audio device and the location of the device in the vehicle (not in the luggage compartment or a metal-type box), and then try the link operation again.
-
Device selection can also be done using voice recognition.
-
How to confirm the device currently linked
Switch to the link-change mode. (Refer to “Changing the link to a Bluetooth® audio device”)
The device name displayed first is the device which is currently linked.
Deleting a device (Bluetooth® Audio)
-
Using the audio control dial, select the pairing delete mode “PAIR DELETE” in the “BT SETUP” mode. (Refer to “Bluetooth® audio device set-up” for details.)
-
Press the audio control dial to determine the mode.
-
The name of the first device among the paired devices is displayed.
-
Rotate the audio control dial and select the name of the paired device you would like to delete.
Only the names of paired devices can be displayed. If only one device is paired, only the name for this device is displayed.
-
If a selection other than “GO BACK” is made and the audio control dial is pressed, “SURE ? NO” is displayed.
-
Rotate the audio control dial clockwise and switch the display to “SURE ? YES”.
The display changes as follows depending on whether the audio control dial is rotated clockwise or anticlockwise.
-Clockwise: “SURE ? YES” displayed
-Anticlockwise: “SURE ? NO” displayed
-
Press the audio control dial to delete the selected device.
Select “GO BACK” and press the audio control dial to return to the “PAIR DELETE” display.
-
“PAIR DELETED” is displayed for 3 seconds after the deletion is completed, and then it returns to the normal display.
If an error occurs while trying to delete the paired device, “Err” flashes in the display for 3 seconds and the display returns to “LINK DELETE”.
Bluetooth® audio device information display
-
Using the audio control dial, select the pair device information display mode “DEVICE INFO” in the “BT SETUP” mode. (Refer to “Bluetooth® audio device set-up” for details.)
-
Press the audio control dial to determine the mode.
-
The name of the Bluetooth® unit device is displayed.
-
Rotate the audio control dial to select the information for the Bluetooth® unit which you would like to view.
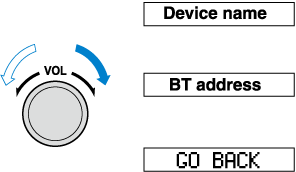
When “GO BACK” is selected and the audio control dial is pressed, the display returns to “DEVICE INFO”.
Available Language (Some Models)
The language used for the word “password” appearing in the Available Language, differs depending on the market.
-
password
Except Thailand: password
Thailand: passcode
The available languages are as follows:
-
(Except Thailand)
-
English
-
French
-
Spanish
-
Italian
-
German
-
Dutch
-
Portuguese
-
-
(Thailand)
-
English
-
Spanish
-
Canadian French
-
-
If the language setting is changed, device registration is maintained.
-
Phonebook records are not cleared, but each language has a separate phonebook. Therefore, entries created in one language will need to be re-entered in the phonebook of the new language.
-
Do these steps before you start driving. These less used functions are too distracting to undertake while driving until you are fully familiar with the system.
(Method 1)
-
Press the pick-up button or talk button with a short press.
-
Say: [Beep] “Setup”
-
Prompt: “Select one of the following: Pairing options, confirmation prompts, language, password, select phone or select music player.”
-
Say: [Beep] “Language”
-
-
(Except Thailand)
Prompt: “Select a language: English, French, Spanish, Italian, German, Dutch, or Portuguese.”
-
(Thailand)
Prompt: “Select a language: English, French, or Spanish.”
-
-
-
(Except Thailand)
Say: [Beep]“French” (Speak the desired language: “English”, “French”, “Spanish”, “Italian”, “German”, “Dutch”, or “Portuguese”)
-
(Thailand)
Say: [Beep] “French” (Speak the desired language: “English”, “French” or “Spanish”)
Other language settings can also be made while in the current setting by saying the name of the language in the native pronunciation.
-
-
Prompt: “French (Desired language) selected. Is this correct?”
-
Say: [Beep] “Yes”
-
Prompt: “Please wait. Switching to French phonebook. French selected.” (Spoken in the newly selected language).
(Method 2)
-
Press the pick-up button or talk button with a short press.
-
-
(Except Thailand)
Say: [Beep] “French” (Say the desired language: “English”, “French”, “Spanish”, “Italian”, “German”, “Dutch”, or “Portuguese”). (Change the desired language by saying the language name.)
-
(Thailand)
Say: [Beep] “French” (Say the desired language: “English”, “French” or “Spanish”). (Change the desired language by saying the language name.)
Other language settings can also be made while in the current setting by saying the name of the language in the native pronunciation.
-
-
Prompt: “Would you like to change the language to French (Desired language)?”
-
Say: [Beep] “Yes”
-
Prompt: “Please wait. Switching to French phonebook. French selected.” (Spoken in the newly selected language).
Security Setting (Some Models)
The language used for the word “password” appearing in the Security Setting, differs depending on the market.
-
password
Except Thailand: password
Thailand: passcode
If a password is set, the system cannot be activated unless the password is input.
Do this function only when parked. It is too distracting to attempt while driving and you may make too many errors to be effective.
Password setting
-
Press the pick-up button or talk button with a short press.
-
Say: [Beep] “Setup”
-
Prompt: “Select one of the following: Pairing options, confirmation prompts, language, password, select phone or select music player.”
-
Say: [Beep] “Password”
-
Prompt: “Password is disabled. Would you like to enable it?”
-
Say: [Beep] “Yes”
-
Prompt: “Please say a 4-digit password. Remember this password. It will be required to use this system.”
-
Say: [Beep] “XXXX” (Say a desired 4-digit password, “PCode”.)
-
Prompt:“Password XXXX (Password, PCode). Is this correct?”
-
Say: [Beep] “Yes”
-
Prompt:“Password is enabled.”
Using Bluetooth® Hands-Free with a password
-
Press the pick-up button or talk button with a short press.
-
Prompt: “Hands-Free system is locked. State the password to continue.”
-
Say: [Beep] “XXXX” (Say the set password “PCode”.)
-
If the correct password is input, voice guidance “XXXXXX... (Ex. “Mary's device”) (Device tag) is connected” is announced.
If the password is incorrect, voice guidance “XXXX (4-digit password, Pcode) incorrect password, please try again” is announced.
Cancelling the password
Do this function only when parked. It is too distracting to attempt while driving and you may make too many errors to be effective.
-
Press the pick-up button or talk button with a short press.
-
Say: [Beep] “Setup”
-
Prompt: “Select one of the following: Pairing options, confirmation prompts, language, password, select phone or select music player.”
-
Say: [Beep] “Password”
-
Prompt:“Password is enabled. Would you like to disable it?”
-
Say: [Beep] “Yes”
-
Prompt:“Password is disabled.”
Confirmation Prompts
The confirmation prompt confirms the command content to the user before advancing to the operation requested by the user. When this function is turned on, the system reads out the voice input command previously received and confirms whether the command is correct before advancing to the command execution.
When the confirmation prompt function is turned on:
(Ex. “Calling John's device. Is this correct?”)
When the confirmation prompt function is turned off:
(Ex. “Calling John's device.”)
If the confirmation prompt function is turned off when making an emergency call, the system reads out and confirms the command before executing it.
-
Press the pick-up button or talk button with a short press.
-
Say: [Beep] “Setup”
-
Prompt: “Select one of the following: Pairing options, confirmation prompts, language, password, select phone or select music player.”
-
Say: [Beep] “Confirmation prompts”
-
Prompt: “Confirmation prompts are on/off. Would you like to turn confirmation prompts off/on?”
-
Say: [Beep] “Yes”
-
Prompt: “Confirmation prompts are off/on.”
Bluetooth® Audio (Some Models)
Applicable Bluetooth® specification (Recommended)
Ver. 2.0
Response profile
-
A2DP (Advanced Audio Distribution Profile) Ver. 1.0
-
AVRCP (Audio/Video Remote Control Profile) Ver. 1.0/1.3
A2DP is a profile which transmits only audio to the Bluetooth® unit. If your Bluetooth® audio device corresponds only to A2DP, but not AVRCP, you cannot operate it using the control panel of the vehicle's audio system. In this case, only the operations on the mobile device are available the same as when a portable audio device for a non-compliant Bluetooth® device is connected to the AUX terminal.
|
Function |
A2DP |
AVRCP |
|
|---|---|---|---|
|
Ver. 1.0 |
Ver. 1.3 |
||
|
Playback |
— |
X |
X |
|
Pause |
— |
X |
X |
|
File (Track) up/down |
— |
X |
X |
|
Reverse |
— |
— |
X |
|
Fast-forward |
— |
— |
X |
|
Text display |
— |
— |
X |
X: Available
—: Not available
-
The battery consumption of Bluetooth® audio devices increases while Bluetooth® is connected.
-
If a general mobile phone device is USB connected during music playback over the Bluetooth® connection, the Bluetooth® connection is disconnected. For this reason, you cannot have music playback over a Bluetooth® connection and music playback using a USB connection at the same time.
-
The system may not operate normally depending on the Bluetooth® audio device.
Switching to Bluetooth® audio mode
To listen to music or voice audio recorded to a Bluetooth® audio device, switch to the Bluetooth® audio mode to operate the audio device using the audio system control panel. Any Bluetooth® audio device must be paired to the vehicle's Bluetooth® unit before it can be used.
Refer to Bluetooth® Preparation (Type A) (Search).
-
Turn on the Bluetooth® audio device's power.
-
Switch the ignition to ACC or ON.
Make sure that the “
” symbol is displayed in the audio display. The symbol is not displayed if an un-paired Bluetooth® audio device is being used or the vehicle's Bluetooth® unit has a malfunction.
Some Bluetooth® audio devices need a certain amount of time before the “
” symbol is displayed. -
Press the media button (
) to switch to the Bluetooth® audio mode and start playback.
If the current device version is lower than AVRCP Ver. 1.3: “BT Audio” is displayed.
If the current device is AVRCP Ver. 1.3: The playback time is displayed.
-
If the Bluetooth® audio device does not begin playback, press the Play/Pause button (4).
-
If a call is received on a hands-free mobile phone during playback from the Bluetooth® audio device, the playback is stopped. Playback from the Bluetooth® audio device resumes after the call ends.
Playback
-
To listen to a Bluetooth® audio device over the vehicle's speaker system, switch the mode to Bluetooth® audio mode. (Refer to “Switching to Bluetooth® audio mode”)
-
To stop playback, press the Play/Pause button (4).
-
Press the button again to resume playback.
Selecting a file (track)
Selects the next file (track)
Short-press the track up button ( ).
).
Selects the beginning of the current file (track)
Short-press the track down button ( ).
).
Fast-forward/Reverse (AVRCP Ver. 1.3)
Fast-forward
Press and hold the fast-forward button ().
Reverse
Press and hold the reverse down button ().
Switching the display (only AVRCP Ver. 1.3)
The information displayed on the audio display changes as follows each time the text button (3) is pressed during playback.
|
Button |
Information displayed on audio display |
|---|---|
|
Elapsed time |
|
Album name |
|
|
Song name |
|
|
Artist name |
|
-
If title information is not available, “NO TITLE” is displayed.
-
This unit cannot display some characters. Characters which cannot be displayed are indicated by an asterisk (
).
Display scroll
Only 13 characters can be displayed at one time. To display the rest of the characters of a long title, press and hold the text button (3). The display scrolls the next 13 characters. Press and hold the text button (3) again after the last 13 characters have been displayed to return to the beginning of the title.
Bluetooth® audio device information display
If a Bluetooth® audio device is connected, the following information is displayed in the audio display.
|
Category |
AVRCP Ver. lower than 1.3 |
AVRCP Ver. 1.3 |
|---|---|---|
|
Device name |
X |
X |
|
Title |
— |
X |
|
Artist name |
— |
X |
|
Album name |
— |
X |
|
File number |
— |
X |
|
Playback time |
— |
X |
|
Folder number |
— |
— |
X: Available
—: Not available
Some information may not display depending on the device, and if the information cannot be displayed, “NO TITLE” is indicated.
Bluetooth® Hands-Free (Some Models)
Making a Call
Phonebook Usage
Telephone calls can be made by saying the name of a person (voice tag) whose phone number has been registered in Bluetooth® Hands-Free in advance. Refer to Phonebook registration.
-
Press the pick-up button or talk button with a short press.
-
Say: [Beep] “Call”
-
Prompt: “Name please.”
-
Say: [Beep] “XXXXX... (Ex. “John's phone”)” (Say a voice tag registered in the phonebook.)
-
Prompt: “Calling XXXXX... (Ex. “John's phone”) XXXX (Ex. “at home”). Is this correct?” (Voice tag and phone number location registered in phonebook).
-
Say: [Beep] “Yes”
-
Prompt: “Dialing”
The “Call” command and the voice tag can be combined.
Ex. In Step 2, say, “Call John's phone”, then, Steps 3 and 4 can be skipped.
Phonebook registration
Phone numbers can be registered to the Bluetooth® Hands-Free phonebook.
Do this function only when parked. It is too distracting to attempt while driving and you may make too many errors to be effective.
-
Press the pick-up button or talk button with a short press.
-
Say: [Beep] “Phonebook”
-
Prompt: “Select one of the following: New entry, edit, list names, delete, erase all or import contact.”
-
Say: [Beep] “New entry”
-
Prompt: “Name please.”
-
Say: [Beep] “XXXXX... (Ex. “Mary's phone”)” (Say a voice tag for the name registered.)
-
Prompt: “Adding XXXXX... (Ex. “Mary's phone”) (Registered voice tag). Is this correct?”
-
Say: [Beep] “Yes”
-
Prompt: “Home, Work, Mobile, or Other?”
-
Say: [Beep] “Mobile” (Say “Home” , “Work”, “Mobile”, or “Other”, for the desired location to be registered.)
-
Prompt: “Mobile (Location to be registered). Is this correct?”
-
Say: [Beep] “Yes”
-
Prompt: “Number, please.”
-
Say: [Beep] “XXXXXXXXXXX” (Say the phone number to be registered.)
-
Prompt: “XXXXXXXXXXX (Phone number registration). After the beep, continue to add numbers, or say Go-Back to re-enter the last entered numbers, or press the Pick-Up button to save the number.”
-
(Registration)
Press the pick-up button or say “Enter”, then go to Step 17.
(Adding/inputting telephone number)
Say, “XXXX” (desired telephone number), then go to Step 15.
(Telephone number correction)
Say, “Go Back”. The prompt replies, “Go Back. The last entered numbers have been removed.”. Then go back to Step 13.
-
Prompt: “Number saved. Would you like to add another number for this entry?”
-
Say: [Beep] “Yes” or “No”.
-
If “Yes”, an additional phone number registration can be made for the same entry.
If “No”, the system returns to standby status.
(Import contact)
Phonebook data from your device (Mobile phone) can be sent and registered to your Bluetooth® Hands-Free phonebook using Bluetooth®.
-
Press the pick-up button or talk button with a short press.
-
Say: [Beep] “Phonebook”
-
Prompt: “Select one of the following: New entry, edit, list names, delete, erase all or import contact.”
-
Say: [Beep] “Import contact”
-
Prompt: “The hands free system is ready to receive a contact from the phone; only a home, work, mobile number can be imported into the hands free system. The import contact process requires the user to operate the phone. Refer to the phone's manual for information on how to operate the phone to perform the import operation.”
-
Prompt: “X (Number of locations which include data) numbers have been imported. What name would you like to use for these numbers?”
-
Say: [Beep] “XXXXX... (Ex. “Mary's phone”)” (Say a voice tag for the name registered.)
-
Prompt: “Adding XXXXX... (Ex. “Mary's phone”) (Voice tag). Is this correct?”
-
Say: [Beep] “Yes”
-
Prompt: “Number saved. Would you like to import another contact?”
-
Say: [Beep] “Yes” or “No”
-
If “Yes”, the procedure proceeds to Step 5.
If “No”, the system returns to standby status.
Editing phonebook
The data registered to the Bluetooth® Hands-Free phonebook can be edited.
Do this function only when parked. It is too distracting to attempt while driving and you may make too many errors to be effective.
-
Press the pick-up button or talk button with a short press.
-
Say: [Beep] “Phonebook”
-
Prompt: “Select one of the following: New entry, edit, list names, delete, erase all or import contact.”
-
Say: [Beep] “Edit”
-
Prompt: “Please say the name of the entry you would like to edit or say, “List names”.”
-
Say: [Beep] “XXXXX... (Ex. “Mary's phone”)” (Say the voice tag for the registered name to be edited in the phonebook.)
-
Prompt: “Home, Work, Mobile, or Other?”
-
Say: [Beep] “Home” (Say the registered location to be edited: “Home”, “Work”, “Mobile”, or “Other”.)
-
Prompt: “XXXXX... (Ex. “Mary's phone”) (Registered voice tag) XXXX (Ex. “Home”) (Registered location). Is this correct?”
-
Say: [Beep] “Yes”
-
Prompt: “The current number is XXXXXXXXXXX (Ex. “555-1234”) (Currently registered number). New number, please.”
If there was no previous phone number registered to a location (Ex. “Work”), the prompt will only read out “Number, please”
-
Say: [Beep] “XXXXXXXXXXX (Ex. “555-5678”)” (Say the new phone number to be registered.)
-
Prompt: “XXXXXXXX (Telephone number) After the beep, continue to add numbers, or say Go-Back to re-enter the last entered numbers, or press the Pick-Up button to save the number.”
-
(Number Change)
Press the pick-up button, then go to Step 15.
(Adding/inputting telephone number)
Say, “XXXX” (desired telephone number), then go to Step 13.
(Telephone number correction)
Say, “Go Back”. The prompt replies, “Go Back. The last entered numbers have been removed. Number, please.”. Then go back to Step 12.
-
Prompt: “Number changed.”
Phonebook data deletion
(Erasing individual phonebook data)
Individual data registered to the Bluetooth® Hands-Free phonebook can be cleared.
Do this function only when parked. It is too distracting to attempt while driving and you may make too many errors to be effective.
-
Press the pick-up button or talk button with a short press.
-
Say: [Beep] “Phonebook”
-
Prompt: “Select one of the following: New entry, edit, list names, delete, erase all or import contact.”
-
Say: [Beep] “Delete”
-
Prompt: “Please say the name of the entry you would like to delete or say, “List names”. ”
-
Say: [Beep] “XXXXX... (Ex. “John's phone”) ” (Say the registered voice tag to be deleted from the phonebook.)
-
Prompt: “Deleting XXXXX... (Ex. “John's phone”) (Registered voice tag) Home (Registered location). Is this correct?”
-
Say: [Beep] “Yes”
-
Prompt: “XXXXX... (Ex. “John's phone”) (Registered voice tag) Home (Registered location) deleted.”
(Complete deletion of the phonebook data)
All data registered to the Bluetooth® Hands-Free phonebook can be erased.
Do this function only when parked. It is too distracting to attempt while driving and you may make too many errors to be effective.
-
Press the pick-up button or talk button with a short press.
-
Say: [Beep] “Phonebook”
-
Prompt: “Select one of the following: New entry, edit, list names, delete, erase all or import contact.”
-
Say: [Beep] “Erase all”
-
Prompt: “Are you sure you want to delete everything from your Hands Free system phonebook?”
-
Say: [Beep] “Yes”
-
Prompt: “You are about to delete everything from your Hands Free system phonebook. Do you want to continue?”
-
Say: [Beep] “Yes”
-
Prompt: “Please wait, deleting the Hands Free system phonebook.”
-
Prompt: “Hands-Free system phonebook deleted.”
Read-out of names registered to the Bluetooth® Hands-Free phonebook
Bluetooth® Hands-Free can read out the list of names registered to its phonebook.
-
Press the pick-up button or talk button with a short press.
-
Say: [Beep] “Phonebook”
-
Prompt: “Select one of the following: New entry, edit, list names, delete, erase all or import contact.”
-
Say: [Beep] “List names”
-
Prompt: “XXXXX..., XXXXX..., XXXXX... (Ex. “John's phone”, Mary's phone, Bill's phone)” (Voice guidance reads out the voice tags registered to the phonebook.)
Press the talk button with a short press during the read-out at the desired name, and then say one of the following voice commands to execute it.
-
“Continue”: Continues the list readout.
-
“Call”: Calls the registered phonebook data when the talk button is short-pressed.
-
“Edit”: Edits the registered phonebook data when the talk button is short-pressed.
-
“Delete”: Deletes the registered phonebook data when the talk button is short-pressed.
-
“Previous”: Returns to the previous phonebook data in read-out when the talk button is short-pressed.
-
-
Prompt: “End of list, would you like to start from the beginning?”
-
Say: [Beep] “No”
Redial Function
Redialing the number of the person previously dialed using the phone is possible.
-
Press the pick-up button or talk button with a short press.
-
Say: [Beep] “Redial”
-
Prompt: “Dialing”
Telephone Number Input
Practice this while parked until you are confident you can do it while driving in a non-taxing road situation. If you are not completely comfortable, make all calls from a safe parking position, and only start driving when you can devote your full attention to driving.
-
Press the pick-up button or talk button with a short press.
-
Say: [Beep] “Dial”
-
Prompt: “Number, please”
-
Say: [Beep] “XXXXXXXXXXX (Telephone number)”
-
Prompt: “XXXXXXXXXXX. (Telephone number) After the beep, continue to add numbers, or say Go-Back to re-enter the last entered numbers, or press the Pick-Up button to execute dialing.”
-
(Dialing)
Press the pick-up button or say “Dial”, then go to Step 7.
(Adding/inputting telephone number)
Say, “XXXX” (desired telephone number), then go to Step 5.
(Telephone number correction)
Say, “Go Back”. The prompt replies, “Go Back. The last entered numbers have been removed.”. Then go back to Step 3.
-
Prompt: “Dialing”
The “Dial” command and a telephone number can be combined.
Ex. In Step 2, say, “Dial 123-4567” then, Steps 3 and 4 can be skipped.
Emergency calls (Some Models)
A call can be made to the emergency phone number (112) using the voice input command.
-
Press the pick-up button or talk button with a short press.
-
Say: [Beep] “Emergency”
-
Prompt: “Dialing “112”, is this correct?”
-
Say: [Beep] “Yes”
-
Prompt: “Dialing”
Receiving an Incoming Call
-
Prompt: “Incoming call, press the pick-up button to answer”
-
To accept the call, press the pick-up button.
To reject the call, press the hang-up button.
Hanging Up a Call
Press the hang-up button during the call. A beep sound will confirm that call is ended.
Mute
The microphone can be muted during a call.
-
Press the talk button with a short press.
-
Say: [Beep] “Mute”
-
Prompt:“Microphone muted”
Cancelling mute
-
Press the talk button with a short press.
-
Say: [Beep] “Mute off”
-
Prompt:“Microphone unmuted”
Transferring a Call from Hands-Free to a Device (Mobile Phone)
Communication between the hands-free unit and a device (Mobile phone) is cancelled, and the line can be switched to a standard call using a device (Mobile phone).
-
Press the talk button with a short press.
-
Say: [Beep] “Transfer call”
-
Prompt:“Transferred call to phone”
Transferring a Call from a Device (Mobile Phone) to Hands-Free
Communication between devices (Mobile phone) can be switched to Bluetooth® Hands-Free.
-
Press the talk button with a short press.
-
Say: [Beep] “Transfer call”
-
Prompt:“Transferred call to Hands Free system”
Call interrupt
A call can be interrupted to receive an incoming call from a third party.
Switch to a new incoming call using the following methods.
(Method 1)
-
Press the pick-up button.
-
Prompt: “Swapping calls.”
(Method 2)
-
Press the talk button with a short press.
-
Say: [Beep] “Swap calls”
-
Prompt: “Swapping calls.”
-
To refuse an incoming call, press the hang-up button.
-
After receiving a new incoming call, the previous call is placed on hold.
Switching calls
Switching back to the previous call can also be done.
Method 1
-
Press the pick-up button.
-
Prompt: “Swapping calls.”
Method 2
-
Press the talk button with a short press.
-
Say: [Beep] “Swap calls”
-
Prompt: “Swapping calls.”
Three-way call function
-
Press the talk button with a short press.
-
Say: [Beep] “Join calls”
-
Prompt: “Joining calls”
Making a call using a telephone number
-
Press the talk button with a short press.
-
Say: [Beep] “Dial”
-
Prompt: “Number, please”
-
Say: [Beep] “XXXXXXXXXXX (Telephone number)”
-
Prompt: “XXXXXXXXXXX. (Telephone number) After the beep, continue to add numbers, or say Go-Back to re-enter the last entered numbers, or press the Pick-Up button to execute dialing.”
-
(Dialing)
Press the pick-up button or say “Dial”, then go to Step 7.
(Adding/inputting telephone number)
Say, “XXXX” (desired telephone number), then go to Step 5.
(Telephone number correction)
Say, “Go Back”. The prompt replies, “Go Back. The last entered numbers have been removed.”. Then go back to Step 3.
-
Prompt: “Dialing”
Making calls using the phonebook
-
Press the talk button with a short press.
-
Say: [Beep] “Call”
-
Prompt: “Name please.”
-
Say: [Beep] “XXXXX... (Ex. “John's phone”)” (Say a voice tag registered in the phonebook.)
-
Prompt: “Calling XXXXX... (Ex. “John's phone”) XXXX (Ex. “at home”). Is this correct?” (Voice tag and phone number location registered in phonebook).
-
Say: [Beep] “Yes”
-
Prompt: “Dialing”
Redialing function
-
Press the talk button with a short press.
-
Say: [Beep] “Redial”
-
Prompt: “Dialing”
Ending the current call
Press the hang-up button during the call.
DTMF (Dual Tone Multi-Frequency Signal) Transmission
This function is used when transmitting DTMF via the user's voice. The receiver of a DTMF transmission is generally a home telephone answering machine or a company's automated guidance call centre (When you send tone signals back according to the voice guidance recording).
-
Press the talk button with a short press.
-
Say: [Beep] “XXXX... send” (Say DTMF code)
-
Prompt:“Sending XXXX... (DTMF code)”
Voice Recognition (Some Models)
In this section, the basic operation of the voice recognition is explained.
Activating Voice Recognition
To Activate the Main Menu: Press the pick-up button or talk button with a short press.
Ending Voice Recognition
Use one of the following methods:
-
Press and hold the talk-button.
-
Press the hang-up button.
Skipping Voice Guidance (for faster operation)
Press and release the talk-button.
-
The Bluetooth® Hands-Free system is operable several seconds after the ignition is switched to ACC or ON (requires less than 15 seconds).
-
When operating the audio unit or the A/C while using Bluetooth® Hands-Free, the beep sounds or voice guidance (audio unit)/cannot be heard.
Tutorial
The tutorial explains how to use Bluetooth® Hands-Free.
To activate the tutorial, do the following:
-
Press the pick-up button or talk button with a short press.
-
Say: [Beep] “Tutorial”
-
Follow the prompts to receive the appropriate voice guidance instructions.
Commands useable anytime during voice recognition
“Help” or “Go Back” are commands which can be used at anytime during voice recognition.
Help function use
The help function informs the user of all the available voice commands under the current conditions.
-
Say: [Beep] “Help”
-
Follow the prompts to receive the appropriate voice guidance instructions.
Returning to previous operation
This command is for returning to the previous operation while in the voice recognition mode.
Say: [Beep] “Go Back”
To prevent a deterioration in the voice recognition rate and voice quality, the following points should be observed:
-
The voice recognition cannot be performed while voice guidance or the beep sound is operating. Wait until the voice guidance or the beep sound is finished before saying your commands.
-
Dialects or different wording other than hands-free prompts cannot be recognised by voice recognition. Speak in the wording specified by the voice commands.
-
It is not necessary to face the microphone or approach it. Speak the voice commands while maintaining a safe driving position.
-
Do not speak too slow or too loud.
-
Speak clearly, without pausing between words or numbers.
-
Close the windows and/or the sunroof to reduce loud noises from outside the vehicle, or turn down the airflow of the air-conditioning system while Bluetooth® Hands-Free is being used.
-
Make sure the vents are not directing air up towards the microphone.
Voice Recognition Learning Function (Speaker Enrolment) (Some Models)
The voice recognition learning function enables voice recognition appropriate to the characteristics of the user's voice. If the recognition of the voice input commands to the system is not adequate, this function can largely improve the system's voice recognition of the user. If your voice can be recognised sufficiently without using this function, you may not realize the added benefit of the function. To register your voice, the voice input command list must be read out. Read out the list when the vehicle is parked. Perform the registration in as quiet a place as possible (Search). The registration must be performed completely. The required time is a few minutes. The user needs to be seated in the driver's seat with the voice input command list for voice recognition learning visible.
When voice recognition learning is done for the first time
-
Press the pick-up button or talk button with a short press.
-
Say: [Beep] “Voice training”
-
Prompt: “This operation must be performed in a quiet environment while the vehicle is stopped. See the owner's manual for the list of required training phrases. Press and release the talk button when you are ready to begin. Press the hang-up button to cancel at any time.”
-
Press the talk button with a short press.
-
The voice guidance reads out the voice input command number (refer to the voice input command list for voice recognition learning). (Ex. “Please read phrase 1”)
-
Say: [Beep] “0123456789” (Say the voice input command for voice recognition learning (1 to 8) according to the voice guidance.)
-
Prompt: “Speaker enrolment is complete.”
If an error occurred in the voice recognition learning, re-learning can be done by pressing the talk button with a short press.
Voice recognition re-learning
If voice recognition learning has already been done.
-
Press the pick-up button or talk button with a short press.
-
Say: [Beep] “Voice training”
-
Prompt: “Enrolment is enabled/disabled. Would you like to disable/enable or retrain?”
-
Say: [Beep] “Retrain”
-
Prompt: “This operation must be performed in a quiet environment while the vehicle is stopped. See the owner's manual for the list of required training phrases. Press and release the talk button when you are ready to begin. Press the hang-up button to cancel at any time.”
-
Press the talk button with a short press.
-
The voice guidance reads out the voice input command number (refer to the voice input command list for voice recognition learning). (Ex. “Please read phrase 1”)
-
Say: [Beep] “0123456789” (Say the voice input command for voice recognition learning (1 to 8) according to the voice guidance.)
-
Prompt: “Speaker enrolment is complete.”
If an error occurred in the voice recognition learning, re-learning can be done by pressing the talk button with a short press.
Voice input command list for voice recognition learning
When reading out, the following points must be observed:
-
Read out the numbers one at a time correctly and naturally.
(For example, “1234” must be read out “one, two, three, four” not “twelve, thirty four”.)
-
Do not read out parentheses. “(” and hyphens “-” are used for separating numbers in a phone number.
Ex.
“(888) 555-1212” must be spoken “Eight, eight, eight, five, five, five, one, two, one, two.”
|
Phrase |
Command |
|---|---|
|
1 |
0123456789 |
|
2 |
(888) 555-1212 |
|
3 |
Call |
|
4 |
Dial |
|
5 |
Setup |
|
6 |
Cancel |
|
7 |
Continue |
|
8 |
Help |
-
The applicable phrase appears in the audio display.
-
After user voice registration is completed, voice guidance “Speaker enrolment is complete” is announced.
Voice recognition learning on/off
-
Press the pick-up button or talk button with a short press.
-
Say: [Beep] “Voice training”
-
Prompt: “Enrolment is enabled/disabled. Would you like to disable/enable or retrain?”
-
Say: [Beep] “Disable” or “Enable”
-
When “Disable” is spoken, the voice recognition learning is turned off.
When “Enable” is spoken, the voice recognition learning is turned on.
-
Prompt: “Speaker Enrolment is disabled/enabled.”
Troubleshooting (Some Models)
Mazda Bluetooth® Hands-Free Customer Service
If you have any problems with Bluetooth®, contact our toll-free customer service centre.
Phone:
(Germany)
0800 4263 738 (8:00―18:00 Central European Time)
(Except Germany)
00800 4263 7383 (8:00―18:00 Central European Time)
(Worldwide)
49 721 5099 8198 (8:00―18:00 Central European Time)
Web:
Bluetooth® Device pairing, connection problems
|
Symptom |
Cause |
Solution method |
|---|---|---|
|
Unable to perform pairing |
― |
First make sure the device is compatible with the Bluetooth® unit, and then check whether the Bluetooth® function and the Find Mode/Visible setting*1 on the device are turned on. If pairing is still not possible after this, contact an expert repairer, we recommend an Authorised Mazda Repairer or Mazda Bluetooth® Hands-Free Customer Service. |
|
Pairing cannot be performed again |
The pairing information paired to the Bluetooth® unit or device is not recognised correctly. |
Perform pairing using the following procedure.
|
|
Unable to perform pairing |
The Bluetooth® function and the Find Mode/Visible setting*1 on the device may turn off automatically after a period of time has elapsed depending on the device. |
Check whether the Bluetooth® function and the Find Mode/Visible setting*1 on the device are turned on and pairing or reconnect. |
|
Does not connect automatically when starting the engine |
||
|
Automatically connects, but then disconnects suddenly |
||
|
Disconnects intermittently |
The device is in a location in which radio wave interference can occur easily, such as inside a bag in a rear seat, in a rear pocket of a pair of pants. |
Move the device to a location in which radio wave interference is less likely to occur. |
|
Does not connect automatically when starting the engine |
The pairing information is updated when the device OS is updated. |
Perform pairing again. |
-
Setting which detects the existence of a device external to the Bluetooth® unit.
-
When the OS of the device is updated, the pairing information may be deleted. If this happens, reprogramme the pairing information to the Bluetooth® unit.
-
If you pair your phone which has already been paired to your vehicle more than once in the past, you need to delete “Mazda” on your mobile device. Then, execute the Bluetooth® search on your mobile device once again, and pair to a newly detected “Mazda”.
-
Before you pair your device, make sure that Bluetooth® is “ON”, both on your phone and on the vehicle.
-
If Bluetooth®-enabled devices are used in the following locations or conditions, connection via Bluetooth® may not be possible.
-
The device is in a location hidden from the unit such as behind or under a seat, or inside the glove compartment.
-
The device contacts or is covered by a metal object or body.
-
The device is set to power-saving mode.
-
-
Different Bluetooth®-enabled devices can be used for Bluetooth® Hands-Free and Bluetooth® audio. For example, device A can be connected as a Bluetooth® Hands-Free device and device B can be connected as a Bluetooth® audio device. However, the following may occur when they are used at the same time.
-
The Bluetooth® connection of the device is disconnected.
-
Noise occurs in the Hands-Free audio.
-
Hands-Free operates slowly.
-
Voice recognition related problems
|
Symptom |
Cause |
Solution method |
|---|---|---|
|
Poor voice recognition |
|
Regarding the causes indicated on the left, be careful with how you speak. In addition, when numbers are spoken in a sequence, recognition ability will improve if no stop is placed between the numbers. |
|
False recognition of numbers |
||
|
Poor voice recognition |
There is a malfunction in the microphone. |
A poor connection or malfunction with the microphone may have occurred. Consult an expert repairer, we recommend an Authorised Mazda Repairer. |
|
Phone-related voice recognition is disabled |
There is a problem with the connection between the Bluetooth® unit and the device. |
If there is any malfunction after checking the pairing situation, check for device pairing or connection problems. |
|
Names in the phonebook are not easily recognised |
The Bluetooth® system is under a condition in which recognition is difficult. |
By carrying out the following measures, the rate of recognition will improve.
|
|
When operating the audio, a song name is not recognised |
Song names cannot be recognised by voice. |
― |
|
You want to skip guidance |
― |
Guidance can be skipped by quickly pressing and releasing the Talk button. |
Regarding problems with calls
|
Symptom |
Cause |
Solution method |
|---|---|---|
|
When starting a call, vehicle noise from the other party can be heard |
For about 3 seconds after starting a call, the Bluetooth® unit's Noise Suppression function requires time to adapt to the call environment. |
This does not indicate a problem with the device. |
|
The other party cannot be heard or the speaker's voice is quiet |
The volume is set at zero or low. |
Increase the volume. |
Other problems
|
Symptom |
Cause |
Solution method |
|---|---|---|
|
The indication for the remaining battery is different between the vehicle and the device |
The indication method is different between the vehicle and the device. |
― |
|
When a call is made from the vehicle, the telephone number is updated in the incoming/outgoing call record but the name does not appear |
The number has not been registered into the phonebook. |
If the number has been registered into the phonebook, the incoming/outgoing call record is updated by the name in the phonebook when the engine is restarted. |
|
The cell phone does not synchronize with the vehicle regarding the incoming/outgoing call record |
Some types of cell phones do not synchronize automatically. |
Operate the cell phone for synchronization. |
|
It takes a long time to complete the function for changing the language |
A maximum of 60 seconds is required. |
― |
