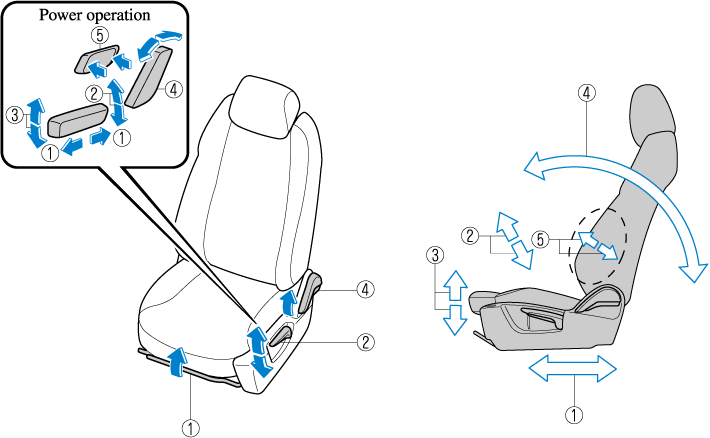
Seats

Seat Operation

Seat Slide

(Manual Seat)

To move a seat forward or backward, raise the lever and slide the seat to the desired position and release the lever.

Make sure the lever returns to its original position and the seat is locked in place by attempting to push it forward and backward.

(Power Seat)

To slide the seat, move the slide lifter switch on the outside of the seat to the front or back and hold it. Release the switch at the desired position.

Height Adjustment (Some Models)

(Manual Seat)

To adjust the seat height, move the lever up or down.

(Power Seat)

To adjust the seat height, move the switch up or down.

Height Adjustment for Front Edge of Seat Bottom (Driver's Power Seat) (Some Models)

To adjust the front height of the seat bottom, raise or lower the front of the slide lifter switch.

Seat Recline

(Manual Seat)

To change the seatback angle, lean forward slightly while raising the lever. Then lean back to the desired position and release the lever.

Make sure the lever returns to its original position and the seatback is locked in place by attempting to push it forward and backward.

(Power Seat)

To change the seatback angle, press the front or rear side of the reclining switch. Release the switch at the desired position.

Lumbar Support Adjustment (Driver's Power Seat)

To increase the seat firmness, press and hold the front part of the switch to the desired position, then release it.

Press the rear part of the switch to decrease firmness.

Driving Position Memory (Some Models)

The desired driving position can be called up after programming the position.

The following driving positions can be programmed.

  • Driver’s seat position (seat slide, height adjustment, front edge of seat bottom, seat recline)

    Refer to Seat Operation (Search).

  • Active driving display (display position, brightness level, display information)

    Refer to Active Driving Display (Search).


Do not place fingers or hands around the bottom of the seat while the seat memory function is operating. The seat moves automatically while the seat memory function is operating and fingers or hands could get pinched and injured.

A driving position can be programmed or operated using the buttons on the side of the seat or the key.


  • Lumbar support adjustment cannot be programmed.

  • A driving position can be programmed to the buttons on the side of the seat and the key in use for driving the vehicle.

  • If the vehicle has been serviced and the battery leads disconnected, the programmed seat positions will have been erased. Re-programme the seat positions.

Programming

  1. Make sure the parking brake is on.

  2. Make sure the selector lever is in the P position.

  3. Start the engine.

  4. Adjust the seat and the active driving display to the desired driving position.

  5. Press the SET button on the seat until a beep sound is heard one time.

  6. Perform one of the following settings within 5 seconds of completing step 5 above:

    • Programming using a button on the side of the seat

      Press the button you want to programme, either button 1 or 2, until a beep sound is heard one time.

    • Programming using the key

      Press the key button until a beep sound is heard one time.


If a beep sound is heard three times, the operation is cancelled.

To move the driving position to a programmed position

(Using a button on the side of the seat)

  1. Make sure the parking brake is on.

  2. Make sure the selector lever is in the P position.

  3. Start the engine.

  4. Press the programming button for the driving position you want to call up (button 1 or 2).

  5. A beep sound is heard when the driving position adjustment is completed.


  • If the driving position movement is not changed, only the beep sounds.

  • A seat position can be called up even with the engine not running.

  • The driving position adjustment is cancelled in the following cases:

    • Any of the seat adjustment switches is operated.

    • The SET button is pressed.

    • Programming button 1 or 2 is pressed.

    • The key button or button is operated.

    • The vehicle starts moving.

    • The active driving display is adjusted.

(Using a programmed key)

  1. Unlock the doors by pressing a request switch or the key button.

  2. After unlocking the doors, the seat position adjustment begins within 40 seconds of opening the driver's door, and a beep sounds when the operation is finished.

  3. Make sure the parking brake is on.

  4. Make sure the selector lever is in the P position.

  5. Start the engine.

  6. The active driving display adjustment begins.


  • If there is no driving position movement, a beep is not heard.

  • The driving position adjustment is cancelled in the following cases:

    • Any of the seat adjustment switches is operated.

    • The SET button is pressed.

    • Programming button 1 or 2 is pressed.

    • The key button or button is operated.

    • The vehicle starts moving.

    • The active driving display is adjusted.

Erasing programmed driving positions

(Erasing the driving positions programmed to the key)

  1. Switch the ignition OFF.

  2. Press the SET button on the side of the seat until a beep sound is heard one time.

  3. After the beep sounds, press the key button within 5 seconds until a beep sound is heard one time.


If a beep sound is heard three times, the operation is cancelled.

Head Restraints

Your vehicle is equipped with head restraints on all outboard seats and the second-row centre seat. The head restraints are intended to help protect you and the passengers from neck injury.


Always drive with the head restraints installed when seats are being used and make sure they are properly adjusted. In addition, always raise the head restraints on all rear seat when they are being used:

Driving with the head restraints adjusted too low or removed is dangerous. With no support behind your head, your neck could be seriously injured in a collision.


(Third-row seat)

The head restraints are non-adjustable.

Height Adjustment

Adjust the head restraint so that the centre is even with the top of the passenger's ears.


To raise a head restraint, pull it up to the desired position.

To lower the head restraint, press the stop-catch release, then push the head restraint down.

Front outboard seat


Second-row outboard seat


Second-row centre seat


Foldable Head Restraints (Third-row seat)

The third-row seats are equipped with foldable head restraints.


The foldable head restraints cannot be adjusted or removed.

(With strap)

To fold the head restraint, pull the strap and fold the head restraint downward.

(With lever)

To fold the head restraint, lower the lever down.


To return the head restraint to its upright position, lift it upward.


Always drive with the head restraints in their upright positions when the third-row seats are occupied, and make sure they are securely locked in place:

Driving with the head restraints folded down is dangerous. With no support behind your head, your neck could be seriously injured in a collision.

Page top