


Fuse Panel Description
Fuse block (Engine compartment)
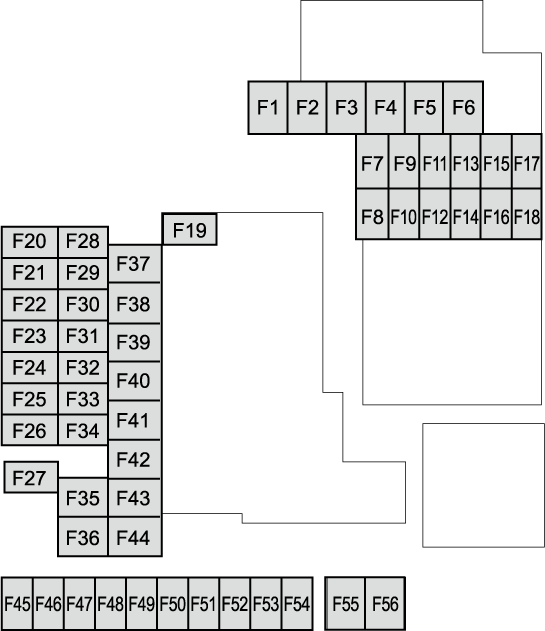
|
No. |
FUSE RATING |
PROTECTED COMPONENT |
|---|---|---|
|
F1 |
― |
― |
|
F2 |
20 A |
Windscreen wiper de-icer (Some Models) |
|
F3 |
30 A |
Engine control system |
|
F4 |
20 A |
S-VT |
|
F5 |
40 A |
Engine control system |
|
F6 |
― |
― |
|
F7 |
20 A |
Fuel pump |
|
F8 |
15 A |
Engine control system |
|
F9 |
15 A |
Transmission control system (Some Models) |
|
F10 |
15 A |
Engine control system |
|
F11 |
7.5 A |
Air conditioner |
|
F12 |
15 A |
Engine control system |
|
F13 |
― |
― |
|
F14 |
20 A |
Front seat warmer (Some Models) |
|
F15 |
― |
― |
|
F16 |
15 A |
For protection of various circuits |
|
F17 |
― |
― |
|
F18 |
15 A |
Accessory sockets |
|
F19 |
60 A |
Electric power steering |
|
F20 |
15 A |
Headlight (LH) 1 |
|
F21 |
15 A |
Headlight (RH) 1 |
|
F22 |
15 A |
Keyless system |
|
F23 |
30 A |
ABS, Dynamic stability control system |
|
F24 |
15 A |
Headlight (LH) 2 |
|
F25 |
15 A |
Headlight (RH) 2 |
|
F26 |
7.5 A |
On board diagnostics |
|
F27 |
25 A |
For protection of various circuits |
|
F28 |
25 A |
For protection of various circuits |
|
F29 |
15 A |
Windscreen washer |
|
F30 |
― |
― |
|
F31 |
15 A |
Horn |
|
F32 |
― |
― |
|
F33 |
― |
― |
|
F34 |
― |
― |
|
F35 |
50A |
ABS, Dynamic stability control system |
|
F36 |
― |
― |
|
F37 |
40 A |
Rear window defogger |
|
F38 |
50 A |
For protection of various circuits |
|
F39 |
― |
― |
|
F40 |
40 A |
Air conditioner |
|
F41 |
― |
― |
|
F42 |
20 A |
Windscreen wiper |
|
F43 |
30 A |
Cooling fan |
|
F44 |
30 A |
Starter |
|
F45 |
10 A |
Engine control system |
|
F46 |
15 A |
Audio |
|
F47 |
15 A |
For protection of various circuits |
|
F48 |
7.5 A |
Air bag |
|
F49 |
15 A |
Instrument cluster |
|
F50 |
15 A |
Room lamp |
|
F51 |
25 A |
Audio |
|
F52 |
10 A |
Sunroof (Some Models) |
|
F53 |
15 A |
Engine control system |
|
F54 |
15 A |
i-ACTIVSENSE |
|
F55 |
50 A |
For protection of various circuit |
|
F56 |
― |
― |
Fuse block (Left side)
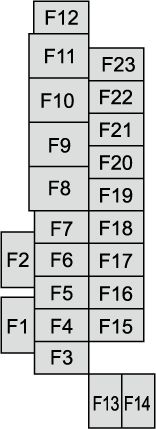
|
No. |
FUSE RATING |
PROTECTED COMPONENT |
|---|---|---|
|
F1 |
― |
― |
|
F2 |
― |
― |
|
F3 |
― |
― |
|
F4 |
15 A |
Power door locks (Driver) |
|
F5 |
15 A |
Power door locks (Passenger) |
|
F6 |
― |
― |
|
F7 |
― |
― |
|
F8 |
― |
― |
|
F9 |
30 A |
Power windows (Driver) |
|
F10 |
30 A |
Power windows (Passenger) |
|
F11 |
30 A |
Power seat (Driver) (Some Models) |
|
F12 |
― |
― |
|
F13 |
15 A |
Audio |
|
F14 |
― |
― |
|
F15 |
15 A |
Back door lock |
|
F16 |
15 A |
Illumination |
|
F17 |
10 A |
Brake lights |
|
F18 |
10 A |
Back lights |
|
F19 |
10 A |
Rear direction indicator lights |
|
F20 |
10 A |
Tail lights |
|
F21 |
10 A |
Tail lights |
|
F22 |
7.5 A |
Electric steering lock |
|
F23 |
― |
― |
