


Spare Tyre
Your Mazda has a temporary spare tyre.
The temporary spare tyre is lighter and smaller than a conventional tyre, and is designed only for emergency use and should be used only for VERY short periods. Temporary spare tyres should NEVER be used for long drives or extended periods.
Do not install the temporary spare tyre on the front wheels (driving wheels):
Driving with the temporary spare tyre on one of the front driving wheels is dangerous. Handling will be affected. You could lose control of the vehicle, especially on ice or snow bound roads, and have an accident. Move a regular tyre to the front wheel and install the temporary spare tyre to the rear.


-
When using the temporary spare tyre, driving stability may decrease compared to when using only the conventional tyre. Drive carefully.
-
To avoid damage to the temporary spare tyre or to the vehicle, observe the following precautions:
-
Do not exceed 80 km/h (50 mph).
-
Avoid driving over obstacles. Also, do not drive through an automatic car wash. This tyre's diameter is smaller than a conventional tyre, so the ground clearance is reduced.
-
Do not use a tyre chain on this tyre because it will not fit properly.
-
Do not use your temporary spare tyre on any other vehicle, it has been designed only for your Mazda.
-
Use only one temporary spare tyre on your vehicle at the same time.
-
To remove the spare tyre
(Vehicles with sub-woofer)
Because the sub-woofer is not operational when the sub-woofer connector is disconnected, no sound is output from the sub-woofer.
-
Set the third-row seatbacks to their on-road positions.
-
Raise the luggage board.
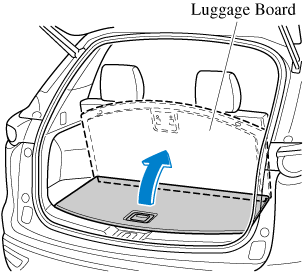
-
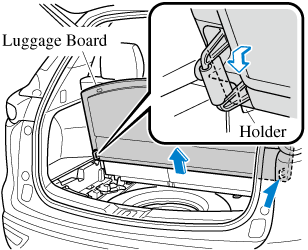
Raise the luggage board a little while pulling it towards you, and then insert the bottom edge into the holders.
-
Remove the tool bag.
-
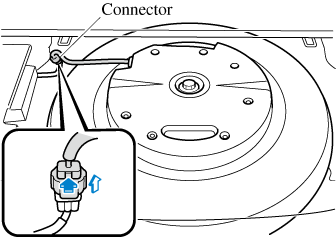
(Vehicles with sub-woofer)
Disconnect the sub-woofer connector.
-
(Vehicles with sub-woofer)
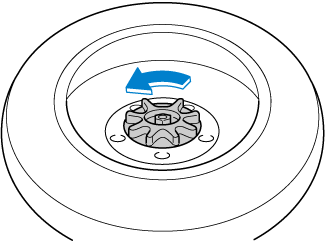
Turn the hold-down bolt anticlockwise and remove the sub-woofer and the spare tyre.
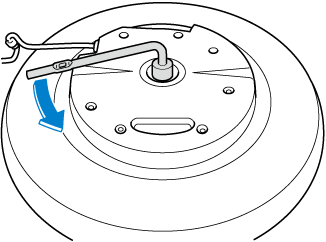
(Vehicles without sub-woofer)
Turn the hold-down bolt anticlockwise and remove the spare tyre.
To secure the spare tyre
Store the spare tyre in the reverse order of removal. After storing, verify that the spare tyre is stored securely.
(Vehicles with sub-woofer)
-
Secure the sub-woofer in its correct position. If the sub-woofer is not installed to the correct position, it may move while the vehicle is driven which may damage the sub-woofer or the wiring harness.
-
Store the tool bag on the right side of the vehicle. If the tool bag is stored on the left side of the vehicle, it may move while the vehicle is driven which may damage the wiring harness.
Refer to Spare Tyre and Tool Storage (Search).
