


Flat Tyre


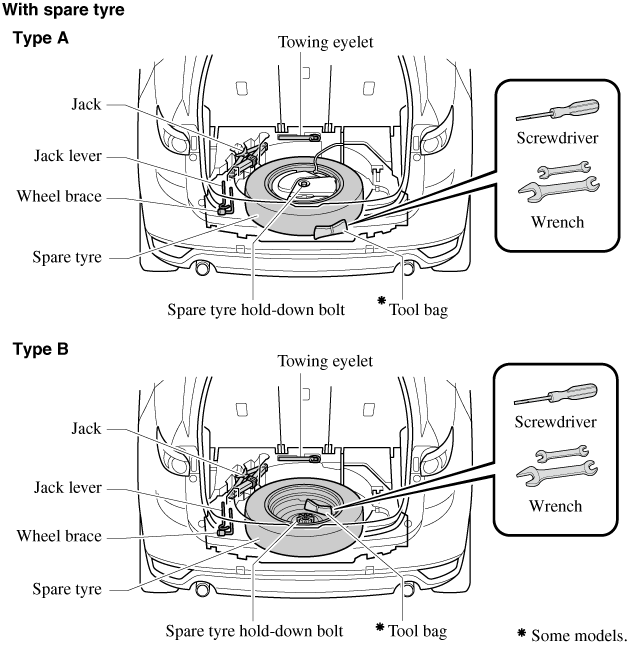
Spare Tyre and Tool Storage
Your vehicle may or may not be equipped with a spare tyre, jack, wheel brace, and tool bag. For details, consult an Authorised Mazda Repairer.


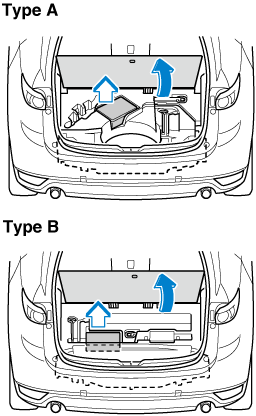
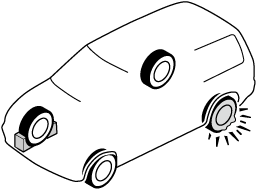
Spare tyre and tools are stored in the locations illustrated in the diagram.
Jack (Some Models)
To remove the jack
-
Open the luggage board, and lift it.

-
Remove the jack.
To secure the jack
Perform the removal procedure in reverse.
Maintenance
-
Always keep the jack clean.
-
Make sure the moving parts are kept free from dirt or rust.
-
Make sure the screw thread is adequately lubricated.
Spare Tyre (Some Models)
Your Mazda has a temporary spare tyre.
The temporary spare tyre is lighter and smaller than a conventional tyre, and is designed only for emergency use and should be used only for VERY short periods. Temporary spare tyres should NEVER be used for long drives or extended periods.
Do not install the temporary spare tyre on the front wheels (driving wheels):
Driving with the temporary spare tyre on one of the front driving wheels is dangerous. Handling will be affected. You could lose control of the vehicle, especially on ice or snow bound roads, and have an accident. Move a regular tyre to the front wheel and install the temporary spare tyre to the rear.
-
When using the temporary spare tyre, driving stability may decrease compared to when using only the conventional tyre. Drive carefully.
-
To avoid damage to the temporary spare tyre or to the vehicle, observe the following precautions:
-
Do not exceed 80 km/h (50 mph).
-
Avoid driving over obstacles. Also, do not drive through an automatic car wash. This tyre's diameter is smaller than a conventional tyre, so the ground clearance is reduced.
-
Do not use a tyre chain on this tyre because it will not fit properly.
-
Do not use your temporary spare tyre on any other vehicle, it has been designed only for your Mazda.
-
Use only one temporary spare tyre on your vehicle at the same time.
-
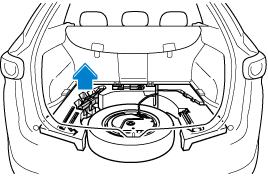
To remove the spare tyre
-
Open the luggage board, and remove it.

-
For vehicles equipped with a sub-woofer, uncouple the connector.
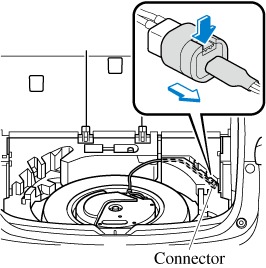
Extra strength may be required to uncouple the connector. Be sure to squeeze the tab firmly.
-
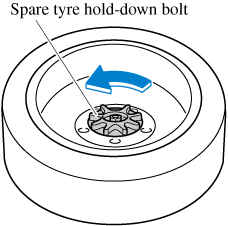
For vehicles equipped with a sub-woofer, loosen the hold-down bolt and remove the woofer and spare tyre.

For vehicles not equipped with a sub-woofer, turn the spare tyre hold-down bolt anticlockwise and remove the spare tyre.
To secure the spare tyre
Store the spare tyre in the reverse order of removal. After storing, verify that the spare tyre is stored securely.
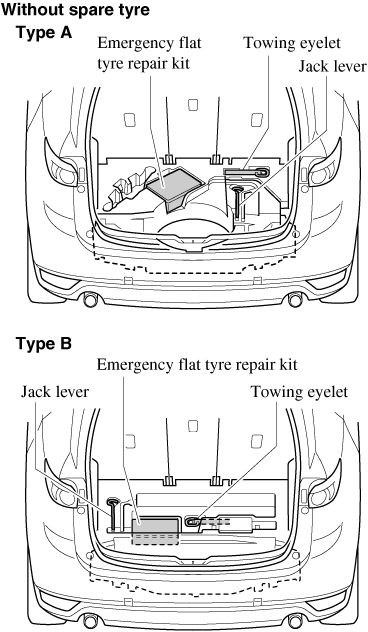
Emergency Flat Tyre Repair Kit (Some Models)
The emergency flat tyre repair kit included with your Mazda is for a temporary repair of a slightly damaged flat tyre resulting from running over nails or similar sharp objects on the road surface.
Perform the emergency flat tyre repair without removing the nail or similar sharp object which punctured the tyre.
Your vehicle is not equipped with a spare tyre. In the event of a flat tyre, use the emergency flat tyre repair kit to repair the tyre temporarily. When doing the repair, refer to the instructions included in the emergency flat tyre repair kit. If an emergency repair was performed on a flat tyre using the emergency flat tyre repair kit, have an expert repairer, we recommend an Authorised Mazda Repairer, repair or replace the tyre as soon as possible.
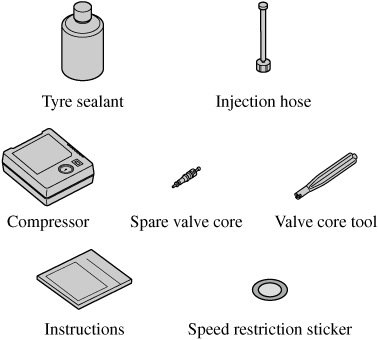
About the Emergency Flat Tyre Repair Kit
The emergency flat tyre repair kit includes the following items.
Do not allow children to touch the tyre sealant:
-
Ingestion of tyre sealant is dangerous. In the event tyre sealant is accidentally swallowed, drink large amounts of water immediately and seek medical assistance.
-
Tyre sealant that comes into contact with the eyes and skin is dangerous. If tyre sealant enters the eyes or contacts the skin, flush immediately with large amounts of water and seek medical assistance.
-
The tyre sealant cannot be reused. Purchase new tyre sealant at an Authorised Mazda Repairer.
-
The emergency flat tyre repair kit cannot be used in the following cases.
Consult an expert repairer, we recommend an Authorised Mazda Repairer.
-
The period of effective use for the tyre sealant has expired. (The period of effectiveness is indicated on the bottle label.)
-
The tear or puncture exceeds about 4 mm (0.16 in).
-
The damage has occurred to an area of the tyre other than the tread.
-
The vehicle has been driven with nearly no air remaining in the tyre.
-
The tyre has come off the wheel rim.
-
Damage to the wheel rim has occurred.
-
The tyre has two or more punctures.
-
Using the Emergency Flat Tyre Repair Kit
-
Park on a level surface off the right-of-way and set the parking brake.
-
Put a vehicle with an automatic transaxle in Park (P), a manual transaxle in Reverse (R) or 1, and turn off the engine.
-
Turn on the hazard warning flasher.
-
Unload passengers and luggage, and remove the emergency flat tyre repair kit.
-
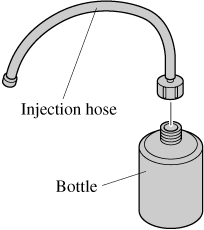
Shake the tyre sealant well.
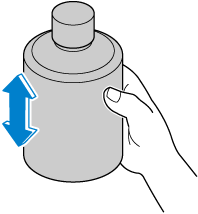
If the bottle is shaken after the injection hose is screwed on, tyre sealant could spray out from the injection hose. Tyre sealant contacting clothing or other objects may be impossible to remove. Shake the bottle before screwing on the injection hose.
The tyre sealant can be used at outside temperatures down to -30°C (-22°F).
In extremely cold temperatures (0°C (32°F) or below), the tyre sealant hardens easily and injection of the sealant will be difficult. Warm the sealant inside the vehicle before doing the injection work.
-
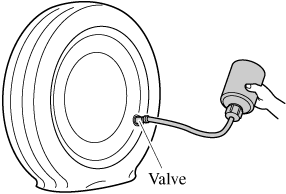
Remove the cap from the bottle. Screw on the injection hose with the bottle's inner cap left on to break the inner cap.
-
Remove the valve cap from the flat tyre. Press the back of a valve core tool to the core of the tyre valve and bleed all the remaining air.
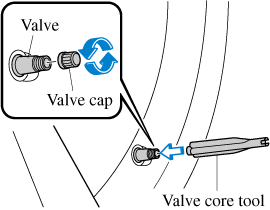
If there is air remaining in the tyre when the valve core is removed, the valve core could fly out. Remove the valve core carefully.
-
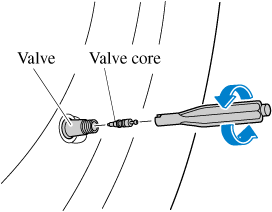
Turn the valve core anticlockwise with the valve core tool and remove the valve core.
-
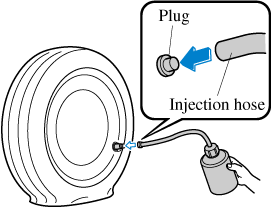
Remove the plug from the injection hose and insert the injection hose into the valve.
-
Hold the bottom of the bottle upright, squeeze the bottle with your hands, and inject the entire amount of tyre sealant into the tyre.
The tyre sealant cannot be reused. Purchase a new tyre sealant kit at an Authorised Mazda Repairer.
-
Pull out the injection hose from the valve. Reinsert the valve core into the valve and turn it clockwise to install it.
Do not throw away the empty tyre sealant bottle after use. Return the empty tyre sealant bottle to an Authorised Mazda Repairer when replacing the tyre. The empty tyre sealant bottle will need to be used to extract and dispose of the used sealant from the tyre.
-
Adhere the speed restriction sticker to the speedometer.
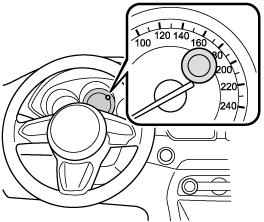
Attach the speed restriction sticker in a place where it can be viewed easily by the driver:
-
Applying the speed restriction sticker to the steering wheel is dangerous as it could interfere with the air bag deployment and result in serious injury.
-
Do not apply the sticker to any position other than the position indicated in the illustration of the speedometer.
-
-
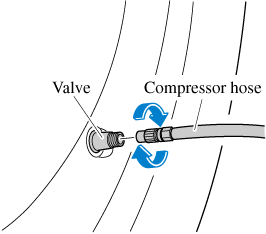
Install the compressor hose to the tyre valve.
-
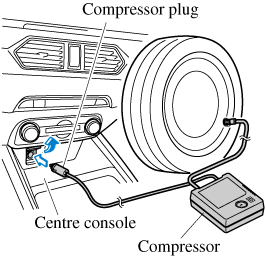
Insert the compressor plug into the interior accessory socket and switch the ignition to ACC (Search).
-
Before pulling out the compressor plug from the electrical socket, make sure the compressor power switch is off.
-
The compressor turns on and off with the push-button switch.
-
-
Turn the compressor switch on and inflate the tyre carefully to the correct inflation pressure.
Never operate the compressor above 300 kPa (3.1 kgf/cm2, 3 bar, 43.5 psi):
Operating the compressor above 300 kPa (3.1 kgf/cm2, 3 bar, 43.5 psi) is dangerous. When the inflation pressure rises above 300 kPa (3.1 kgf/cm2, 3 bar, 43.5 psi), heated air will be exhausted from the back of the compressor and you could be burned.
-
Check the tyre inflation pressure label (driver's door frame) for the correct tyre inflation pressure.
-
Do not use the compressor for longer than 10 minutes because using the compressor for long periods could damage it.
-
If the tyre does not inflate, repair of the tyre may not be possible. If the tyre does not reach the correct inflation pressure within a 10-minute period, it probably has received more extensive damage. When this happens, the emergency flat tyre repair kit cannot be used to repair the tyre. Contact an expert repairer, we recommend an Authorised Mazda Repairer.
-
If the tyre has been over-inflated, loosen the screw cap on the compressor and bleed some of the air out.
-
-
When the tyre has been inflated to the proper inflation pressure, turn the compressor switch off and remove the compressor hose from the tyre valve.
-
Install the tyre valve cap.
-
Put the emergency flat tyre repair kit in the boot and continue driving.
-
Drive carefully to an expert repairer, we recommend an Authorised Mazda Repairer and keep the vehicle speed below 80 km/h (50 mph).
-
If the vehicle is driven 80 km/h (50 mph) or higher, the vehicle might begin to vibrate.
(With Tyre Pressure Monitoring System)
If the tyre is not properly inflated, the tyre pressure monitoring system warning light will illuminate (Search).
-
-
After driving the vehicle for 10 minutes or 5 km (3 miles), check the tyre pressure with the tyre pressure gauge equipped with the compressor. If the tyre pressure has fallen below the correct tyre pressure, inflate the tyre to the correct pressure again following the steps from number 14.
-
If the tyre inflation pressure falls below 130 kPa (1.3 kgf/cm2 or bar, 18.9 psi), repair cannot be done with the repair kit. Park the vehicle on a level surface off the right-of-way and contact an expert repairer, we recommend an Authorised Mazda Repairer.
-
If the tyre inflation pressure continues to remain low after repeating steps 13 to 20, park the vehicle on a level surface off the right-of-way and contact an expert repairer, we recommend an Authorised Mazda Repairer.
When checking the tyre inflation pressure with the tyre pressure gauge on the compressor unit, make sure the compressor switch is turned off.
-
-
The emergency flat tyre repair is completed if the tyre air pressure does not decrease. Drive the vehicle carefully to the nearest expert repairer, we recommend an Authorised Mazda Repairer promptly and have the tyre replaced. Mazda recommends that the tyre be replaced with a new one. If the tyre is to be repaired and reused, consult an expert repairer, we recommend an Authorised Mazda Repairer.
Peel off the speed restriction sticker after replacing the tyre.
-
For a tyre which has undergone an emergency flat tyre repair using the emergency flat tyre repair kit, Mazda recommends that the tyre be replaced with a new one as soon as possible. If the tyre is to be repaired and reused, consult an expert repairer, we recommend an Authorised Mazda Repairer.
-
The wheel can be reused after any sealant adhering to it is wiped off and carefully inspected. However, replace the tyre valve with a new one.
-
Inspecting the Emergency Flat Tyre Repair Kit
Changing a Flat Tyre (With Spare Tyre)
If the following occurs while driving, it could indicate a flat tyre.
-
Steering becomes difficult.
-
The vehicle begins to vibrate excessively.
-
The vehicle pulls in one direction.
If you have a flat tyre, drive slowly to a level spot that is well off the road and out of the way of traffic to change the tyre.
Stopping in traffic or on the shoulder of a busy road is dangerous.
Be sure to follow the directions for changing a tyre:
Changing a tyre is dangerous if not done properly. The vehicle can slip off the jack and seriously injure someone.
No person should place any portion of their body under a vehicle that is supported by a jack.
Never allow anyone inside a vehicle supported by a jack:
Allowing someone to remain in a vehicle supported by a jack is dangerous. The occupant could cause the vehicle to fall resulting in serious injury.
-
Park on a hard, level surface off the right-of-way and firmly set the parking brake.
-
Put a vehicle with an automatic transaxle in Park (P), a manual transaxle in Reverse (R) or 1, and turn off the engine.
-
Turn on the hazard warning flasher.
-
Have everyone get out of the vehicle and away from the vehicle and traffic.
-
Remove the jack, tool, and spare tyre (Search).
-
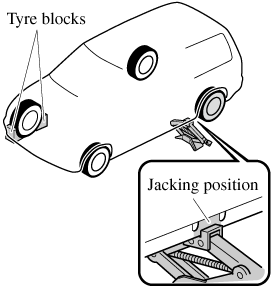
Block the wheel diagonally opposite the flat tyre. When blocking a wheel, place a tyre block both in front and behind the tyre.
When blocking a tyre, use rocks or wood blocks of sufficient size if possible to hold the tyre in place.
Removing a Flat Tyre
When jacking-up a vehicle, always shift the shift lever to 1st or R (manual transaxle vehicle) or shift the selector lever to P (automatic transaxle vehicle), apply the parking brake, and place wheel blocks in the position diagonally opposed to the jack:
Changing a flat tyre without using wheel blocks is dangerous because the vehicle may move and fall off the jack even with the shift lever in 1st or R, or the select lever is in P, which could result in an accident.
-
If your vehicle is equipped with steel wheels, pry off the centre cap with the bevelled end of the jack lever.
Use the jack lever when removing the centre cap. Using your hands to remove it may cause an injury. In addition, using a tool other than the jack lever may cause damage to the wheel or the centre cap.
-
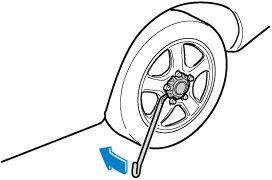
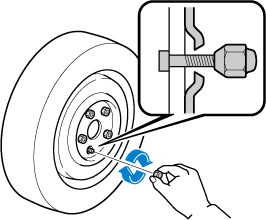
Loosen the wheel nuts by turning them anticlockwise one turn each, but do not remove any wheel nuts until the tyre has been raised off the ground.
-
Place the jack on the ground.
-
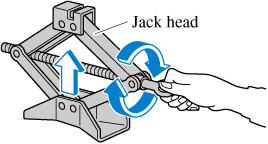
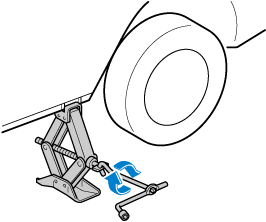
Turn the jack screw in the direction shown in the figure and adjust the jack head so that it is close to the jack-up position.
-
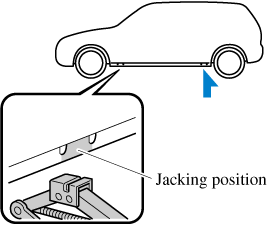
Place the jack under the jack-up position closest to the tyre being changed with the jack head squarely under the jack-up point.
-
Continue raising the jack head gradually by rotating the screw with your hand until the jack head is inserted into the jack-up position.
Use only the front and rear jacking positions recommended in this manual:
Attempting to jack the vehicle in positions other than those recommended in this manual is dangerous. The vehicle could slip off the jack and seriously injure or even kill someone. Use only the front and rear jacking positions recommended in this manual.
Do not jack up the vehicle in a position other than the designated jack-up position or place any objects on or under the jack:
Jacking up the vehicle in a position other than the designated jack-up position or placing objects on or under the jack is dangerous as it could deform the vehicle body or the vehicle could fall off the jack resulting in an accident.
Use only the jack provided with your Mazda:
Using a jack that is not designed for your Mazda is dangerous. The vehicle could slip off the jack and seriously injure someone.
Never place objects under the jack:
Jacking the vehicle with an object under the jack is dangerous. The jack could slip and someone could be seriously injured by the jack or the falling vehicle.
-
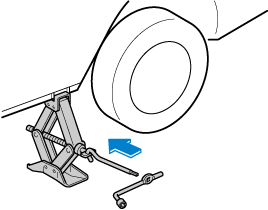
Insert the jack lever and attach the wheel brace to tyre jack.
-
Turn the jack handle clockwise and raise the vehicle high enough so that the spare tyre can be installed. Before removing the wheel nuts, make sure your Mazda is firmly in position and that it cannot slip or move.
Do not jack up the vehicle higher than is necessary:
Jacking up the vehicle higher than is necessary is dangerous as it could destabilize the vehicle resulting in an accident.
Do not start the engine or shake the vehicle while it is jacked up:
Starting the engine or shaking the vehicle while it is jacked up is dangerous as it could cause the vehicle to fall off the jack resulting in an accident.
Never go under the vehicle while it is jacked up:
Going under the vehicle while it is jacked up is dangerous as it could result in death or serious injury if the vehicle were to fall off the jack.
-
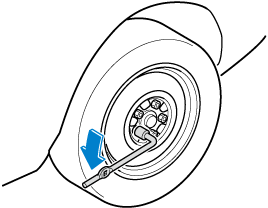
Remove the wheel nuts by turning them anticlockwise; then remove the wheel and centre cap.
Mounting the Spare Tyre
-
Remove dirt and grime from the mounting surfaces of the wheel and hub, including the hub bolts, with a cloth.
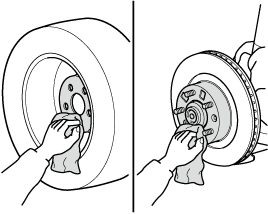
Make sure the mounting surfaces of the wheel, hub and wheel nuts are clean before changing or replacing tyres:
When changing or replacing a tyre, not removing dirt and grime from the mounting surfaces of the wheel, hub and hub bolts is dangerous. The wheel nuts could loosen while driving and cause the tyre to come off, resulting in an accident.
-
Mount the spare tyre.
-
Install the wheel nuts with the bevelled edge inward; tighten them by hand.
Do not apply oil or grease to wheel nuts and bolts and do not tighten the wheel nuts beyond the recommended tightening torque:
Applying oil or grease to wheel nuts and bolts is dangerous. The wheel nuts could loosen while driving and cause the tyre to come off, resulting in an accident. In addition, wheel nuts and bolts could be damaged if tightened more than necessary.
-
Turn the wheel brace anticlockwise and lower the vehicle.
-
Use the wheel brace to tighten the nuts in the order shown.
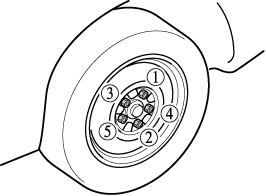
If you are unsure of how tight the nuts should be, have them inspected at an expert repairer, we recommend an Authorised Mazda Repairer.
Nut tightening torque
N·m (kgf·m, ft·lbf)
108―147 (12―14, 80―108)
Always securely and correctly tighten the wheel nuts:
Improperly or loosely tightened wheel nuts are dangerous. The wheel could wobble or come off. This could result in loss of vehicle control and cause a serious accident.
Be sure to reinstall the same nuts you removed or replace them with metric nuts of the same configuration:
Because the wheel studs and wheel nuts on your Mazda have metric threads, using a non-metric nut is dangerous. On a metric stud, it would not secure the wheel and would damage the stud, which could cause the wheel to slip off and cause an accident.
-
Remove the tyre blocks and store the tools and jack.
-
Store the damaged tyre in the luggage compartment.
-
Check the inflation pressure. Refer to Tyres (Search).
-
Have the flat tyre repaired or replaced as soon as possible.
Do not drive with any tyres that have incorrect air pressure:
Driving on tyres with incorrect air pressure is dangerous. Tyres with incorrect pressure could affect handling and result in an accident. When you check the regular tyres' air pressure, check the spare tyre, too.
